pg14+etcd+Patroni 高可用配置流程
pg14+etcd+Patroni 高可用配置流程
目录
- pg14+etcd+Patroni 高可用配置流程
- 基础配置
- IP 规划:
- 修改超级用户密码:
- 在主库上创建流复制用户
- 修改 pg_hba 文件
- 备库重新创建数据目录:
- 开启watchdog
- 创建.pgpass
- 生成备库
- 在备库修改同步信息
- 备库查看
- 主库查看同步信息
- 安装etcd
- 下载etcd安装包:
- 创建etcd启动文件
- 添加到系统启动命令中
- 安装python3
- 验证安装并升级pip3
- 升级pip3
- Patroni 安装
- 配置文件
- 配置patroni服务
- 安装Keepalived
- 配置主备服务器的Keepalived
- node1
- node2
- node3
- 启动keepalived
- 配置主备服务器的Keepalived
- 安装HAProxy
- 修改配置文件(主备库共用一份配置文件):
- 修改内核参数:允许监听不存在的地址
- 执行sysctl -p,启动HAProxy
- 验证HAProxy
- 使用psql连接到vip的5000端口,查看是否为主库,并且能否写入/读取数据:
- 创建测试表,写入数据正常。
- 使用psql连接到5001端口,查看是否为备库,是否可以写入/读取数据
- HAProxy监控页面
- 基础配置
基础配置
IP 规划:
前置条件:3 个实例下 PG 安装配置已完成。
主库:10.43.20.102
备库 01:10.43.20.103
备库 02:10.43.20.104
虚拟IP:10.43.20.105
修改超级用户密码:
alter user postgres with password '123456';
在主库上创建流复制用户
psql -c "CREATE USER replicator WITH REPLICATION ENCRYPTED PASSWORD 'secret'"
修改 pg_hba 文件
host  replication   replicator     10.43.20.102/24     md5
host  replication   replicator     10.43.20.103/24     md5
host  replication   replicator     10.43.20.104/24     md5
备库重新创建数据目录:
[postgres@node2 ~]$ echo $PGDATA
/postgresql/pgdata
[postgres@node2 ~]$
[postgres@node2 ~]$ cd /postgresql/
[postgres@node2 postgresql]$ ls
pg14  pgdata  soft
[postgres@node2 postgresql]$ cd pgdata/
[postgres@node2 pgdata]$ rm -rf *
[postgres@node2 pgdata]$
开启watchdog
modprobe softdog
chown postgres:postgres /dev/watchdog
创建.pgpass
su - postgres
echo 10.43.20.102:5432:replication:replicator:secret >> .pgpass
chmod 0600 .pgpass
生成备库
pg_basebackup -D /postgresql/pgdata -Fp -Xs -v -P -h 10.43.20.102 -p 5432 -U replicator

在备库修改同步信息
cat $PGDATA/postgresql.auto.conf
echo "primary_conninfo = 'user=replicator password=secret host=10.43.20.102 port=5432 sslmode=prefer sslcompression=0 gssencmode=prefer krbsrvname=postgres target_session_attrs=any'" >> $PGDATA/postgresql.auto.conf
touch $PGDATA/standby.signal
备库查看
ps -ef | grep postgres

主库查看同步信息
select * from pg_stat_replication;

流复制搭建成功。
安装etcd
下载etcd安装包:
最新版为3.5.15,下载etcd-v3.5.15-linux-amd64.tar.gz即可。
3台机器做相同操作:
[root@node1 ~]# tar -zxvf etcd-v3.5.15-linux-amd64.tar.gz -C /postgresql/soft/
[root@node1 ~]# mv /postgresql/soft/etcd-v3.5.15-linux-amd64  mv /postgresql/soft/etcd-v3.5.15
[root@node1 ~]# cd /postgresql/soft/etcd-v3.5.15/
[root@node1 etcd-v3.5.15]# ls -rt
READMEv2-etcdctl.md  README.md  README-etcdutl.md  README-etcdctl.md  etcdutl  etcdctl  etcd  Documentation   start_etcd.log
创建etcd启动文件
vi start_etcd.sh
3台机器的配置分别为:
--10.43.20.102
/postgresql/soft/etcd-v3.5.15/etcd --name etcd_01 \
  --initial-advertise-peer-urls http://10.43.20.102:2380 \
  --listen-peer-urls http://10.43.20.102:2380 \
  --listen-client-urls http://10.43.20.102:2379,http://127.0.0.1:2379 \
  --advertise-client-urls http://10.43.20.102:2379 \
  --initial-cluster-token etcd-cluster \
  --initial-cluster etcd_01=http://10.43.20.102:2380,etcd_02=http://10.43.20.103:2380,etcd_03=http://10.43.20.104:2380 \
  --initial-cluster-state new \
  --enable-v2

--10.43.20.103
/postgresql/soft/etcd-v3.5.15/etcd --name etcd_02 \
  --initial-advertise-peer-urls http://10.43.20.103:2380 \
  --listen-peer-urls http://10.43.20.103:2380 \
  --listen-client-urls http://10.43.20.103:2379,http://127.0.0.1:2379 \
  --advertise-client-urls http://10.43.20.103:2379 \
  --initial-cluster-token etcd-cluster \
  --initial-cluster etcd_01=http://10.43.20.102:2380,etcd_02=http://10.43.20.103:2380,etcd_03=http://10.43.20.104:2380 \
  --initial-cluster-state new \
  --enable-v2

--10.43.20.104
/postgresql/soft/etcd-v3.5.15/etcd --name etcd_03 \
  --initial-advertise-peer-urls http://10.43.20.104:2380 \
  --listen-peer-urls http://10.43.20.104:2380 \
  --listen-client-urls http://10.43.20.104:2379,http://127.0.0.1:2379 \
  --advertise-client-urls http://10.43.20.104:2379 \
  --initial-cluster-token etcd-cluster \
  --initial-cluster etcd_01=http://10.43.20.102:2380,etcd_02=http://10.43.20.103:2380,etcd_03=http://10.43.20.104:2380 \
  --initial-cluster-state new \
  --enable-v2
添加到系统启动命令中
vi /usr/lib/systemd/system/etcd.service
[Unit]
Description=etcd
After=network.target remote-fs.target nss-lookup.target

[Service]
Type=forking
ExecStart=/bin/bash -c "/postgresql/soft/etcd-v3.5.15/start_etcd.sh > /postgresql/soft/etcd-v3.5.15/start_etcd.log 2>&1 &"
[Install]
WantedBy=multi-user.target

chmod 754 /usr/lib/systemd/system/etcd.service
systemctl daemon-reload
service etcd start
systemctl enable etcd.service
cd /postgresql/soft/etcd-v3.5.15
./etcdctl endpoint status --cluster -w table
etcd搭建完成:

安装python3
yum install wget gcc make zlib-devel openssl openssl-devel

wget "https://www.python.org/ftp/python/3.6.5/Python-3.6.5.tar.xz"
tar -xvJf Python-3.6.5.tar.xz
cd Python-3.6.5
./configure prefix=/usr/local/python3
make && make install
ln -fs /usr/local/python3/bin/python3 /usr/bin/python3
ln -fs /usr/local/python3/bin/pip3 /usr/bin/pip3
验证安装并升级pip3

升级pip3
下载:pip-21.3.1-py3-none-any.whl
https://files.pythonhosted.org/packages/a4/6d/6463d49a933f547439d6b5b98b46af8742cc03ae83543e4d7688c2420f8b/pip-21.3.1-py3-none-any.whl
[root@node1 ~]# pip3 install pip-21.3.1-py3-none-any.whl
Processing ./pip-21.3.1-py3-none-any.whl
Installing collected packages: pip
  Found existing installation: pip 9.0.3
    Uninstalling pip-9.0.3:
      Successfully uninstalled pip-9.0.3
Successfully installed pip-21.3.1
Patroni 安装
pip3 install psycopg2-binary -i https://mirrors.aliyun.com/pypi/simple/
pip3 install patroni[etcd] -i https://mirrors.aliyun.com/pypi/simple/
ln -fs /usr/local/python3/bin/patroni /usr/bin/patroni
ln -fs /usr/local/python3/bin/patronictl /usr/bin/patronictl
验证安装完成:

配置文件
node1配置:
vi /postgresql/soft/patroni/patroni.yml
scope: pg_patroni
namespace: /service/
name: pg_patroni01

restapi:
  listen: 10.43.20.102:8008
  connect_address: 10.43.20.102:8008

etcd:
  #Provide host to do the initial discovery of the cluster topology:
  host: 10.43.20.102:2379

bootstrap:
  # this section will be written into Etcd:/<namespace>/<scope>/config after initializing new cluster
  # and all other cluster members will use it as a `global configuration`
  dcs:
    ttl: 30
    loop_wait: 10
    retry_timeout: 10
    maximum_lag_on_failover: 1048576
    master_start_timeout: 300
    synchronous_mode: true
    #standby_cluster:
      #host: 127.0.0.1
      #port: 1111
      #primary_slot_name: patroni
    postgresql:
      use_pg_rewind: true
      use_slots: true
      parameters:
      wal_level: locical
      hot_standby: "on"
      wal_keep_segments: 128
      max_wal_senders: 10
      max_replication_slots: 10
      wal_log_hints: "on"
      archive_mode: "on"
      #primary_conninfo: 'host=10.43.20.102 port=31003 user=replicator'
      hot_standby: on
      archive_timeout: 1800s

postgresql:
  listen: 0.0.0.0:5432
  connect_address: 10.43.20.102:5432
  data_dir: /postgresql/pgdata
  bin_dir: /postgresql/pg14/bin
  config_dir: /postgresql/pgdata
  pgpass: /home/postgres/.pgpass
  authentication:
    replication:
      username: replicator
      password: secret
    superuser:
      username: postgres
      password: 123456


tags:
    nofailover: false
    noloadbalance: false
    clonefrom: false
nosync: false
watchdog:
    mode: automatic
    device: /dev/watchdog
    safety_margin: 5
node2配置:
vi /postgresql/soft/patroni/patroni.yml
scope: pg_patroni
namespace: /service/
name: pg_patroni02

restapi:
  listen: 10.43.20.103:8008
  connect_address: 10.43.20.103:8008

etcd:
  #Provide host to do the initial discovery of the cluster topology:
  host: 10.43.20.103:2379

bootstrap:
  # this section will be written into Etcd:/<namespace>/<scope>/config after initializing new cluster
  # and all other cluster members will use it as a `global configuration`
  dcs:
    ttl: 30
    loop_wait: 10
    retry_timeout: 10
    maximum_lag_on_failover: 1048576
    master_start_timeout: 300
    synchronous_mode: true
    #standby_cluster:
      #host: 127.0.0.1
      #port: 1111
      #primary_slot_name: patroni
    postgresql:
      use_pg_rewind: true
      use_slots: true
      parameters:
      wal_level: locical
      hot_standby: "on"
      wal_keep_segments: 128
      max_wal_senders: 10
      max_replication_slots: 10
      wal_log_hints: "on"
      archive_mode: "on"
      #primary_conninfo: 'host=10.43.20.103 port=31003 user=replicator'
      hot_standby: on
      archive_timeout: 1800s

postgresql:
  listen: 0.0.0.0:5432
  connect_address: 10.43.20.103:5432
  data_dir: /postgresql/pgdata
  bin_dir: /postgresql/pg14/bin
  config_dir: /postgresql/pgdata
  pgpass: /home/postgres/.pgpass
  authentication:
    replication:
      username: replicator
      password: secret
    superuser:
      username: postgres
      password: 123456


tags:
    nofailover: false
    noloadbalance: false
    clonefrom: false
nosync: false
watchdog:
    mode: automatic
    device: /dev/watchdog
    safety_margin: 5
node3配置:
vi /postgresql/soft/patroni/patroni.yml
scope: pg_patroni
namespace: /service/
name: pg_patroni03

restapi:
  listen: 10.43.20.104:8008
  connect_address: 10.43.20.104:8008

etcd:
  #Provide host to do the initial discovery of the cluster topology:
  host: 10.43.20.104:2379

bootstrap:
  # this section will be written into Etcd:/<namespace>/<scope>/config after initializing new cluster
  # and all other cluster members will use it as a `global configuration`
  dcs:
    ttl: 30
    loop_wait: 10
    retry_timeout: 10
    maximum_lag_on_failover: 1048576
    master_start_timeout: 300
    synchronous_mode: true
    #standby_cluster:
      #host: 127.0.0.1
      #port: 1111
      #primary_slot_name: patroni
    postgresql:
      use_pg_rewind: true
      use_slots: true
      parameters:
      wal_level: locical
      hot_standby: "on"
      wal_keep_segments: 128
      max_wal_senders: 10
      max_replication_slots: 10
      wal_log_hints: "on"
      archive_mode: "on"
      #primary_conninfo: 'host=10.43.20.104 port=31003 user=replicator'
      hot_standby: on
      archive_timeout: 1800s

postgresql:
  listen: 0.0.0.0:5432
  connect_address: 10.43.20.104:5432
  data_dir: /postgresql/pgdata
  bin_dir: /postgresql/pg14/bin
  config_dir: /postgresql/pgdata
  pgpass: /home/postgres/.pgpass
  authentication:
    replication:
      username: replicator
      password: secret
    superuser:
      username: postgres
      password: 123456


tags:
    nofailover: false
    noloadbalance: false
    clonefrom: false
nosync: false
watchdog:
    mode: automatic
    device: /dev/watchdog
    safety_margin: 5
配置patroni服务
chown -R postgres:postgres /postgresql/soft/patroni/patroni.yml

#配置服务&开机自启动

vi /usr/lib/systemd/system/patroni.service
#添加以下内容:(三台机器都一致)

[Unit]
Description=patroni
After=network.target remote-fs.target nss-lookup.target

[Service]
Type=forking
ExecStart=/bin/bash -c "sudo -u postgres patroni  /postgresql/soft/patroni/patroni.yml> /postgresql/soft/patroni/patroni.log 2>&1 &"
[Install]
WantedBy=multi-user.target

#修改权限,启动服务
chmod 754 /usr/lib/systemd/system/patroni.service
systemctl daemon-reload
service patroni start
systemctl enable patroni.service

启动成功。
安装Keepalived
yum -y install keepalived.x86_64
配置主备服务器的Keepalived
mv /etc/keepalived/keepalived.conf /etc/keepalived/keepalived.conf.bak
vi /etc/keepalived/keepalived.conf
配置文件为:
node1
global_defs {
   smtp_connect_timeout 30
   router_id LVS_DEVEL01
}

vrrp_instance VI_1 {
    state MASTER
    interface ens33
    virtual_router_id 51
    priority 100
    advert_int 1
    authentication {
        auth_type PASS
        auth_pass 123456
    }
    virtual_ipaddress {
        10.43.20.105
    }
}
node2
node3
global_defs {
   smtp_connect_timeout 30
   router_id LVS_DEVEL02
}

vrrp_instance VI_1 {
    state BACKUP
    interface ens33
    virtual_router_id 51
    priority 90
    advert_int 1
    authentication {
        auth_type PASS
        auth_pass 123456
    }
    virtual_ipaddress {
        10.43.20.105
}
node3
node3
global_defs {
   smtp_connect_timeout 30
   router_id LVS_DEVEL03
}

vrrp_instance VI_1 {
    state BACKUP
    interface ens33
    virtual_router_id 51
    priority 80
    advert_int 1
    authentication {
        auth_type PASS
        auth_pass 123456
    }
    virtual_ipaddress {
        10.43.20.105
}
启动keepalived
虚拟IP已经绑定。
安装HAProxy
yum -y install haproxy.x86_64
修改配置文件(主备库共用一份配置文件):
vi /etc/haproxy/haproxy.cfg
global
    maxconn 100000
    stats  timeout 5s
    user   haproxy
    group  haproxy
    daemon

defaults
    mode               tcp
    log                global
    retries            2
    timeout queue      5s
    timeout connect    5s
    timeout client     60m
    timeout server     60m
    timeout check      15s

listen stats
    mode  http
    bind  10.43.20.102:7000
    stats enable
    stats uri /stats

listen master
    bind 10.43.20.105:5000
    mode tcp
    maxconn 2000
    option tcplog
    option httpchk OPTIONS /master
    http-check expect status 200
    default-server inter 3s fastinter 1s fall 3 rise 4 on-marked-down shutdown-sessions
    server db01 10.43.20.102:5432 check port 8008
    server db02 10.43.20.103:5432 check port 8008
    server db03 10.43.20.104:5432 check port 8008

listen replicas
    bind 10.43.20.105:5001
    mode tcp
    maxconn 6000
    option tcplog
    option httpchk OPTIONS /replica
    balance roundrobin
    http-check expect status 200
    default-server inter 3s fastinter 1s fall 3 rise 2 on-marked-down shutdown-sessions
    server db01 10.43.20.102:5432 check port 8008
    server db02 10.43.20.103:5432 check port 8008
    server db03 10.43.20.104:5432 check port 8008
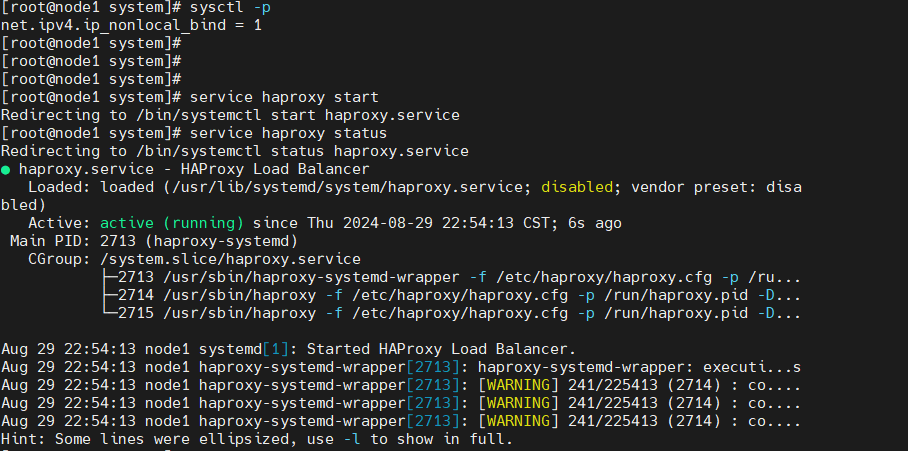
修改内核参数:允许监听不存在的地址
vi /etc/sysctl.conf
#文末尾新增
net.ipv4.ip_nonlocal_bind = 1
执行sysctl -p,启动HAProxy
验证HAProxy
使用psql连接到vip的5000端口,查看是否为主库,并且能否写入/读取数据:
su - postgres
[postgres@node1 ~]$ psql -h 10.43.20.105 -p5000
select * from pg_is_in_recovery();
create table t1(id int);
insert into t1 values(1);
select * from t1;
创建测试表,写入数据正常。
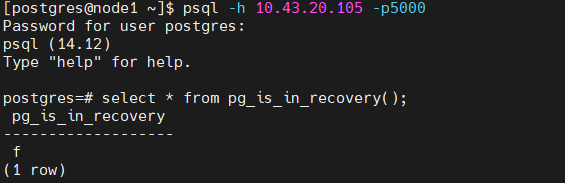
可读写,验证通过。
使用psql连接到5001端口,查看是否为备库,是否可以写入/读取数据
[postgres@node1 ~]$ psql -h 10.43.20.105 -p5001
select * from pg_is_in_recovery();
create table t2(id int);

只读,不可写,验证通过。
HAProxy监控页面
访问:http://10.43.20.102:7000/stats
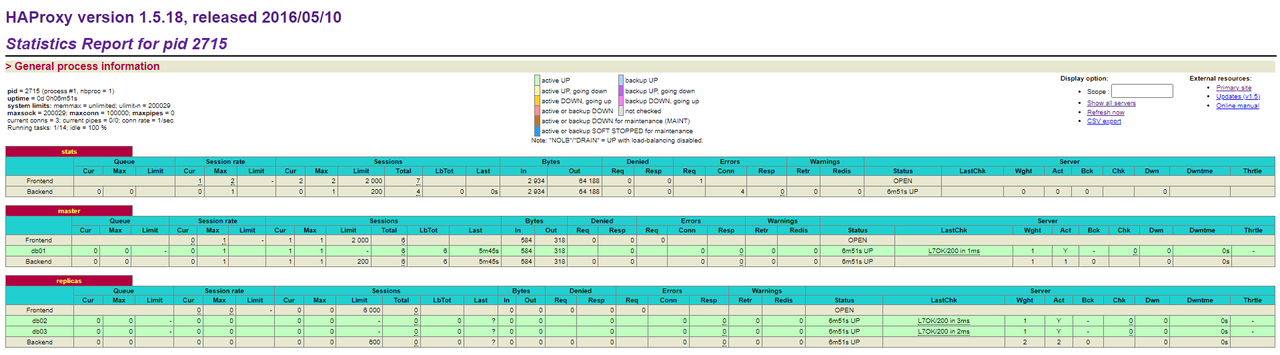
master只有一个db为up。
replicas有两个db为up。