SciTech-BigDataAI-ImageProcessing-OpenCV-Splitting and Merging Channels with OpenCV+NumPy+Pandas
Links:
- https://pyimagesearch.com/2021/01/23/splitting-and-merging-channels-with-opencv/
- OpenCV Official: https://docs.opencv.org/3.4/d3/df2/tutorial_py_basic_ops.html
Shortpath Codes
import cv2 as cv
import numpy as np
import pandas as pd

# Load the image first
img_path = 'downloads/Signature.jpg'
img = cv.imread(img_path)
assert img is not None, "file could not be read, check with os.path.exists('%s')" % img_path

# Color Channels Splitting and merging
b, g, r = cv.split(img)
# **Numpy indexing is faster** than cv.split(img)
b1, g1, r1 =img[:, :, 0], img[:, :, 1], img[:, :, 2]
img0,img1  = cv.merge((b, g, r)), cv.merge((b1, g1, r1))

# Greystyle
gray_img = cv.cvtColor(img, cv2.COLOR_BGR2GRAY)

# Save the grayscale image
cv2.imwrite('gray_img.jpg', gray_img)

# Show the original image
cv2.imshow('Original Image', img)

# Define the method for background removal
method = cv.bgsegm.createBackgroundSubtractorMOG()

# Exit
cv.waitKey(0)
cv.destroyAllWindows()
Accessing Image Properties
- Image properties include "number of rows, columns, and channels"; "type of image data"; "number of pixels"; etc.
- Note:
- it is a good method to check whether the loaded image is grayscale or color.
img.dtypeis very important while debugging,
because a large number of errors in OpenCV-Python code are caused by invalid datatype.
#1. **Total number of pixels** is accessed by `img.size`:
#2. **Image datatype** is obtained by `img.dtype`:
#3. **shape of an image** is accessed by `img.shape`, It returns
#    a tuple of the number of rows, columns, and channels(if the image is color)
#    a tuple of the number of rows and columns ONLY**if an image is grayscale**.
#    **check whether the loaded image is grayscale or color** first by Using `3 == len(img.shape)` .

print( img.shape, img.size, img.dtype)
(342, 548, 3)  562248  uint8
Splitting and Merging Image Channels
Sometimes you will need to work separately on the B,G,R channels of an image.
- In this case, you need to split the BGR image into single channels.
- In other cases, you may need to join these individual channels to create a BGR image.
- Warning:
cv.split()is a time costly operation. So use it only if necessary.
Otherwise go for Numpy indexing.
You can do this simply by:
b, g, r = cv.split(img)
img = cv.merge((b, g, r))

# OR a better faster way by using **Numpy indexing**

b, g, r =img[:,:,0], img[:,:,0] img[:,:,0]
img = cv.merge((b, g, r))

# Suppose you want to set all the red pixels to zero
#   **Numpy indexing is faster**,
# so you do not need to split the channels first.:

img[:,:,2] = 0
Accessing and Modifying pixel values
You can access a pixel value by its row and column coordinates.
- For BGR image, it returns an array of Blue, Green, Red values.
- For grayscale image, just corresponding intensity is returned.
# Access a pixel value by its row and column coordinates
px = img[100, 100]
print( px )
[157 166 200] # an array of Blue, Green, Red values for BGR image
# accessing only blue pixel
blue = img[100, 100, 0]
print( blue )
157
#You can modify the pixel values the same way.
img[100, 100] = [255, 255, 255]
print( img[100, 100] )
[255 255 255]

# **Better pixel accessing and editing method** :

# accessing only RED value
img.item(10, 10, 2)
59
# modifying RED value
img.itemset((10, 10, 2), 100)
img.item(10, 10, 2)
100
- Warning: Numpy is an optimized library for fast array calculations.
So simply accessing each and every pixel value and modifying it will be very slow and it is discouraged. - Note
- The above coordinates method is normally used for selecting a region of an array,
say the first 5 rows and last 3 columns. - For individual pixel access, the Numpy array methods, array.item() and array.itemset() are considered better.
They always return a scalar, however, so if you want to access all the B,G,R values, you will need to call array.item() separately for each value.
- The above coordinates method is normally used for selecting a region of an array,
ROI of Image
Sometimes, you will have to play with certain regions of images. For eye detection in images:
- first face detection is done over the entire image.
- when a face is obtained, we select the face region alone and search for eyes inside it instead of searching the whole image. It improves:
- accuracy, because eyes are always on faces 😄,
- performance, because we search in a small area.
ROI is again obtained using Numpy indexing.
# Here I am selecting the ball and copying it to another region in the image:
ball = img[280:340, 330:390]
img[273:333, 100:160] = ball
Check the results below
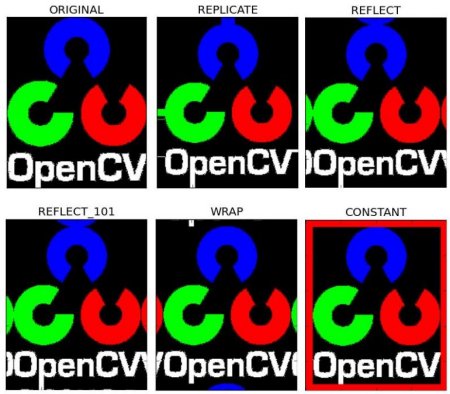
Making Borders for Images (Padding)
If you want to create a border around an image, something like a photo frame,
you can use cv.copyMakeBorder(). But it has more applications for convolution operation, zero padding etc. This function takes following arguments:
- src - input image
- top, bottom, left, right - border width in number of pixels in corresponding directions
- borderType - Flag defining what kind of border to be added. It can be following types:
- cv.BORDER_CONSTANT - Adds a constant colored border. The value should be given as next argument.
- cv.BORDER_REFLECT - Border will be mirror reflection of the border elements, like this : fedcba|abcdefgh|hgfedcb
- cv.BORDER_REFLECT_101 or cv.BORDER_DEFAULT - Same as above, but with a slight change, like this : gfedcb|abcdefgh|gfedcba
- cv.BORDER_REPLICATE - Last element is replicated throughout, like this: aaaaaa|abcdefgh|hhhhhhh
- cv.BORDER_WRAP - Can't explain, it will look like this : cdefgh|abcdefgh|abcdefg
- value - Color of border if border type is cv.BORDER_CONSTANT
Below is a sample code demonstrating all these border types for better understanding:
import cv2 as cv
import numpy as np
from matplotlib import pyplot as plt

BLUE = [255, 0, 0]

img1 = cv.imread('opencv-logo.png')
assert img1 is not None, "file could not be read, check with os.path.exists()"

replicate = cv.copyMakeBorder(img1, 10,10,10,10, cv.BORDER_REPLICATE)
reflect = cv.copyMakeBorder(img1, 10,10,10,10, cv.BORDER_REFLECT)
reflect101 = cv.copyMakeBorder(img1, 10,10,10,10, cv.BORDER_REFLECT_101)
wrap = cv.copyMakeBorder(img1, 10,10,10,10, cv.BORDER_WRAP)
constant= cv.copyMakeBorder(img1, 10,10,10,10, cv.BORDER_CONSTANT,value=BLUE)
plt.subplot(231),plt.imshow(img1,'gray'),plt.title('ORIGINAL')
plt.subplot(232),plt.imshow(replicate,'gray'),plt.title('REPLICATE')
plt.subplot(233),plt.imshow(reflect,'gray'),plt.title('REFLECT')
plt.subplot(234),plt.imshow(reflect101,'gray'),plt.title('REFLECT_101')
plt.subplot(235),plt.imshow(wrap,'gray'),plt.title('WRAP')
plt.subplot(236),plt.imshow(constant,'gray'),plt.title('CONSTANT')
plt.show()
See the result below. (Image is displayed with matplotlib. So RED and BLUE channels will be interchanged):