MetaGPT-main-官方教程学习
学习最新版本的MetaGPT官方教程(v0.8.1 maybe)
学习教程:https://docs.deepwisdom.ai/main/zh/guide/tutorials/concepts.html
v0.8.1 改动(相比v0.4)
智能体入门
1.)在《智能体入门》章节,v0.8.1版本在创建Role时显式地创建了Context对象,与v0.4版本相比,相关的类代码并没有改动。
# v0.8.1
from metagpt.context import Context

context = Context()
role = ProductManager(context=context)

# Role类定义
class Role(SerializationMixin, ContextMixin, BaseModel):
     rc: RoleContext = Field(default_factory=RoleContext)
# RoleContext
class RoleContext(BaseModel):
    memory: Memory = Field(default_factory=Memory)
# Memory定义
class Memory(BaseModel):
    storage: list[SerializeAsAny[Message]] = []
WARNING | metagpt.utils.common:wrapper:649 - There is a exception in role's execution, in order to resume, we delete the newest role communication message in the role's memory.
如果不显式地指定context,会报错ValueError: Invalid root
# v0.4
role = ProductManager()

# Role 对象中维护着 RoleContext 对象
class Role:
    def __init__(self, name="", profile="", goal="", constraints="", desc="", is_human=False):
        self._rc = RoleContext()

# RoleContext 对象中维护着 Memory 对象
class RoleContext(BaseModel):
    memory: Memory = Field(default_factory=Memory)

# Memory 对象中存储Message结构体
class Memory:
    def __init__(self):
        self.storage: list[Message] = []
2.)定义动作 & 定义角色 & 运行角色代码没有变化,在创建角色时都需要显式地指定context,在运行自定义角色时没有显式传递context也可以正常运行。
更多细节需要阅读Role以及ProductManager源码查找原因。
多智能体入门
在创建Team运行时,由team.start_project(idea)改为了team.run_project(idea).
新增-创建和使用工具
在MetaGPT中,可以直接创建自己的函数或类作为工具,放在metagpt/tools/libs 目录下。
创建工具的步骤
- 编写专门用于与外部环境进行特定交互的函数或类,并将它们放置在
metagpt/tools/libs目录中。 - 为每个函数或类配备谷歌风格的文档字符串。这作为一个简洁而全面的参考资料,详细说明其用途、输入参数和预期输出。
- 使用
@register_tool装饰器以确保在工具注册表中准确注册。这个装饰器简化了函数或类与DataInterpreter的集成。
自定义工具案例
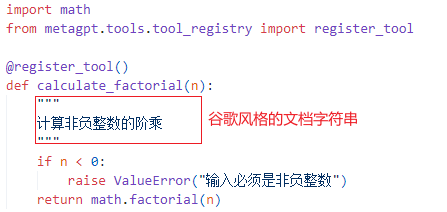
1.)自定义计算阶乘的工具
在 metagpt/tools/libs 中创建一个自己的函数,假设它是 calculate_factorial.py,并添加装饰器 @register_tool 以将其注册为工具
2.)register_tool装饰器函数详解
# 将一个工具类或函数注册到一个工具注册表中
def register_tool(tags: list[str] = None, schema_path: str = "", **kwargs):
    """
    register a tool to registry
    tags:字符串列表,用于标记工具
    schema_path:表示工具的模式文件路径
    """
    # 装饰器函数,cls 表示被装饰器装饰的类
    def decorator(cls):
        # 获取被装饰的类或函数的文件路径
        file_path = inspect.getfile(cls)
        if "metagpt" in file_path:
            # split to handle ../metagpt/metagpt/tools/... where only metapgt/tools/... is needed
            file_path = "metagpt" + file_path.split("metagpt")[-1]
        # 获取被装饰类的源代码
        source_code = inspect.getsource(cls)
        # 将工具的信息注册到注册表中
        TOOL_REGISTRY.register_tool(
            tool_name=cls.__name__,	# 工具名称 = 类名
            tool_path=file_path,
            schema_path=schema_path,
            tool_code=source_code,
            tags=tags,
            tool_source_object=cls,
            **kwargs,
        )
        return cls

    return decorator
当导入包含 @register_tool 装饰器的模块时,装饰器会自动运行,将类注册到 TOOL_REGISTRY 中。
3.)将自定义工具集成到数据解释器DataInterpreter中,并在计算过程中使用工具
import asyncio
from metagpt.roles.di.data_interpreter import DataInterpreter
from metagpt.tools.libs import calculate_factorial

async def main(requirement: str):
    role = DataInterpreter(tools=["calculate_factorial"]) # 集成工具
    await role.run(requirement)

if __name__ == "__main__":
    requirement = "请计算 5 的阶乘"
    await main(requirement)

"""
运行过程:

metagpt.tools.tool_recommend:recall_tools:194 - Recalled tools: ['calculate_factorial']; Scores: [0.0]
metagpt.tools.tool_recommend:recommend_tools:100 - Recommended tools: ['calculate_factorial']
metagpt.roles.di.data_interpreter:_write_code:153 - ready to WriteAnalysisCode

```python
# Importing the pre-defined tool for calculating factorial
from metagpt.tools.libs.calculate_factorial import calculate_factorial

# Calculate the factorial of 5
result = calculate_factorial(5)

# Print the result
print("The factorial of 5 is:", result
```
"""
注意:
- 编写谷歌风格的文档字符串(docstring),有助于
DataInterpreter选择合适的工具并理解其工作方式。- 在注册工具时,工具的名称就是函数的名称。
- 在运行 DataInterpreter 之前,记得从
metagpt.tools.libs导入自定义的calculate_factorial模块,以确保该工具已被注册。
通过上述步骤,可以无缝地创建并整合MetaGPT中Tools框架内的工具,使DataInterpreter能够有效地与外部环境交互。
人类介入
环境的创建
新增-集成开源LLM
目前,如果要得到比较稳定的代码生成结果,需要使用OpenAI的GPT-3.5或GPT-4。但目前也有很多其他优秀的开源模型可以供实验,也能够得到令人相对满意的结果。
下面将展开如何接入开源LLM并根据你的输入需求得到项目输出。
待补充
新增-为角色或动作配置不同的LLM
每个Role可以根据其特定的需求和背景,以及每个Action的特点,选择最合适的LLM,增强了团队互动的灵活性和现实性。
通过这种方式,你可以更精细地控制对话的质量和方向,从而创造出更加丰富和真实的交互体验。
设置步骤如下:
-
定义不同的LLM配置文件
from metagpt.config2 import Config # 1. 创建新的gpt-4配置文件并加载 gpt4 = Config.from_home("gpt-4.yaml") # 从`~/.metagpt`目录加载自定义配置`gpt-4.yaml` # 2. 使用默认的配置文件 gpt4t = Config.default() # 使用默认配置,即`config2.yaml`文件中的配置,此处`config2.yaml`文件中的model为"gpt-4-turbo" # 3. 修改配置文件中使用的LLM gpt35 = Config.default() gpt35.llm.model = "gpt-3.5-turbo" # 将model修改为"gpt-3.5-turbo" -
在创建Role和Action时,为其分配不同的配置文件
from metagpt.roles import Role from metagpt.actions import Action # 创建a1、a2和a3三个Action。并为a1指定`gpt4t`的配置。 a1 = Action(config=gpt4t, name="Say", instruction="Say your opinion with emotion and don't repeat it") a2 = Action(name="Say", instruction="Say your opinion with emotion and don't repeat it") a3 = Action(name="Vote", instruction="Vote for the candidate, and say why you vote for him/her") # 创建A,B,C三个角色,分别为“民主党候选人”、“共和党候选人”和“选民”。 # 虽然A设置了config为gpt4,但因为a1已经配置了Action config,所以A将使用model为gpt4的配置,而a1将使用model为gpt4t的配置。 A = Role(name="A", profile="Democratic candidate", goal="Win the election", actions=[a1], watch=[a2], config=gpt4) # 因为B设置了config为gpt35,而为a2未设置Action config,所以B和a2将使用Role config,即model为gpt35的配置。 B = Role(name="B", profile="Republican candidate", goal="Win the election", actions=[a2], watch=[a1], config=gpt35) # 因为C未设置config,而a3也未设置config,所以C和a3将使用Global config,即model为gpt4的配置。 C = Role(name="C", profile="Voter", goal="Vote for the candidate", actions=[a3], watch=[a1, a2]) -
注意配置的优先级:Action config > Role config > Global config(config in config2.yaml)
-
创建一个带有环境的团队,开始交互。
import asyncio
from metagpt.environment import Environment
from metagpt.team import Team

# 创建一个描述为“美国大选现场直播”的环境
env = Environment(desc="US election live broadcast")
team = Team(investment=10.0, env=env, roles=[A, B, C])
# 运行团队,我们应该会看到它们之间的协作
asyncio.run(team.run(idea="Topic: climate change. Under 80 words per message.", send_to="A", n_round=3))
# await team.run(idea="Topic: climate change. Under 80 words per message.", send_to="A", n_round=3) # 如果在Jupyter Notebook中运行,使用这行代码