扫码登录---对外版本
7层访问扫码登录
参考扫码登录第三方网站
https://open.dingtalk.com/document/orgapp/scan-qr-code-to-log-on-to-third-party-websites 旧版sdk方案如下
方式二:支持网站将钉钉登录二维码内嵌到自己页面中
用户使用钉钉扫码登录后JS会将loginTmpCode返回给网站。
JS钉钉登录主要用途:网站希望用户在网站内就能完成登录,无需跳转到钉钉域下登录后再返回,提升钉钉登录的流畅性与成功率。
网站内嵌二维码钉钉登录JS实现办法:
- 在页面中先引入如下JS文件(支持HTTPS
<script src="https://g.alicdn.com/dingding/dinglogin/0.0.5/ddLogin.js"></script>- 在需要使用钉钉登录的地方实例以下JS对象
/*
* 解释一下goto参数,参考以下例子:
* var url = encodeURIComponent('http://localhost.me/index.php?test=1&aa=2');
* var goto = encodeURIComponent('https://oapi.dingtalk.com/connect/oauth2/sns_authorize?appid=SuiteKey&response_type=code&scope=snsapi_login&state=STATE&redirect_uri='+url)
*/
var obj = DDLogin({
     id:"login_container",//这里需要你在自己的页面定义一个HTML标签并设置id,例如<div id="login_container"></div>或<span id="login_container"></span>
     goto: "", //请参考注释里的方式
     style: "border:none;background-color:#FFFFFF;",
     width : "365",
     height: "400"
 });
/*
goto参数结构:https://oapi.dingtalk.com/connect/oauth2/sns_authorize?appid=SuiteKey&response_type=code&scope=snsapi_login
&state=STATE&redirect_uri=REDIRECT_URI,并且要将goto参数urlencode编码。
*/引入的js会在获取用户扫描之后将获取的loginTmpCode通过window.parent.postMessage(loginTmpCode,'*');返回给您的网站。
可以通过以下代码获取loginTmpCode:
var handleMessage = function (event) {
  var origin = event.origin;
  console.log("origin", event.origin);
  if( origin == "https://login.dingtalk.com" ) { //判断是否来自ddLogin扫码事件。
    var loginTmpCode = event.data;
    //获取到loginTmpCode后就可以在这里构造跳转链接进行跳转了

    console.log("loginTmpCode", loginTmpCode);
  }
};
if (typeof window.addEventListener != 'undefined') {
    window.addEventListener('message', handleMessage, false);
} else if (typeof window.attachEvent != 'undefined') {
    window.attachEvent('onmessage', handleMessage);
}通过JS获取到loginTmpCode后,需要构造并跳转到如下链接:
https://oapi.dingtalk.com/connect/oauth2/sns_authorize?appid=SuiteKey&response_type=code&scope=snsapi_login&state=STATE&redirect_uri=REDIRECT_URI&loginTmpCode=loginTmpCode-
服务端通过临时授权码获取授权用户的个人信息。
调用sns/getuserinfo_bycode接口获取授权用户的个人信息,详情请参考根据sns临时授权码获取用户信息。
重要通过临时授权码Code获取用户信息,临时授权码只能使用一次。
-
根据unionid获取userid。
调用user/getbyunionid接口获取userid,详情请参考根据unionid获取用户userid。
-
根据userid获取用户详情。
调用user/get接口获取用户信息,详情请参考查询用户详情。
1、https://idp.pre.xxxxxyun.cn/idp/app/login?app_id=app-xxxxx&redirect_url=https%3A%2F%2Fxxxxyun.portal.xxxxxx.com%2F&portal_type=&ins_id=xxxxxxx&source_id=xxxxxxxxxxxxxx --->307 Temporary Redirect
2、https://idp.pre.xxxxxx.cn/ui/login.html?osType=windows&requestId=xxxxxx&idp_type=4&appid=xxxxxx&corp_code=&redirect_uri=https%3A%2F%2Fidp.pre.xxxxxx.cn%2FdingtalkLogin&authentication_error---->200ok
3、https://idp.pre.xxxxxx.cn/third/auth/list?requestId=sxxxxxx
4、https://idp.pre.xxxxxx.cn/innerApi/v1/spa/corpInfoConfig/?corp_code=
5、https://login.dingtalk.com/login/qrcode.htm?goto=https%3A%2F%2Foapi.dingtalk.com%2Fconnect%2Foauth2%2Fsns_authorize%3Fappid%3Dxxxxxx%26response_type%3Dcode%26scope%3Dsnsapi_login%26state%3Dsaml_xxxxxxxxxx%26redirect_uri%3Dhttps%3A%2F%2Fidp.pre.eagleyun.cn%2FdingtalkLogin&style=border%3A%20none%3B%20background-color%3A%20%23fff%3B
6、https://login.dingtalk.com/login/login_with_qr
7、https://oapi.dingtalk.com/connect/oauth2/sns_authorize?appid=xxxxxxxx&response_type=code&scope=snsapi_login&state=xxxxxxxx&redirect_uri=https://idp.pre.xxxxx.cn/dingtalkLogin&loginTmpCode=xxxxxxxxxxxxxxxxxxxxxx
8、https://idp.pre.eagleyun.cn/dingtalkLogin?code=2xxxx&state=xxxxx_xxxx
9、https://eagleyun.portal.pre.eagleyun.com/?brizoo_app_ticket=app_ticket_xxxxxxxx
10.认证成功302 到一开始登录的页面
方案一 url:https://oapi.dingtalk.com/connect/qrconnect?appid=xxxxxxx&response_type=code&scope=snsapi_login&state=STATE&redirect_uri=https://idp.pre.xxxxx.cn/dingtalkLogin
访问方案一种的URL也会变成访问 如下URL https://login.dingtalk.com/login/qrcode.htm?goto=https://oapi.dingtalk.com/connect/oauth2/sns_authorize?appid=xxxxxx&response_type=code&scope=snsapi_login&state=STATE&redirect_uri=https://idp.xxxxxxxx.cn/dingtalkLogin
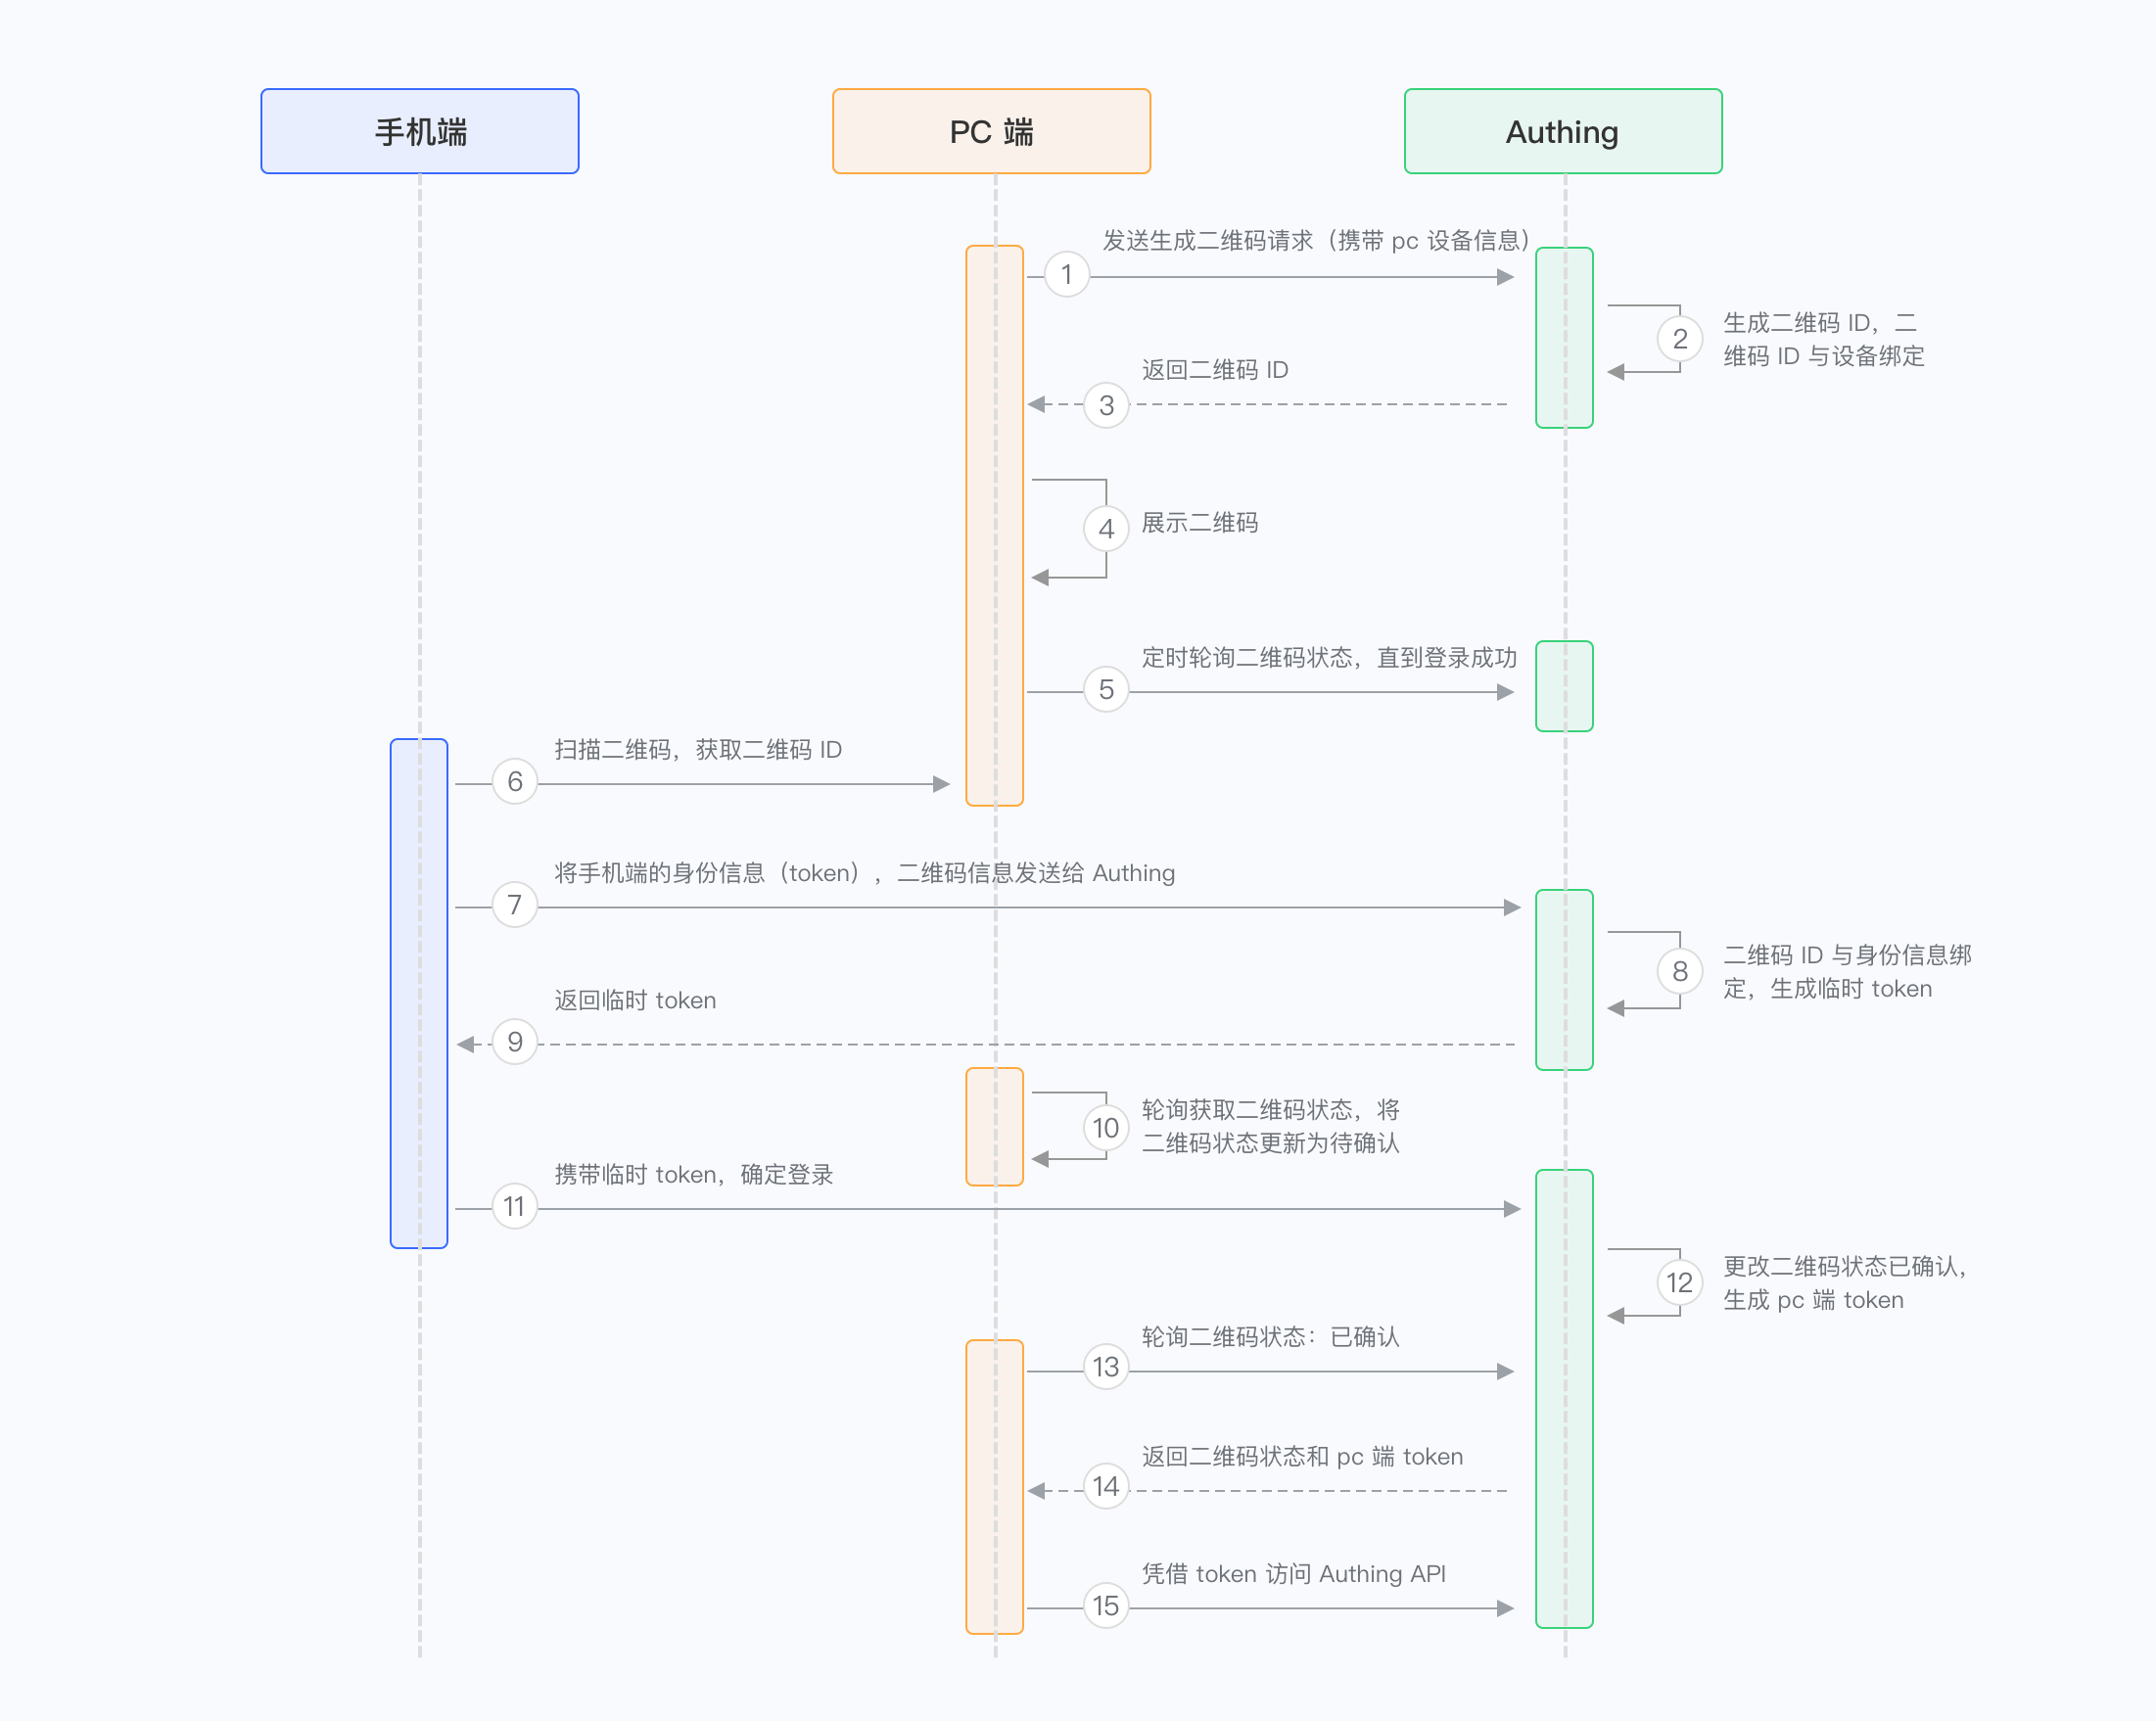
扫码登录的原理
通过业微信桌面端进行快速登录
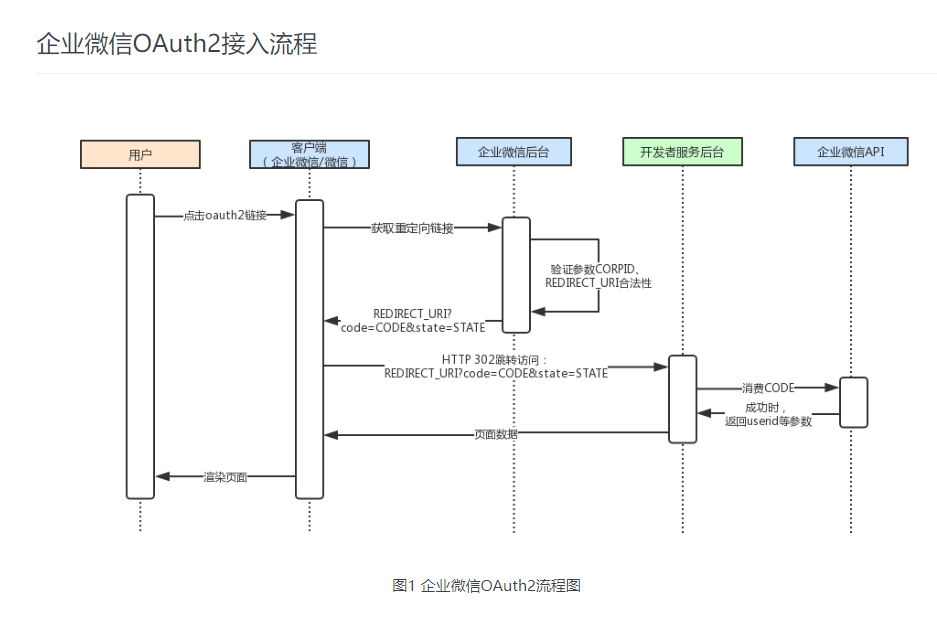
https://developer.work.weixin.qq.com/document/path/96713
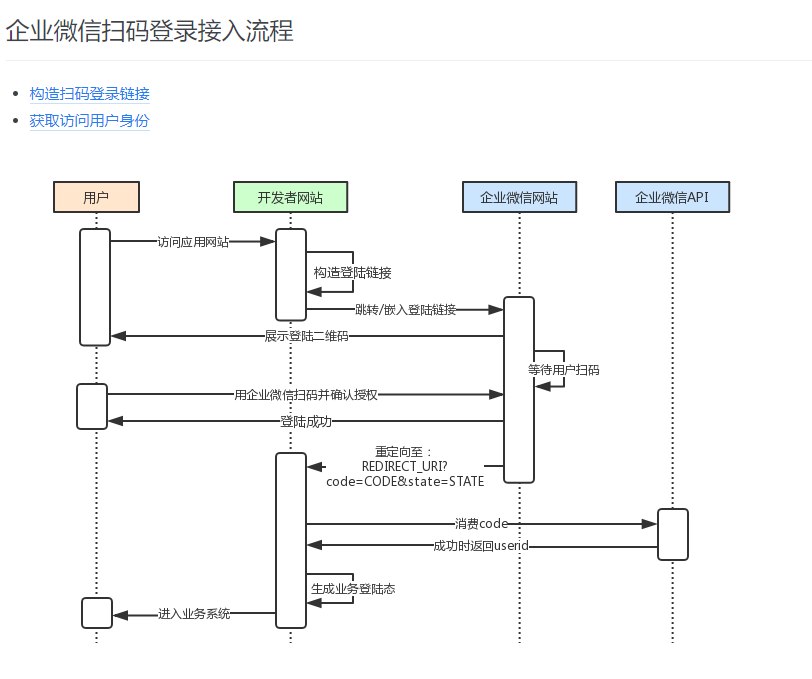
弹出二维码 扫码登录
https://developer.work.weixin.qq.com/document/15063
钉钉授权登录
OAuth登录授权
当要代表用户使用DingTalk OpenAPI读取和写入资源,需要通过OAuth 2.0授权流程完成授权。OAuth 2.0授权的流程如下图所示。
https://login.dingtalk.com/oauth2/auth?
redirect_uri=https%3A%2F%2Fwww.aaaaa.com%2Fa%2Fb
&response_type=code
&client_id=dingbbbbbbb
&scope=openid
&state=dddd
&prompt=consent
