Ceph的安装和学习
1.安装单节点的Ceph
在节点上创建及配置bind DNS解析
# yum install -y bind bind-utils
/etc/named.conf
[root@ceph-node ~]# cat /etc/named.conf
//
// named.conf
//
// Provided by Red Hat bind package to configure the ISC BIND named(8) DNS
// server as a caching only nameserver (as a localhost DNS resolver only).
//
// See /usr/share/doc/bind*/sample/ for example named configuration files.
//
// See the BIND Administrator's Reference Manual (ARM) for details about the
// configuration located in /usr/share/doc/bind-{version}/Bv9ARM.html

options {
    listen-on port 53 { 127.0.0.1; 192.168.56.110; };
    listen-on-v6 port 53 { ::1; };
    directory     "/var/named";
    dump-file     "/var/named/data/cache_dump.db";
    statistics-file "/var/named/data/named_stats.txt";
    memstatistics-file "/var/named/data/named_mem_stats.txt";
    recursing-file  "/var/named/data/named.recursing";
    secroots-file   "/var/named/data/named.secroots";
    allow-query     { localhost;any; };

    /*
     - If you are building an AUTHORITATIVE DNS server, do NOT enable recursion.
     - If you are building a RECURSIVE (caching) DNS server, you need to enable
       recursion.
     - If your recursive DNS server has a public IP address, you MUST enable access
       control to limit queries to your legitimate users. Failing to do so will
       cause your server to become part of large scale DNS amplification
       attacks. Implementing BCP38 within your network would greatly
       reduce such attack surface
    */
    recursion yes;

    dnssec-enable yes;
    dnssec-validation yes;

    /* Path to ISC DLV key */
    bindkeys-file "/etc/named.root.key";

    managed-keys-directory "/var/named/dynamic";

    pid-file "/run/named/named.pid";
    session-keyfile "/run/named/session.key";
};

logging {
        channel default_debug {
                file "data/named.run";
                severity dynamic;
        };
};

zone "." IN {
    type hint;
    file "named.ca";
};


zone "example.com" IN {
    type    master;
    file    "/var/named/zonefile.db";
};

zone "56.168.192.in-addr.arpa" IN {
    type    master;
    file    "/var/named/reverse.db";
};

include "/etc/named.rfc1912.zones";
include "/etc/named.root.key";
/var/named/zonefile.db
[root@ceph-node ~]# cat /var/named/zonefile.db
$TTL 1D
@    IN SOA    @ example.com. (
                    0    ; serial
                    1D    ; refresh
                    1H    ; retry
                    1W    ; expire
                    3H )    ; minimum
    IN    NS    @
    IN    A    127.0.0.1
    IN    AAAA    ::1
ceph-node    IN    A    192.168.56.110
/var/named/reverse.db
[root@ceph-node ~]# cat /var/named/reverse.db
$TTL 1W
@    IN    SOA    ns1.example.com.    root (
            2019120205    ; serial
            3H        ; refresh (3 hours)
            30M        ; retry (30 minutes)
            2W        ; expiry (2 weeks)
            1W )        ; minimum (1 week)
    IN    NS    ns1.example.com.
;
; syntax is "last octet" and the host must have fqdn with trailing dot
110      IN      PTR     ceph-node.example.com.
;EOF
2.开启mimic Ceph dashboard
[root@ceph-node ~]# sudo ceph -v
ceph version 13.2.10 (564bdc4ae87418a232fc901524470e1a0f76d641) mimic (stable)

$ sudo ceph mgr module enable dashboard

$ sudo ceph dashboard create-self-signed-cert

[cephadmin@ceph-node storage_cluster]$ sudo ceph dashboard set-login-credentials admin welcome1
Username and password updated
访问dashboard
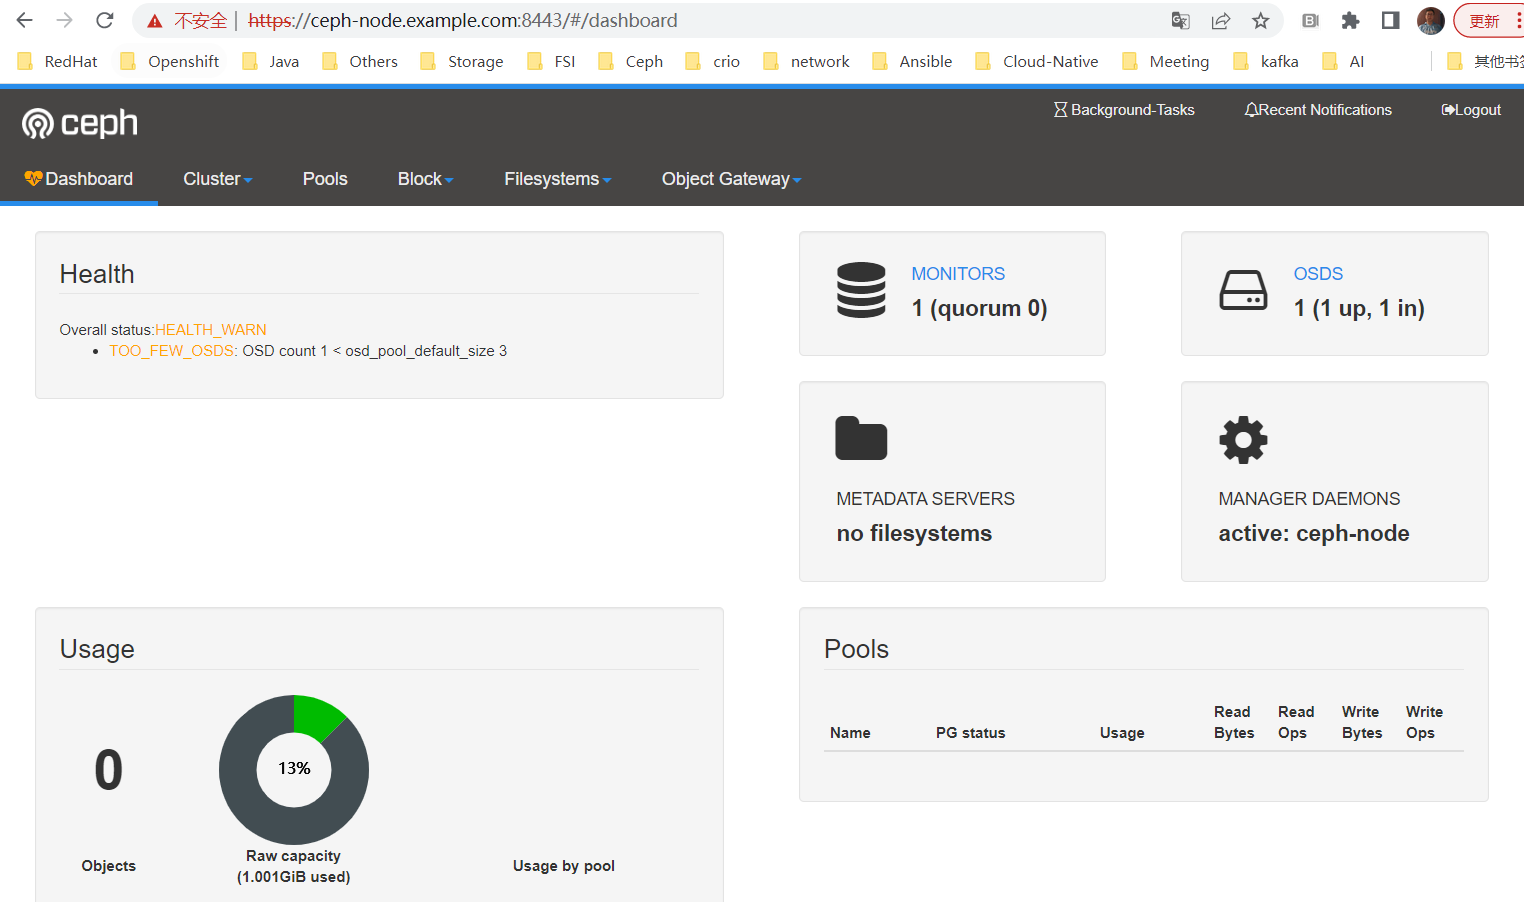
3. 添加新的节点node到集群
- 新节点的用户准备
$ useradd -m cephadmin -s /bin/bash
$ passwd cephadmin
$ echo "cephadmin ALL = (root) NOPASSWD:ALL" | sudo tee /etc/sudoers.d/cephadmin
$ sudo chmod 0440 /etc/sudoers.d/cephadmin
systemctl disable firewalld
systemctl stop firewalld

sed -i 's/SELINUX=enforcing/SELINUX=disabled/g' /etc/selinux/config

sed -i s'/Defaults    requiretty/#Defaults    requiretty'/g /etc/sudoers
- Add Ceph repo
- 主节点配置ssh
[cephadmin@ceph-node root]$ ssh-keygen
Generating public/private rsa key pair.
Enter file in which to save the key (/home/cephadmin/.ssh/id_rsa):
Created directory '/home/cephadmin/.ssh'.
Enter passphrase (empty for no passphrase):
Enter same passphrase again:
Your identification has been saved in /home/cephadmin/.ssh/id_rsa.
Your public key has been saved in /home/cephadmin/.ssh/id_rsa.pub.
The key fingerprint is:
SHA256:SMPU0jGahxkHdRpz+01Z+PghJMqkcdUSgOcAi6mzz4E cephadmin@ceph-node.example.com
The key's randomart image is:
+---[RSA 2048]----+
|     .==Oo=oo  ..|
|    ooo@o@ + o.o |
|   o .O.% o + oo |
|  .  . = + . +...|
| o    . S   . o..|
|  +             .|
| E .             |
|  o .            |
|   o             |
+----[SHA256]-----+

[cephadmin@ceph-node root]$ ssh-copy-id cephadmin@ceph-node1
/usr/bin/ssh-copy-id: INFO: Source of key(s) to be installed: "/home/cephadmin/.ssh/id_rsa.pub"
The authenticity of host 'ceph-node1 (192.168.56.111)' can't be established.
ECDSA key fingerprint is SHA256:QxTTL/y0HrTXK2GwOJxQ//TQMYpOdx9z40zvB2+GXI8.
ECDSA key fingerprint is MD5:c6:27:96:cd:3a:bc:2a:b0:b6:fc:93:00:2c:52:5e:71.
Are you sure you want to continue connecting (yes/no)? yes
/usr/bin/ssh-copy-id: INFO: attempting to log in with the new key(s), to filter out any that are already installed
/usr/bin/ssh-copy-id: INFO: 1 key(s) remain to be installed -- if you are prompted now it is to install the new keys
cephadmin@ceph-node1's password:

Number of key(s) added: 1

Now try logging into the machine, with:   "ssh 'cephadmin@ceph-node1'"
and check to make sure that only the key(s) you wanted were added.
- 配置时间同步
在两台机器上都安装
[root@ceph-node ~]# yum install -y chrony
主节点配置
[root@ceph-node ~]# cat /etc/chrony.conf
# Use public servers from the pool.ntp.org project.
# Please consider joining the pool (http://www.pool.ntp.org/join.html).
server ceph-node.example.com iburst
#server 1.centos.pool.ntp.org iburst
#server 2.centos.pool.ntp.org iburst
#server 3.centos.pool.ntp.org iburst

# Record the rate at which the system clock gains/losses time.
driftfile /var/lib/chrony/drift

# Allow the system clock to be stepped in the first three updates
# if its offset is larger than 1 second.
makestep 1.0 3

# Enable kernel synchronization of the real-time clock (RTC).
rtcsync

# Enable hardware timestamping on all interfaces that support it.
#hwtimestamp *

# Increase the minimum number of selectable sources required to adjust
# the system clock.
#minsources 2

# Allow NTP client access from local network.
allow 192.168.56.0/16

# Serve time even if not synchronized to a time source.
local stratum 10

# Specify file containing keys for NTP authentication.
#keyfile /etc/chrony.keys

# Specify directory for log files.
logdir /var/log/chrony

# Select which information is logged.
#log measurements statistics tracking
客户端配置
[root@ceph-node1 ~]# cat /etc/chrony.conf
# Use public servers from the pool.ntp.org project.
# Please consider joining the pool (http://www.pool.ntp.org/join.html).
server ceph-node.example.com iburst

# Record the rate at which the system clock gains/losses time.
driftfile /var/lib/chrony/drift

# Allow the system clock to be stepped in the first three updates
# if its offset is larger than 1 second.
makestep 1.0 3

# Enable kernel synchronization of the real-time clock (RTC).
rtcsync

# Enable hardware timestamping on all interfaces that support it.
#hwtimestamp *

# Increase the minimum number of selectable sources required to adjust
# the system clock.
#minsources 2

# Allow NTP client access from local network.
#allow 192.168.0.0/16

# Serve time even if not synchronized to a time source.
#local stratum 10

# Specify file containing keys for NTP authentication.
#keyfile /etc/chrony.keys

# Specify directory for log files.
logdir /var/log/chrony

# Select which information is logged.
#log measurements statistics tracking
[root@ceph-node1 ~]# systemctl start chronyd
[root@ceph-node1 ~]# systemctl enable chronyd
主节点修改ceph.conf
public_network = 192.168.56.0/24
cluster_network = 192.168.56.0/24
添加节点和OSD
sudo ceph-deploy install ceph-node1

sudo ceph-deploy disk list ceph-node1

sudo ceph-deploy disk zap ceph-node1 /dev/sdb

sudo ceph-deploy osd create --data /dev/sdb ceph-node1
[cephadmin@ceph-node storage_cluster]$ sudo ceph -s
  cluster:
    id:     90933ecf-4a54-475b-8222-b2c57868512a
    health: HEALTH_WARN
            OSD count 2 < osd_pool_default_size 3

  services:
    mon: 1 daemons, quorum ceph-node
    mgr: ceph-node(active)
    osd: 2 osds: 2 up, 2 in

  data:
    pools:   0 pools, 0 pgs
    objects: 0  objects, 0 B
    usage:   2.0 GiB used, 14 GiB / 16 GiB avail
    pgs:
参考文章
https://technologyrss.com/how-to-install-ceph-cluster-on-centos-7-using-single-server/
https://ralph.blog.imixs.com/2020/02/28/howto-install-ceph-on-centos-7/
https://www.virtualtothecore.com/adventures-with-ceph-storage-part-7-add-a-node-and-expand-the-cluster-storage/
https://juejin.cn/post/7086381284733222948
https://www.51cto.com/article/641024.html