ArkUI-Image详解
ArkUI-Image详解
文章摘要:
给Image组件设置属性可以使图片显示更灵活,达到一些自定义的效果。以下是几个常用属性的使用示例。这时可以使用interpolation属性对图片进行插值,使图片显示得更清晰。Image组件引入本地图片路径,即可显示图片(根目录为ets文件夹)。通过renderMode属性设置图片的渲染模式为原色或黑白。通过objectFit属性使图片缩放到高度和宽度确定的框内。创建文件夹,将本地图片放入ets文件夹下的任意位置。当原图分辨率较低并且放大显示时,图片会模糊出现锯齿。
- 本地资源
创建文件夹,将本地图片放入ets文件夹下的任意位置。
Image组件引入本地图片路径,即可显示图片(根目录为ets文件夹)。
Image('images/pic1.webp')
    .width(100)
    .height(100)

- Resource资源
使用资源格式可以跨包/跨模块引入图片,
resources文件夹下的图片都可以通过$r资源接口读
取到并转换到Resource格式。
支持png、webp、jpg等格式
Image($r('app.media.pic1'))
    .width('100')
    .height('100')
- 设置图片渲染模式
通过renderMode属性设置图片的渲染模式为原色或黑白。
ImageRenderMode.Original: 渲染模式为原色
ImageRenderMode.Template: 渲染模式为黑白
Image($r('app.media.pic1'))
    // 设置图片的渲染模式为黑白
    .renderMode(ImageRenderMode.Template)
    .width(100)
    .height(100)
    .border({ width: 1 })
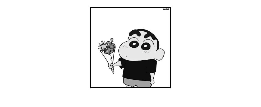
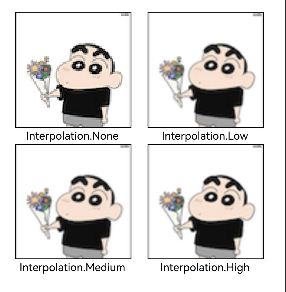
- 图片插值
当原图分辨率较低并且放大显示时,图片会模糊出现锯齿。
这时可以使用interpolation属性对图片进行插值,使图片显示得更清晰。
 Column() {
      Row() {
        Image($r('app.media.pic1_low'))
          .width('40%')
          .interpolation(ImageInterpolation.None)
          .borderWidth(1)
          .overlay("Interpolation.None", { align: Alignment.Bottom, offset: { x: 0, y: 20 } })
          .margin(10)
        Image($r('app.media.pic1_low'))
          .width('40%')
          .interpolation(ImageInterpolation.Low)
          .borderWidth(1)
          .overlay("Interpolation.Low", { align: Alignment.Bottom, offset: { x: 0, y: 20 } })
          .margin(10)
      }.width('100%')
      .justifyContent(FlexAlign.Center)

      Row() {
        Image($r('app.media.pic1_low'))
          .width('40%')
          .interpolation(ImageInterpolation.Medium)
          .borderWidth(1)
          .overlay("Interpolation.Medium", { align: Alignment.Bottom, offset: { x: 0, y: 20 } })
          .margin(10)
        Image($r('app.media.pic1_low'))
          .width('40%')
          .interpolation(ImageInterpolation.High)
          .borderWidth(1)
          .overlay("Interpolation.High", { align: Alignment.Bottom, offset: { x: 0, y: 20 } })
          .margin(10)
      }
    }
效果如下:
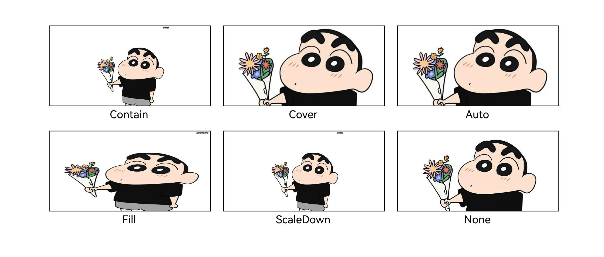
- 设置图片缩放类型
给Image组件设置属性可以使图片显示更灵活,达到一些自定义的效果。以下是几个常用属性的使用示例。
设置图片缩放类型:
通过objectFit属性使图片缩放到高度和宽度确定的框内。
ImageFit.Contain:保持宽高比进行缩小或者放大,使得图片完全显示在显示边界内。

ImageFit.Cover: 保持宽高比进行缩小或者放大,使得图片两边都大于或等于显示边界。

ImageFit.Auto: 自适应显示。

ImageFit.Fill: 不保持宽高比进行放大缩小,使得图片充满显示边界。

ImageFit.ScaleDown: 保持宽高比显示,图片缩小或者保持不变。

ImageFit.None: 保持原有尺寸显示。
案例代码如下:
@Entry
@Component
struct ImageDemo {
  @State imageWidth: number = 0
  @State imageHeight: number = 0
  build() {
  Column({space: 30}) {
    Row({space: 15}) {
      Image($r('app.media.pic1'))
        .width(200)
        .height(100)
        .border({ width: 1 })
          // 保持宽高比进行缩小或者放大,使得图片完全显示在显示边界内。
        .objectFit(ImageFit.Contain)
        .overlay('Contain', { align: Alignment.Bottom, offset: { x: 0, y: 20 } })
      Image($r('app.media.pic1'))
        .width(200)
        .height(100)
        .border({ width: 1 })
        .objectFit(ImageFit.Cover)
        // 保持宽高比进行缩小或者放大,使得图片两边都大于或等于显示边界。
        .overlay('Cover', { align: Alignment.Bottom, offset: { x: 0, y: 20 } })
      Image($r('app.media.pic1'))
        .width(200)
        .height(100)
        .border({ width: 1 })
          // 自适应显示。
        .objectFit(ImageFit.Auto)
        .overlay('Auto', { align: Alignment.Bottom, offset: { x: 0, y: 20 } })
    }

    Row({space: 15}) {
      Image($r('app.media.pic1'))
        .width(200)
        .height(100)
        .border({ width: 1 })
          // 不保持宽高比进行放大缩小,使得图片充满显示边界。
        .objectFit(ImageFit.Fill)
        .overlay('Fill', { align: Alignment.Bottom, offset: { x: 0, y: 20 } })
      Image($r('app.media.pic1'))
        .width(200)
        .height(100)
        .border({ width: 1 })
          // 保持宽高比显示,图片缩小或者保持不变。
        .objectFit(ImageFit.ScaleDown)
        .overlay('ScaleDown', { align: Alignment.Bottom, offset: { x: 0, y: 20 } })
      Image($r('app.media.pic1'))
        .width(200)
        .height(100)
        .border({ width: 1 })
          // 保持原有尺寸显示。
        .objectFit(ImageFit.None)
        .overlay('None', { align: Alignment.Bottom, offset: { x: 0, y: 20 } })
    }

  }
  .width('100%')
  .height('100%')
    .justifyContent(FlexAlign.Start)
    .alignItems(HorizontalAlign.Center)
  }
}
显示效果:
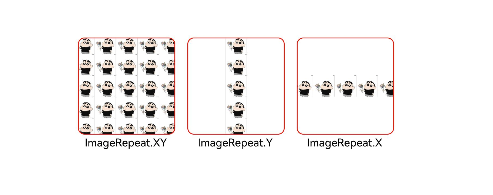
- 设置图片重复样式
.objectRepeat(ImageRepeat.XY): 在水平轴和竖直轴上同时重复绘制图片
.objectRepeat(ImageRepeat.X): 只在水平轴上重复绘制图片
.objectRepeat(ImageRepeat.Y): 只在竖直轴上重复绘制图片
案例代码如下:
@Entry
@Component
struct ImageDemo {
  build() {
    Column({space: 15}) {
      Row({ space: 15 }) {
        Image($r('app.media.pic1_low'))
            .size({width: 120, height: 120})
            .border({width: 1,color: Color.Red, radius: 8})
            // 在水平轴和竖直轴上同时重复绘制图片
            .objectRepeat(ImageRepeat.XY)
            .objectFit(ImageFit.ScaleDown)

            .overlay('ImageRepeat.XY', { align: Alignment.Bottom, offset: { x: 0, y: 20 } })

        Image($r('app.media.pic1_low'))
            .size({width: 120, height: 120})
            .border({width: 1,color: Color.Red, radius: 8})
            // 只在竖直轴上重复绘制图片
            .objectRepeat(ImageRepeat.Y)
            .objectFit(ImageFit.ScaleDown)
            .overlay('ImageRepeat.Y', { align: Alignment.Bottom, offset: { x: 0, y: 20 } })

        Image($r('app.media.pic1_low'))
            .size({width: 120, height: 120})
            .border({width: 1,color: Color.Red, radius: 8})
            // 只在水平轴上重复绘制图片
            .objectRepeat(ImageRepeat.X)
            .objectFit(ImageFit.ScaleDown)
            .overlay('ImageRepeat.X', { align: Alignment.Bottom, offset: { x: 0, y: 20 } })
    }
  }
    .width('100%')
    .height('100%')
    .justifyContent(FlexAlign.Start)
    .alignItems(HorizontalAlign.Center)
  }
}
显示效果: