Spring原理基础
Spring 高级
1 容器与Bean
1.1 接口容器
1.1.1 BeanFactory是什么
@SpringBootApplication
public class ShowApplication {

    public static void main(String[] args) {
        ConfigurableApplicationContext context = SpringApplication.run(ShowApplication.class, args);
        /**
         *  1、到底什么是 BeanFactory
         *  - 它是 ApplicationContext 的父接口
         *  - 它才是 Spring 的核心容器,主要的 ApplicationContext 实现 【组合】 了它的功能
         */
        System.out.println(context);

    }

}
1.1.2 BeanFactory作用
@SpringBootApplication
public class ShowApplication {

    public static void main(String[] args) throws NoSuchFieldException, IllegalAccessException {
        ConfigurableApplicationContext context = SpringApplication.run(ShowApplication.class, args);
        /**
         BeanFactory 能干点啥
            - 表面上只有 getBean
            - 实际上控制反转、基本的依赖注入、直至 Bean 的生命周期的各种功能,都由它的实现类提供
                - 例子中通过反射查看了它的成员变量 singletonObjects,内部包含了所有的单例 bean
         */
        Field singletonObjects = DefaultSingletonBeanRegistry.class.getDeclaredField("singletonObjects");
        singletonObjects.setAccessible(true);
        ConfigurableListableBeanFactory beanFactory = context.getBeanFactory();
        Map<String,Object> map = (Map<String, Object>) singletonObjects.get(beanFactory);
        map.entrySet().stream().filter(e -> e.getKey().startsWith("component"))
                .forEach(e -> System.out.println(e.getKey() + " = " + e.getValue()));

    }

}

1.1.3 applicationContext和BeanFactory比较
@SpringBootApplication
public class ShowApplication {

    public static void main(String[] args) throws NoSuchFieldException, IllegalAccessException, IOException {
        ConfigurableApplicationContext context = SpringApplication.run(ShowApplication.class, args);

        /**
         * 3、applicationContext 比 BeanFactory 多点啥
                 - ApplicationContext 组合并扩展了 BeanFactory 的功能
        		 - 国际化、通配符方式获取一组 Resource 资源、整合 Environment 环境、事件发布与监听
        		 - 新学一种代码之间解耦途径,事件解耦
         */
        //context.getMessage("hello",null, Locale.CHINA);//国际化
        //classpath* 加一个* 代表去jar包中找
        Resource[] resources = context.getResources("classpath*:META-INF/spring.factories");//资源加载
        for (Resource resource : resources) {
            System.out.println(resource);
        }
        //获取环境变量,不区分大小写
        System.out.println(context.getEnvironment().getProperty("java_home"));
    }

}

1.1.4 事件处理
事件处理: 实现组件之间的解耦
UserRegisteredEvent
public class UserRegisteredEvent extends ApplicationEvent {
    //事件,source: 事件源
    public UserRegisteredEvent(Object source) {
        super(source);
    }
}
@SpringBootApplication
public class ShowApplication {

    public static void main(String[] args) throws NoSuchFieldException, IllegalAccessException, IOException {

        ConfigurableApplicationContext context = SpringApplication.run(ShowApplication.class, args);
        context.publishEvent(new UserRegisteredEvent(context));//发送事件
    }

}
@Component
public class Component2 {
    private static final Logger log=   LoggerFactory.getLogger(Component2.class);

    @EventListener
    public void aaa(UserRegisteredEvent event){
        System.out.println(event);
    }
}

@Component
public class Component1 {
    private static final Logger log=   LoggerFactory.getLogger(Component1.class);

    @Autowired
    public ApplicationEventPublisher context;
    public void register(){
        log.info("用户注册");
        context.publishEvent(new UserRegisteredEvent(this));
    }
}
@Component
public class Component2 {
    private static final Logger log=   LoggerFactory.getLogger(Component2.class);

    @EventListener
    public void aaa(UserRegisteredEvent event){
        System.out.println(event);
        log.info("发送短信");
    }
}
@SpringBootApplication
public class ShowApplication {

    public static void main(String[] args) throws NoSuchFieldException, IllegalAccessException, IOException {
        ConfigurableApplicationContext context = SpringApplication.run(ShowApplication.class, args);
        context.getBean(Component1.class).register();
    }
}

1.2 容器实现
Spring 的发展历史较为悠久,因此很多资料还在讲解它较旧的实现,这里出于怀旧的原因,把它们都列出来,供大家参考
- DefaultListableBeanFactory,是 BeanFactory 最重要的实现,像控制反转和依赖注入功能,都是它来实现
- ClassPathXmlApplicationContext,从类路径查找 XML 配置文件,创建容器(旧)
- FileSystemXmlApplicationContext,从磁盘路径查找 XML 配置文件,创建容器(旧)
- XmlWebApplicationContext,传统 SSM 整合时,基于 XML 配置文件的容器(旧)
- AnnotationConfigWebApplicationContext,传统 SSM 整合时,基于 java 配置类的容器(旧)
- AnnotationConfigApplicationContext,Spring boot 中非 web 环境容器(新)
- AnnotationConfigServletWebServerApplicationContext,Spring boot 中 servlet web 环境容器(新)
- AnnotationConfigReactiveWebServerApplicationContext,Spring boot 中 reactive web 环境容器(新)
另外要注意的是,后面这些带有 ApplicationContext 的类都是 ApplicationContext 接口的实现,但它们是组合了 DefaultListableBeanFactory 的功能,并非继承而来
1.2.1 DefaultListableBeanFactory
package com.feng.beanfactory02;
import org.slf4j.Logger;
import org.slf4j.LoggerFactory;
import org.springframework.beans.factory.annotation.Autowired;
import org.springframework.beans.factory.config.BeanFactoryPostProcessor;
import org.springframework.beans.factory.support.AbstractBeanDefinition;
import org.springframework.beans.factory.support.BeanDefinitionBuilder;
import org.springframework.beans.factory.support.DefaultListableBeanFactory;
import org.springframework.context.annotation.AnnotationConfigUtils;
import org.springframework.context.annotation.Bean;
import org.springframework.context.annotation.Configuration;
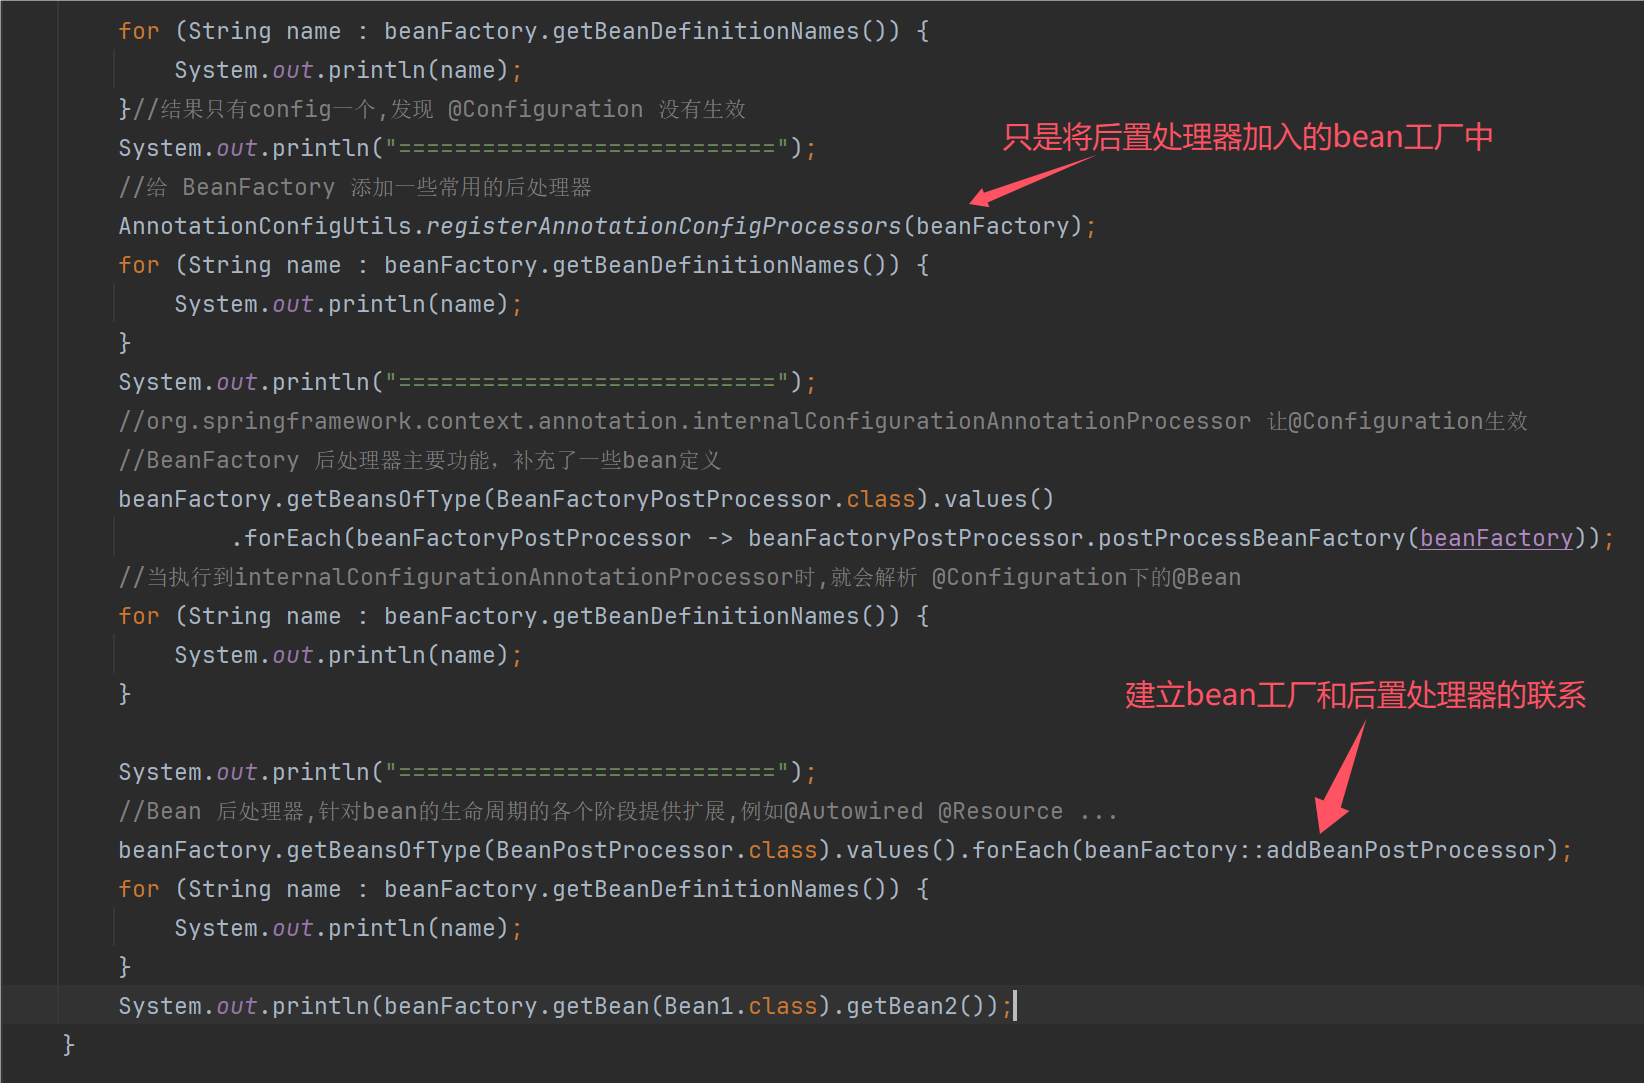
public class TestBeanFactory {
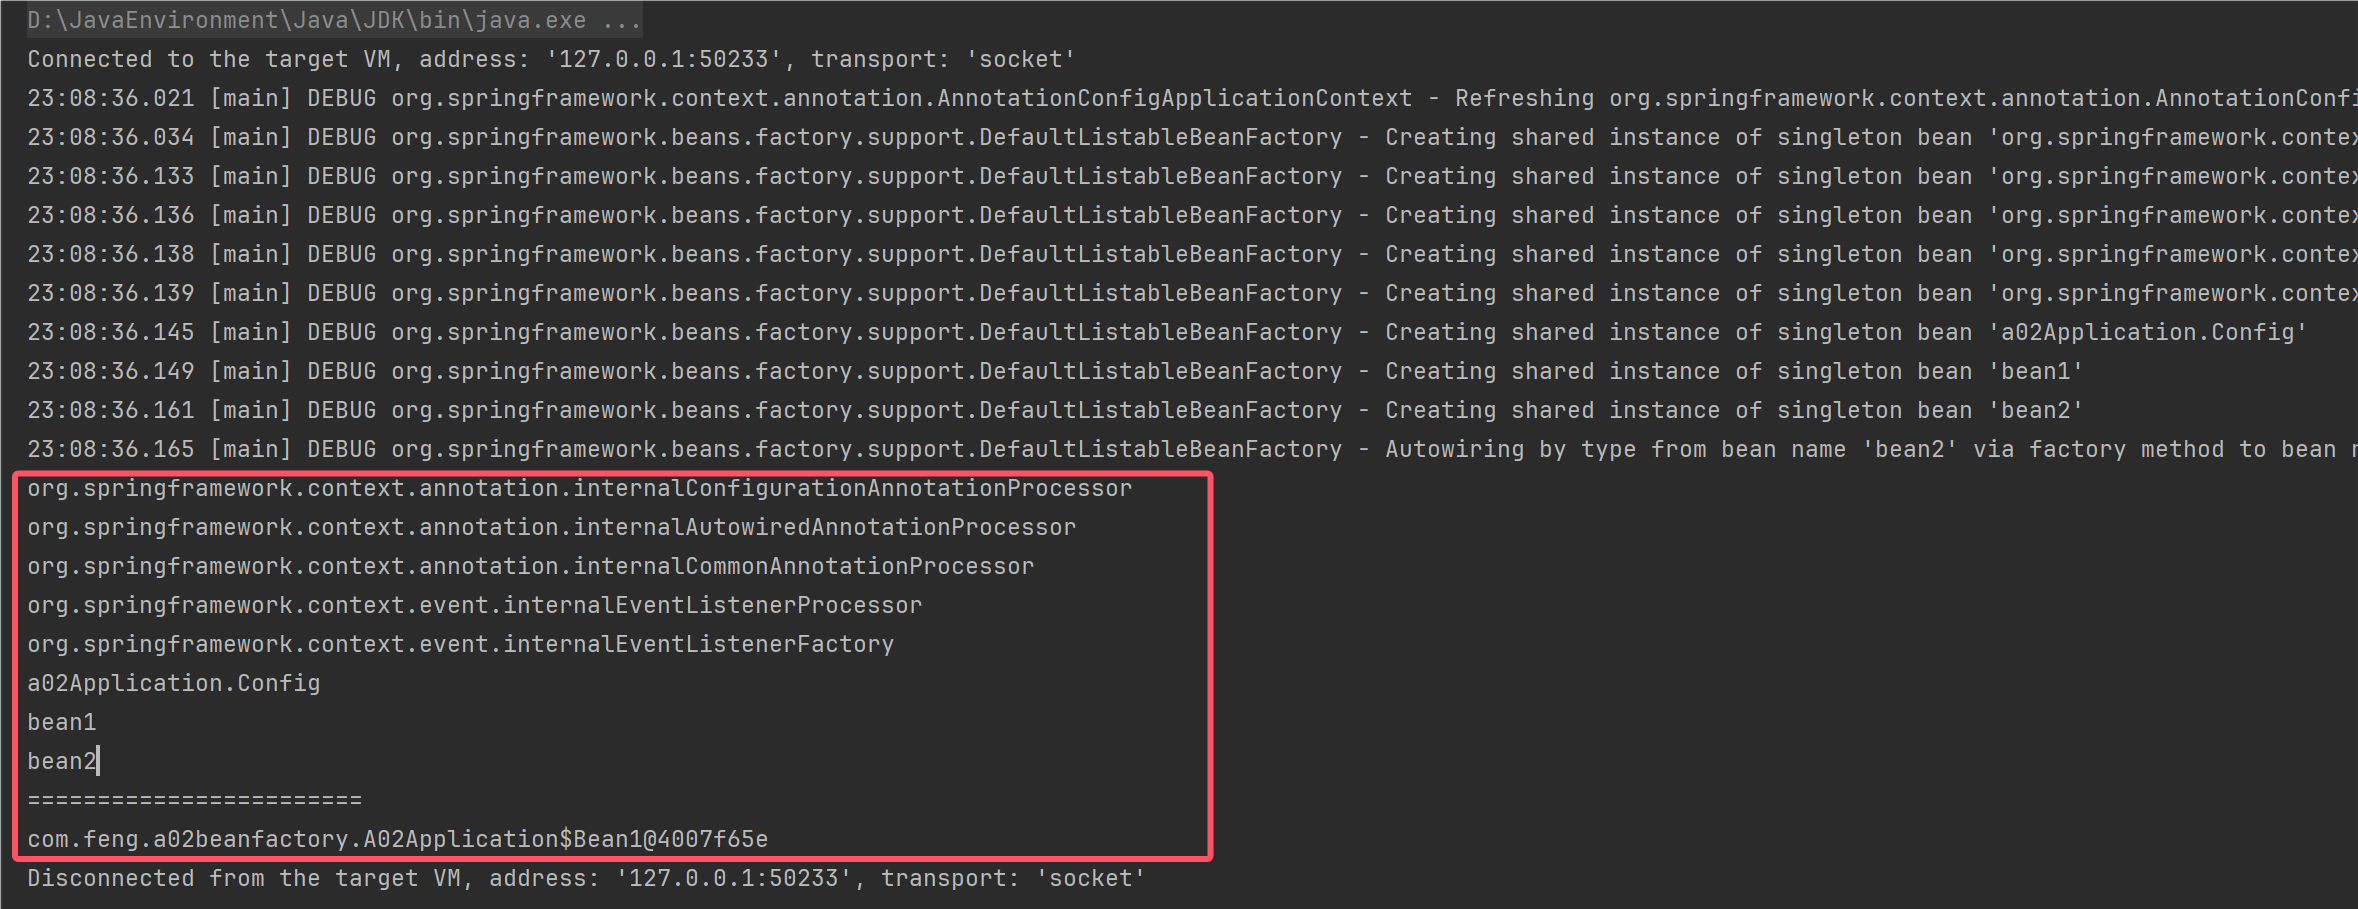
public static void main(String[] args) {
DefaultListableBeanFactory beanFactory = new DefaultListableBeanFactory();
//bean 的定义(class,scope,初始化,销毁)
AbstractBeanDefinition beanDefinition =
BeanDefinitionBuilder.genericBeanDefinition(Config.class).setScope("singleton").getBeanDefinition();
beanFactory.registerBeanDefinition("config",beanDefinition);
for (String name : beanFactory.getBeanDefinitionNames()) {
System.out.println(name);
}//结果只有config一个,发现 @Configuration 没有生效
System.out.println("===========================");
//给 BeanFactory 添加一些常用的后处理器
AnnotationConfigUtils.registerAnnotationConfigProcessors(beanFactory);
for (String name : beanFactory.getBeanDefinitionNames()) {
System.out.println(name);
}
System.out.println("===========================");
//org.springframework.context.annotation.internalConfigurationAnnotationProcessor 让@Configuration生效
//BeanFactory 后处理器主要功能,补充了一些bean定义
beanFactory.getBeansOfType(BeanFactoryPostProcessor.class).values()
.stream().forEach(beanFactoryPostProcessor -> beanFactoryPostProcessor.postProcessBeanFactory(beanFactory));
//当执行到internalConfigurationAnnotationProcessor时,就会解析 @Configuration下的@Bean
for (String name : beanFactory.getBeanDefinitionNames()) {
System.out.println(name);
}
}
@Configuration
static class Config{
@Bean
public Bean1 bean1(){
return new Bean1();
}
@Bean
public Bean2 bean2(){
return new Bean2();
}
}
static class Bean1{
private static final Logger log = LoggerFactory.getLogger(Bean1.class);
public Bean1(){
log.info("构造 Bean1()");
}
@Autowired
private Bean2 bean2;
public Bean2 getBean2(){
return bean2;
}
}
static class Bean2{
private static final Logger log = LoggerFactory.getLogger(Bean2.class);
public Bean2(){
log.info("构造 Bean2()");
}
}
}
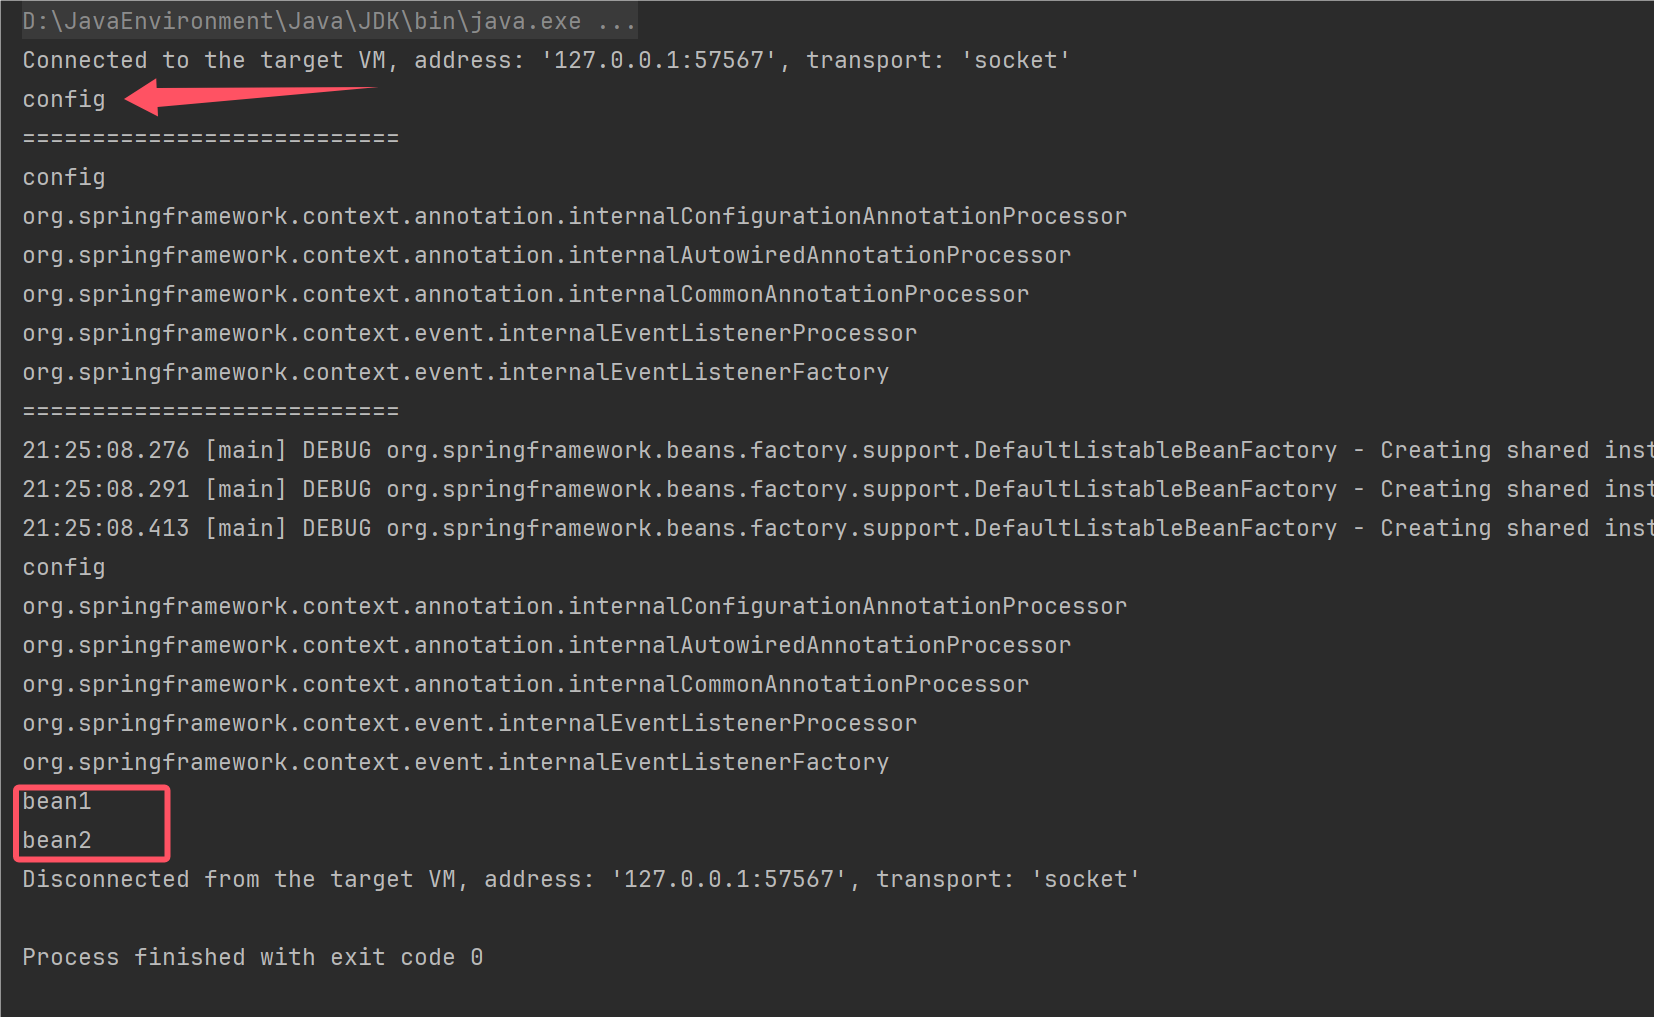
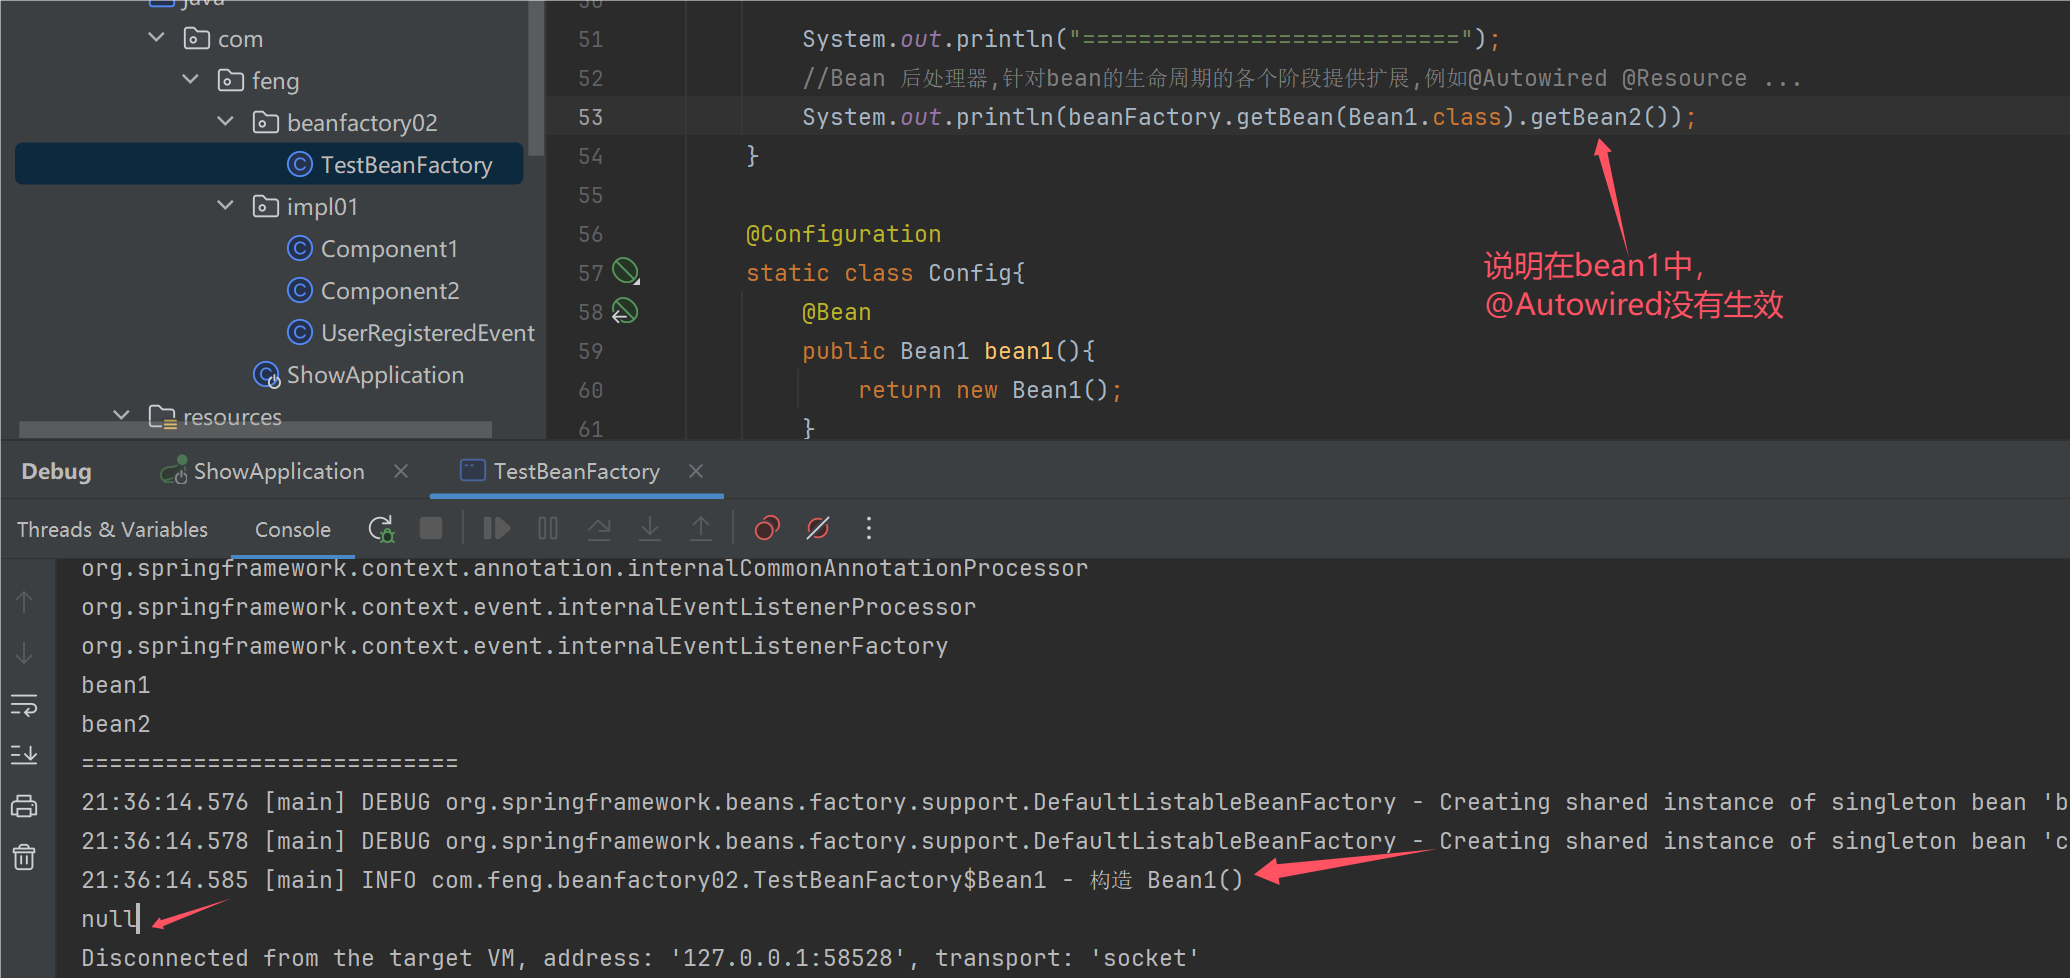
System.out.println("===========================");
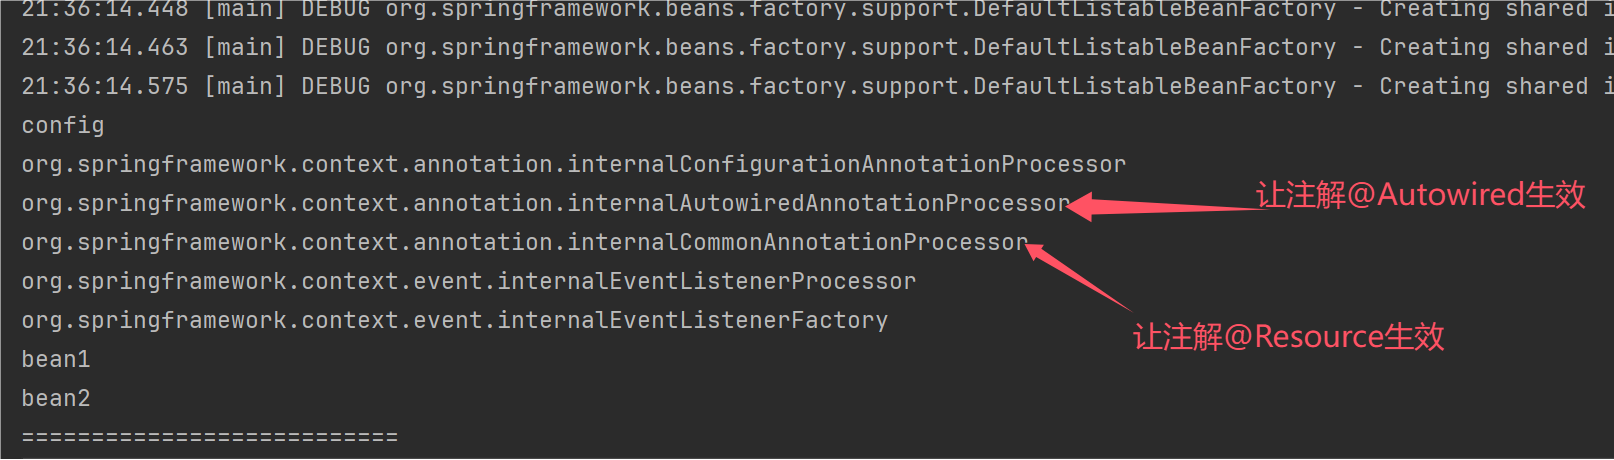
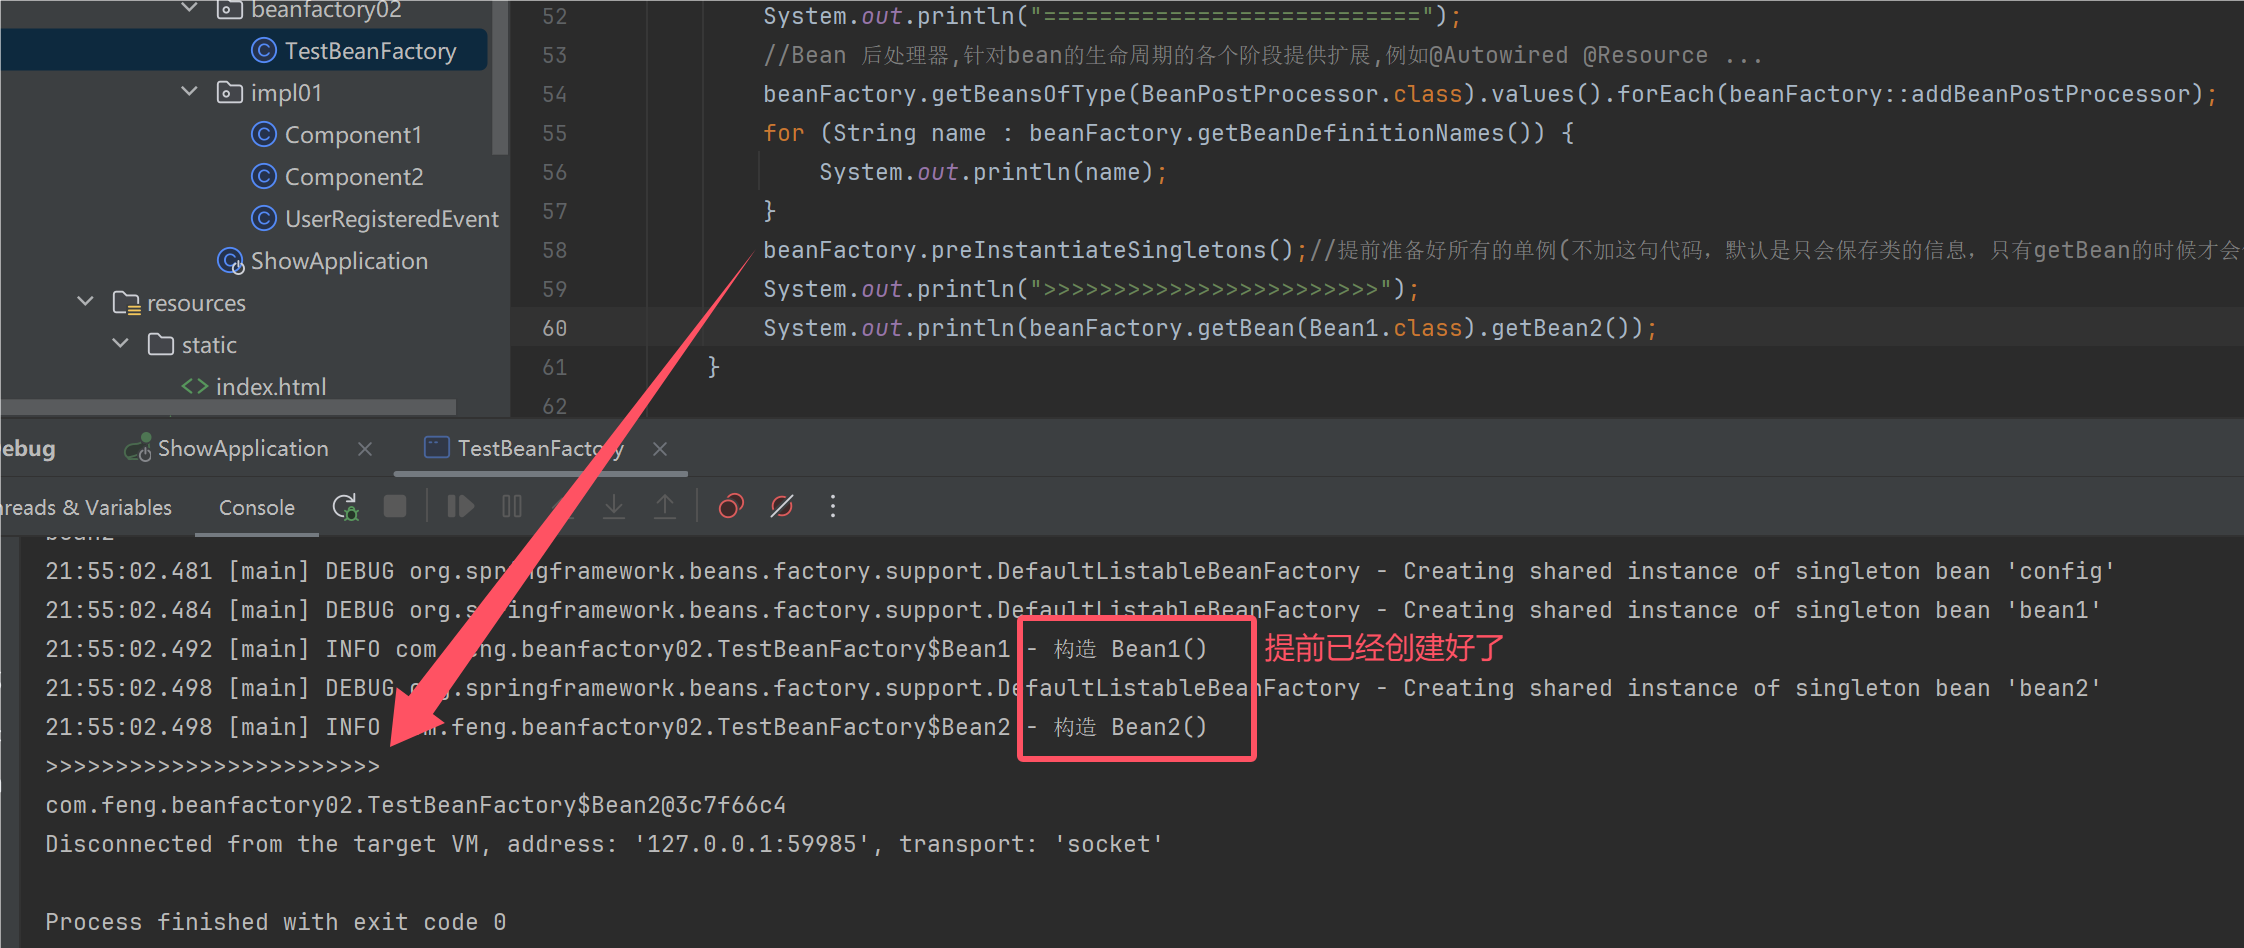
//Bean 后处理器,针对bean的生命周期的各个阶段提供扩展,例如@Autowired @Resource ...
beanFactory.getBeansOfType(BeanPostProcessor.class).values().forEach(beanFactory::addBeanPostProcessor);
for (String name : beanFactory.getBeanDefinitionNames()) {
System.out.println(name);
}
System.out.println(beanFactory.getBean(Bean1.class).getBean2());
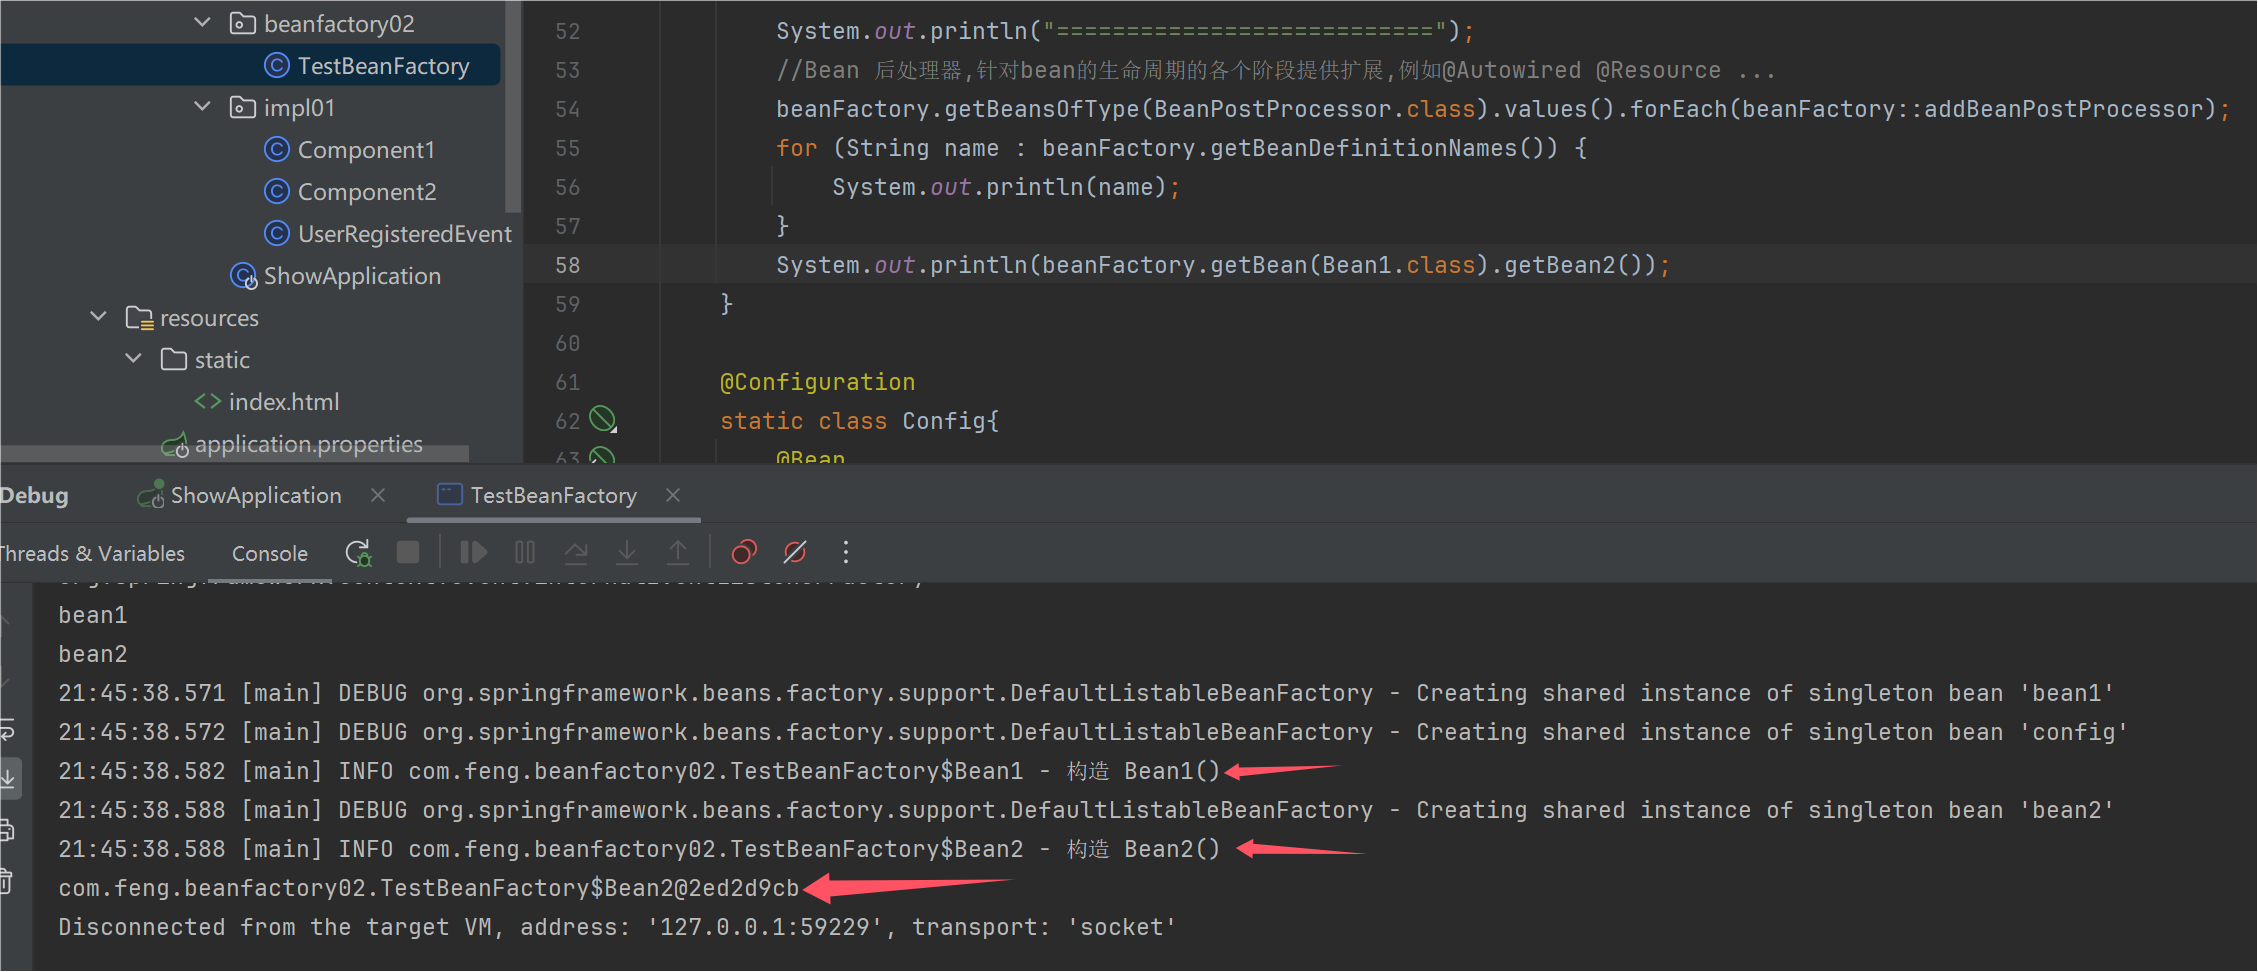
//Bean 后处理器,针对bean的生命周期的各个阶段提供扩展,例如@Autowired @Resource ...
beanFactory.getBeansOfType(BeanPostProcessor.class).values().forEach(beanFactory::addBeanPostProcessor);
for (String name : beanFactory.getBeanDefinitionNames()) {
    System.out.println(name);
}
beanFactory.preInstantiateSingletons();//提前准备好所有的单例(不加这句代码,默认是只会保存类的信息,只有getBean的时候才会创建实例)
System.out.println(">>>>>>>>>>>>>>>>>>>>>>>>");
System.out.println(beanFactory.getBean(Bean1.class).getBean2());
/**
   学到了什么:
    a.beanFactory不会做的事
         1.不会主动调用BeanFactory 后处理器
         2.不会主动添加Bean 后处理器
         3.不会主动初始化单例
         4.不会解析beanFactory 还不会解析 ${} 与 #{}
    b.bean后处理器会有排序的逻辑 (@Autowired排在@Resource前面,所以会先注入)

*/
收获💡
- beanFactory 可以通过 registerBeanDefinition 注册一个 bean definition 对象
- 我们平时使用的配置类、xml、组件扫描等方式都是生成 bean definition 对象注册到 beanFactory 当中
- bean definition 描述了这个 bean 的创建蓝图:scope 是什么、用构造还是工厂创建、初始化销毁方法是什么,等等
- beanFactory 需要手动调用 beanFactory 后处理器对它做增强
- 例如通过解析 @Bean、@ComponentScan 等注解,来补充一些 bean definition
- beanFactory 需要手动添加 bean 后处理器,以便对后续 bean 的创建过程提供增强
- 例如 @Autowired,@Resource 等注解的解析都是 bean 后处理器完成的
- bean 后处理的添加顺序会对解析结果有影响,见视频中同时加 @Autowired,@Resource 的例子
- beanFactory 需要手动调用方法来初始化单例
- beanFactory 需要额外设置才能解析 ${} 与 #{}
1.2.2 ApplicationContext实现
方式1
ClassPathXmlApplicationContext
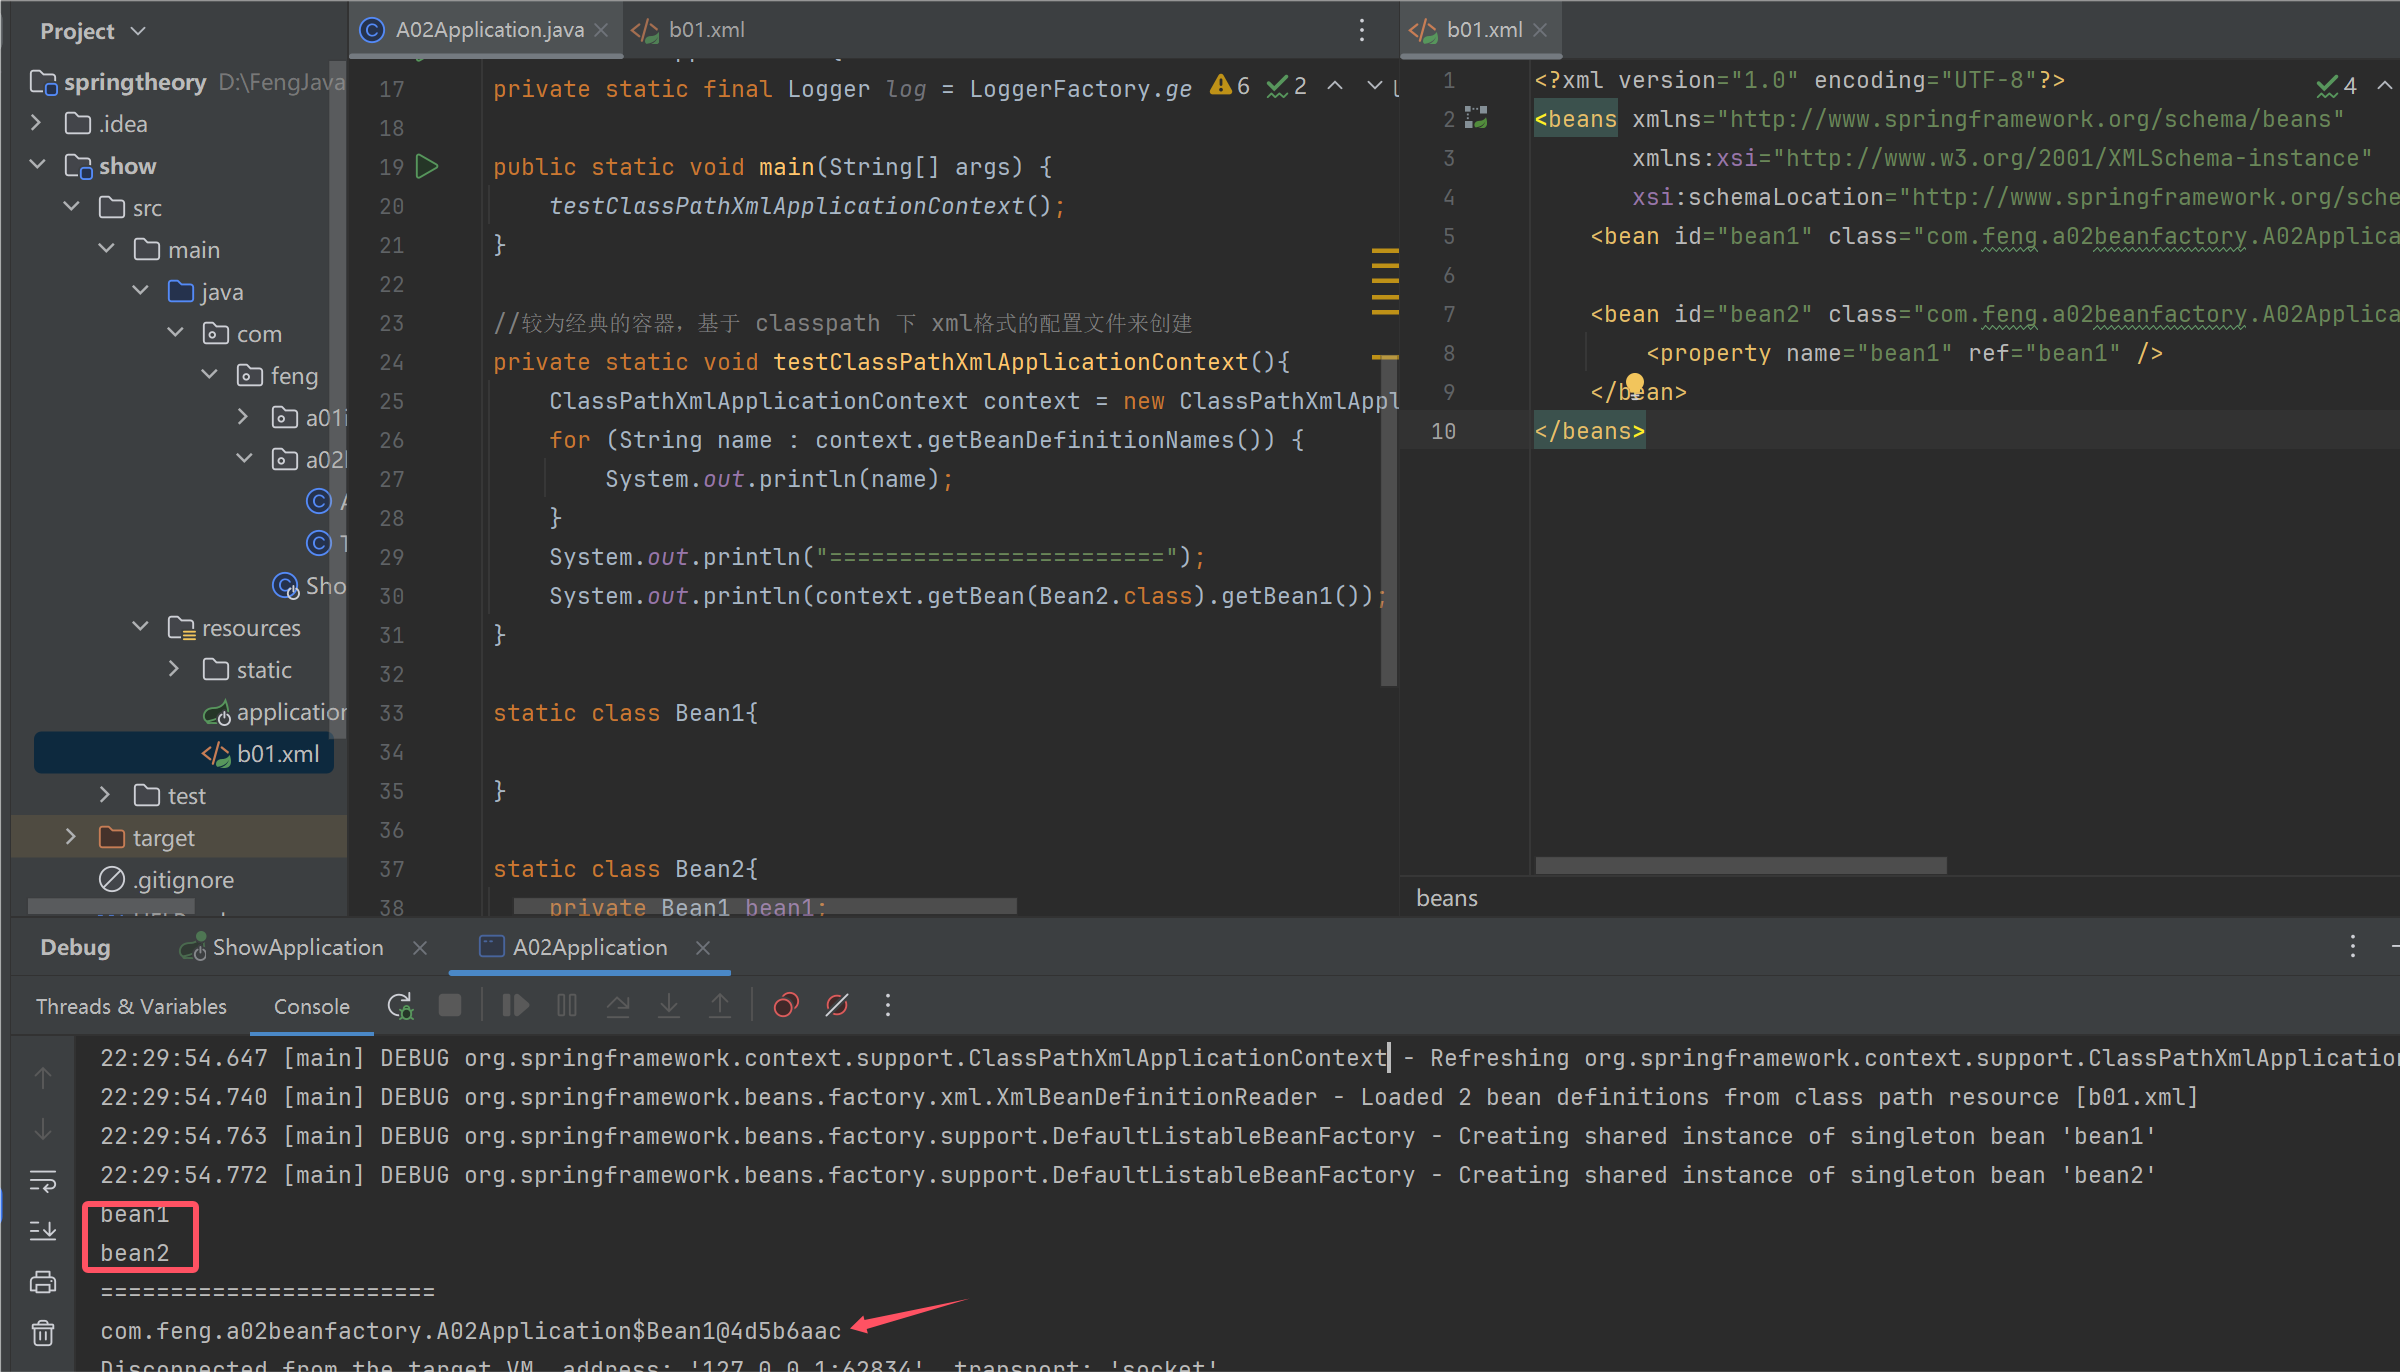
public class A02Application {
    private static final Logger log = LoggerFactory.getLogger(A02Application.class);

    public static void main(String[] args) {
        testClassPathXmlApplicationContext();
    }

    //较为经典的容器,基于 classpath 下 xml格式的配置文件来创建
    private static void testClassPathXmlApplicationContext(){
        ClassPathXmlApplicationContext context = new ClassPathXmlApplicationContext("b01.xml");
        for (String name : context.getBeanDefinitionNames()) {
            System.out.println(name);
        }
        System.out.println("========================");
        System.out.println(context.getBean(Bean2.class).getBean1());
    }

    static class Bean1{

    }

    static class Bean2{
        private Bean1 bean1;

        public void setBean1(Bean1 bean1) {
            this.bean1 = bean1;
        }
        public Bean1 getBean1() {
            return bean1;
        }
    }
}
b01.xml
<?xml version="1.0" encoding="UTF-8"?>
<beans xmlns="http://www.springframework.org/schema/beans"
       xmlns:xsi="http://www.w3.org/2001/XMLSchema-instance"
       xsi:schemaLocation="http://www.springframework.org/schema/beans http://www.springframework.org/schema/beans/spring-beans.xsd">
    <bean id="bean1" class="com.feng.a02beanfactory.A02Application.Bean1"/>

    <bean id="bean2" class="com.feng.a02beanfactory.A02Application.Bean2">
        <property name="bean1" ref="bean1" />
    </bean>
</beans>
方式2
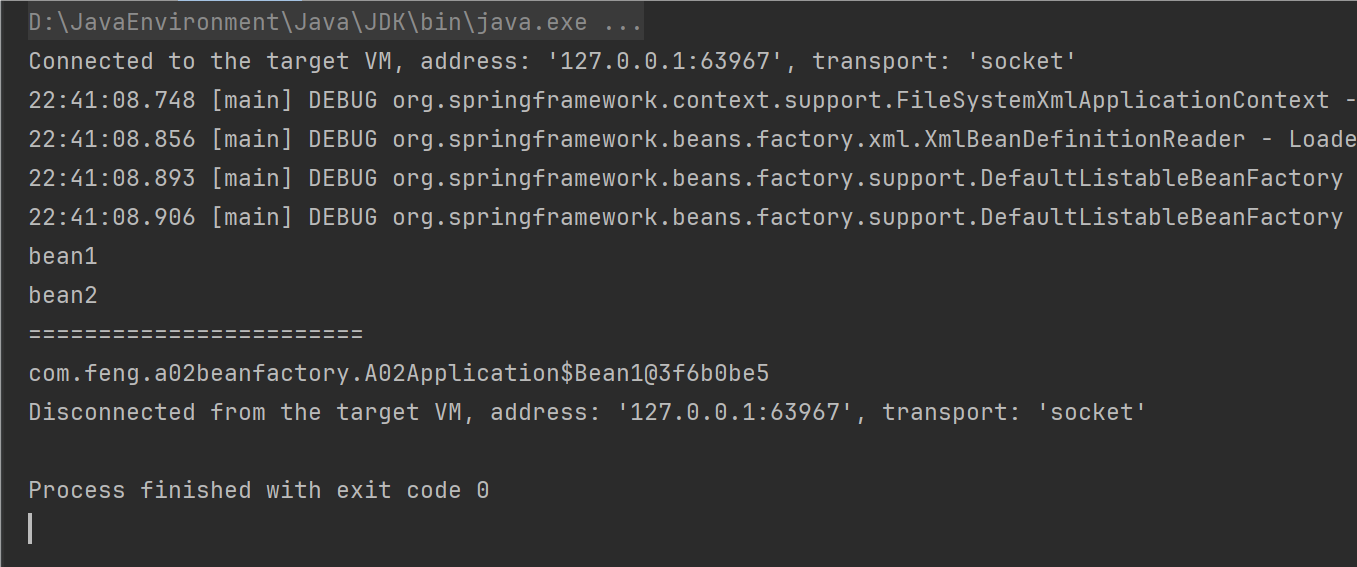
FileSystemXmlApplicationContext
public static void main(String[] args) {
    //testClassPathXmlApplicationContext();
    testFileSystemXmlApplicationContext();
}

//基于磁盘路径下xml 格式的配置文件来创建
private static void testFileSystemXmlApplicationContext(){
    FileSystemXmlApplicationContext context =
            new FileSystemXmlApplicationContext(
                    "D:\\FengJavaProject\\springtheory\\show\\src\\main\\resources\\b01.xml");
    for (String name : context.getBeanDefinitionNames()) {
        System.out.println(name);
    }
    System.out.println("========================");
    System.out.println(context.getBean(Bean2.class).getBean1());
}
使用ClassPathXmlApplicationContext、FileSystemXmlApplicationContext的底层原理
public static void main(String[] args) {
    //testClassPathXmlApplicationContext();
    //testFileSystemXmlApplicationContext();

    DefaultListableBeanFactory beanFactory = new DefaultListableBeanFactory();
    System.out.println("===读取之前===");
    for (String name : beanFactory.getBeanDefinitionNames()) {
        System.out.println(name);
    }
    System.out.println("===读取之后===");
    //将读取到的bean放到beanFactory
    XmlBeanDefinitionReader reader = new XmlBeanDefinitionReader(beanFactory);
    //开始从配置文件中读取bean
    reader.loadBeanDefinitions(new ClassPathResource("b01.xml"));
    //或者使用  reader.loadBeanDefinitions(new 	   FileSystemResource("D:\\FengJavaProject\\springtheory\\show\\src\\main\\resources\\b01.xml"));
    for (String name : beanFactory.getBeanDefinitionNames()) {
        System.out.println(name);
    }
}

方式3
AnnotationConfigApplicationContext
//较为经典的容器,基于 java配置类来创建
private static void testAnnotationConfigApplicationContext(){
    AnnotationConfigApplicationContext context = new AnnotationConfigApplicationContext(Config.class);
    for (String name : context.getBeanDefinitionNames()) {
        System.out.println(name);
    }
    System.out.println("========================");
    System.out.println(context.getBean(Bean2.class).getBean1());
}

@Configuration
static class Config{
    @Bean
    public Bean1 bean1(){
        return new Bean1();
    }

    @Bean
    public Bean2 bean2(Bean1 bean1){
        Bean2 bean2 = new Bean2();
        bean2.setBean1(bean1);
        return bean2;
    }
}


static class Bean1{

}

static class Bean2{
    private Bean1 bean1;

    public void setBean1(Bean1 bean1) {
        this.bean1 = bean1;
    }
    public Bean1 getBean1() {
        return bean1;
    }
}
之前用ClassPathXmlApplicationContext方式只有bean1和bean2,没有其他的bean。全部都需要在bean.xml中去配置。但是我们之前可以通过标签的方式去配置
b01.xml
<?xml version="1.0" encoding="UTF-8"?>
<beans xmlns="http://www.springframework.org/schema/beans"
       xmlns:xsi="http://www.w3.org/2001/XMLSchema-instance"
       xmlns:context="http://www.springframework.org/schema/context"
       xsi:schemaLocation="http://www.springframework.org/schema/beans
       http://www.springframework.org/schema/beans/spring-beans.xsd
       http://www.springframework.org/schema/context
       https://www.springframework.org/schema/context/spring-context.xsd">
    <bean id="bean1" class="com.feng.a02beanfactory.A02Application.Bean1"/>

    <bean id="bean2" class="com.feng.a02beanfactory.A02Application.Bean2">
        <property name="bean1" ref="bean1" />
    </bean>
    <!--自动配置其他的bean-->
    <context:annotation-config/>
</beans>
加上这个注解后,ClassPathXmlApplicationContext和AnnotationConfigApplicationContext的结果相同
方式4
@Configuration
static class WebConfig{
//前3个是构建web环境必须的
@Bean
public ServletWebServerFactory servletWebServerFactory(){
//返回一个tomcat
return new TomcatServletWebServerFactory();
}
@Bean
public DispatcherServlet dispatcherServlet(){
//返回一个前端控制器
return new DispatcherServlet();
}
@Bean
public DispatcherServletRegistrationBean registrationBean(DispatcherServlet dispatcherServlet){
//将前端控制器注册到tomcat "/"代表所有的请求都需要经过前端控制器
return new DispatcherServletRegistrationBean(dispatcherServlet,"/");
}
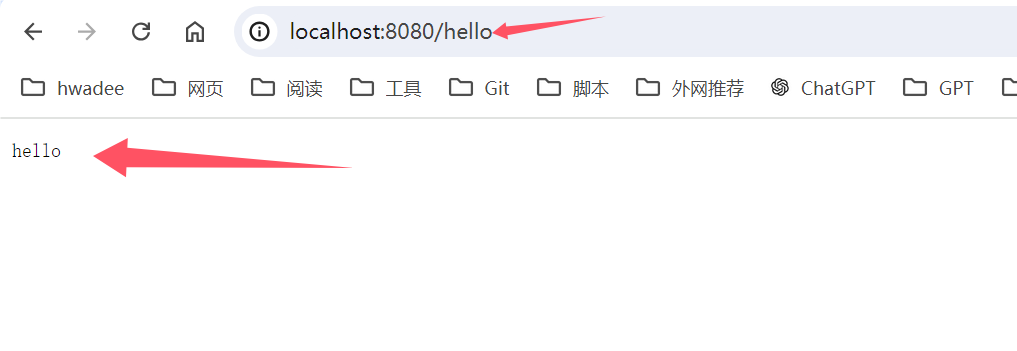
@Bean("/hello")
public Controller controller1(){
//用于处理请求
return (request, response) -> {
response.getWriter().println("hello");
return null;
};
}
}
//较为经典的容器,基于 java配置类来创建,用于web环境
private static void testAnnotationConfigServletWebServerApplicationContext(){
AnnotationConfigServletWebServerApplicationContext context =
new AnnotationConfigServletWebServerApplicationContext(WebConfig.class);
for (String name : context.getBeanDefinitionNames()) {
System.out.println(name);
}
}

1.3 Bean 的生命周期
@Component
public class LifeCycleBean {
    private static final Logger log = LoggerFactory.getLogger(LifeCycleBean.class);

    public LifeCycleBean(){
        log.info("LifeCycleBean 构造");
    }

    @Autowired
    public void autowire(@Value("${JAVA_HOME}") String home){
        log.info("LifeCycleBean 依赖注入, home:{}", home);
    }

    @PostConstruct
    public void init(){
        log.info("LifeCycleBean 初始化");
    }

    @PreDestroy
    public void destory(){
        log.info("LifeCycleBean 销毁");
    }
}
@Component
public class MyBeanPostProcessor implements InstantiationAwareBeanPostProcessor, DestructionAwareBeanPostProcessor {
    private static final Logger log = LoggerFactory.getLogger(MyBeanPostProcessor.class);
    @Override
    public void postProcessBeforeDestruction(Object bean, String beanName) throws BeansException {
        if (beanName.equals("lifeCycleBean")) {
            log.info("<<<<<<销毁之前调用,如@PreDestroy");
        }
    }

    @Override
    public Object postProcessBeforeInstantiation(Class<?> beanClass, String beanName) throws BeansException {
        if (beanName.equals("lifeCycleBean")) {
            log.info("<<<<<<实例化之前执行,这里返回的对象会替换掉原来的 bean");
        }
        return null;
    }

    @Override
    public boolean postProcessAfterInstantiation(Object bean, String beanName) throws BeansException {
        if (beanName.equals("lifeCycleBean")) {
            log.info("<<<<<<实例化之后执行,这里如果返回 false 会跳过依赖注入阶段");
        }
        return true;
    }

    @Override
    public PropertyValues postProcessProperties(PropertyValues pvs, Object bean, String beanName) throws BeansException {
        if (beanName.equals("lifeCycleBean")) {
            log.info("<<<<<<依赖注入阶段执行, 如@Value、@Autowired、@Resource");
        }
        return pvs;
    }

    @Override
    public Object postProcessBeforeInitialization(Object bean, String beanName) throws BeansException {
        if (beanName.equals("lifeCycleBean")) {
            log.info("<<<<<<初始化之前执行,这里返回的对象会替换原来的bean,如@PostConstruct、@ConfigurationProperties");
        }
        return bean;
    }

    @Override
    public Object postProcessAfterInitialization(Object bean, String beanName) throws BeansException {
        if (beanName.equals("lifeCycleBean")) {
            log.info("<<<<<<初始化之后执行,这里返回的对象会替换掉原来的 bean ,如代理增强");
        }
        return bean;
    }
}
@SpringBootApplication
public class A03Application {
    public static void main(String[] args) {
        ConfigurableApplicationContext context = SpringApplication.run(A03Application.class, args);
        context.close();
    }
}
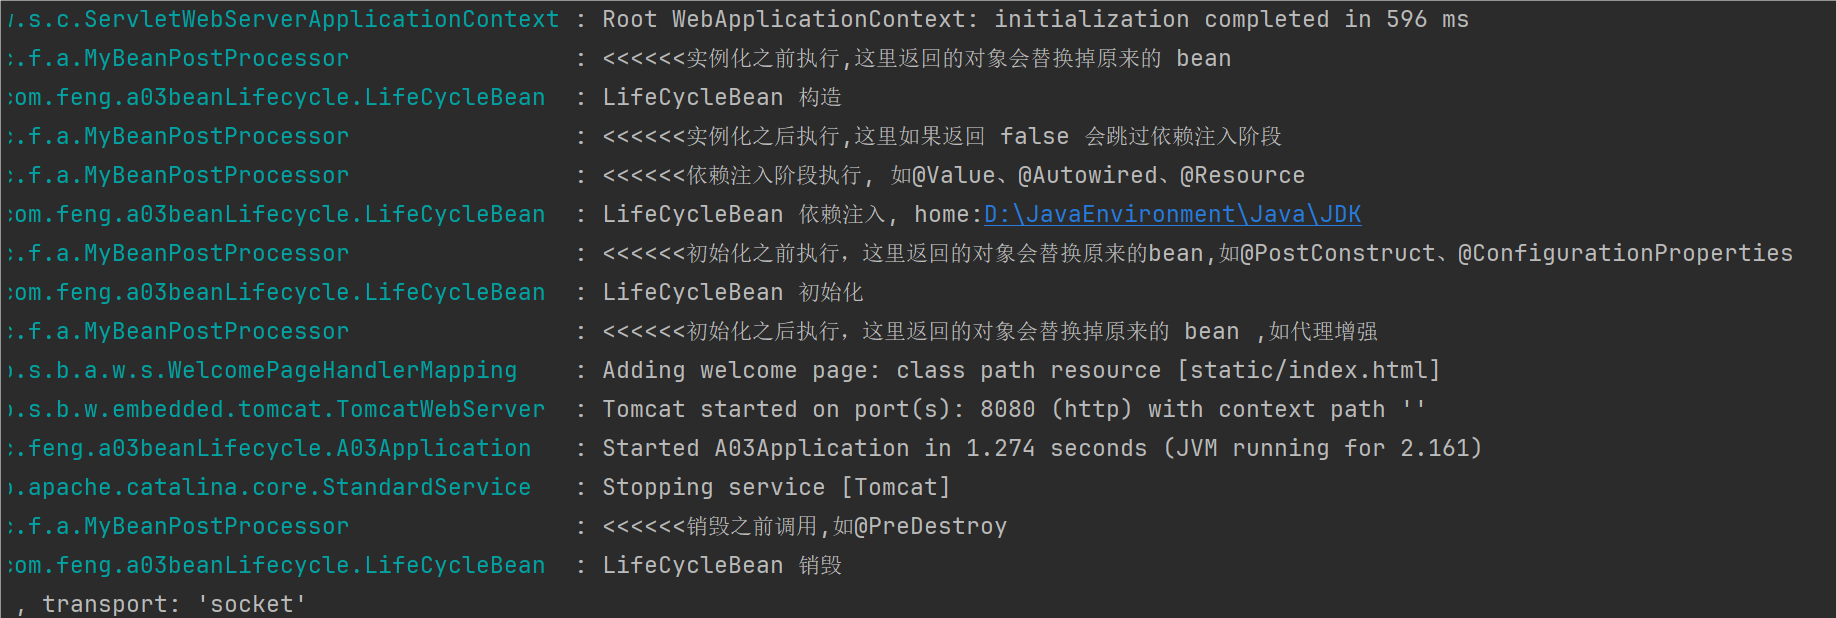
一个受 Spring 管理的 bean,生命周期主要阶段有
- 创建:根据 bean 的构造方法或者工厂方法来创建 bean 实例对象
- 依赖注入:根据 @Autowired,@Value 或其它一些手段,为 bean 的成员变量填充值、建立关系
- 初始化:回调各种 Aware 接口,调用对象的各种初始化方法
- 销毁:在容器关闭时,会销毁所有单例对象(即调用它们的销毁方法)
- prototype 对象也能够销毁,不过需要容器这边主动调用
一些资料会提到,生命周期中还有一类 bean 后处理器:BeanPostProcessor,会在 bean 的初始化的前后,提供一些扩展逻辑。但这种说法是不完整的,见下面的演示1
演示1 - bean 生命周期
代码参考
com.itheima.a03 包
创建前后的增强
- postProcessBeforeInstantiation
- 这里返回的对象若不为 null 会替换掉原本的 bean,并且仅会走 postProcessAfterInitialization 流程
- postProcessAfterInstantiation
- 这里如果返回 false 会跳过依赖注入阶段
依赖注入前的增强
- postProcessProperties
- 如 @Autowired、@Value、@Resource
初始化前后的增强
- postProcessBeforeInitialization
- 这里返回的对象会替换掉原本的 bean
- 如 @PostConstruct、@ConfigurationProperties
- postProcessAfterInitialization
- 这里返回的对象会替换掉原本的 bean
- 如代理增强
销毁之前的增强
- postProcessBeforeDestruction
- 如 @PreDestroy
收获💡
- Spring bean 生命周期各个阶段
- 模板设计模式, 指大流程已经固定好了, 通过接口回调(bean 后处理器)在一些关键点前后提供扩展
模板方法设计模式
public class TestMethodTemplate {

    public static void main(String[] args) {
        MyBeanFactory beanFactory = new MyBeanFactory();
        beanFactory.addBeanPostProcessor(new BeanPostProcessor() {
            @Override
            public void inject(Object bean) {
                System.out.println("解析 @Autowired");
            }
        });
        beanFactory.addBeanPostProcessor(new BeanPostProcessor() {
            @Override
            public void inject(Object bean) {
                System.out.println("解析 @Resource");
            }
        });
        beanFactory.getBean();
    }

    static class MyBeanFactory{
        public Object getBean(){
            Object bean = new Object();
            System.out.println("构造 " +bean);
            System.out.println("依赖注入 " +bean);
            for(BeanPostProcessor processor : processors){
                processor.inject(bean);
            }
            System.out.println("初始化 " +bean);
            return bean;
        }

        private List<BeanPostProcessor> processors = new ArrayList<>();

        public void addBeanPostProcessor(BeanPostProcessor processor){
            processors.add(processor);
        }
    }

    static interface BeanPostProcessor{
        public void inject(Object bean);//对依赖注入阶段的扩展
    }
}
bean 后处理器排序
收获💡
- 实现了 PriorityOrdered 接口的优先级最高
- 实现了 Ordered 接口与加了 @Order 注解的平级, 按数字升序
- 其它的排在最后
1.4 Bean 后处理器
后处理器作用
Bean1
public class Bean1 {
    private static final Logger log = LoggerFactory.getLogger(Bean1.class);
    private Bean2 bean2;

    @Autowired
    public void setBean2(Bean2 bean2) {
        log.debug("@Autowired 生效: {}" ,bean2);
        this.bean2 = bean2;
    }

    private Bean3 bean3;

    @Resource
    public void setBean3(Bean3 bean3) {
        log.debug("@Resource 生效: {}" ,bean3);
        this.bean3 = bean3;
    }

    private String home;

    /**
     * 如果参数是对象, @Autowired会根据参数类型自动注入,如果是参数是字符串则不会。
     * @Value注解会生效,如果参数是字符串,@Autowired会失效。
     * @param home
     */
    @Autowired
    public void setHome(@Value("${JAVA_HOME}") String home) {
        log.debug("@Value 生效: {}" ,home);
        this.home = home;
    }

    @PostConstruct
    public void init(){
        log.debug("@PostConstruct 生效");
    }

    @PreDestroy
    public void destroy(){
        log.debug("@PreDestroy 生效");
    }

    @Override
    public String toString() {
        return "Bean1{" +
        "bean2="+ bean2 +
        ", bean3="+ bean3 +
        ", home='"+ home +'\''+
                '}';
    }
}
Bean2
public class Bean2 {
}
Bean3
public class Bean3 {
}
A04Application
public class A04Application {
    public static void main(String[] args) {
        //GenericApplicationContext 是一个【干净】的容器
        GenericApplicationContext context = new GenericApplicationContext();

        //用原始的方法注册三个bean
        context.registerBean("bean1", Bean1.class);
        context.registerBean("bean2", Bean2.class);
        context.registerBean("bean3", Bean3.class);
        context.getDefaultListableBeanFactory()
                .setAutowireCandidateResolver(new ContextAnnotationAutowireCandidateResolver());//帮助@Value值获取
        context.registerBean(AutowiredAnnotationBeanPostProcessor.class);//@Autowired @Value

        context.registerBean(CommonAnnotationBeanPostProcessor.class); //@Resource  @PostConstruct @PreDestroy
        //初始化容器
        context.refresh(); //执行beanFactory后处理器,添加bean后处理器,初始化所有单例

        //销毁容器
        context.close();

    }
}
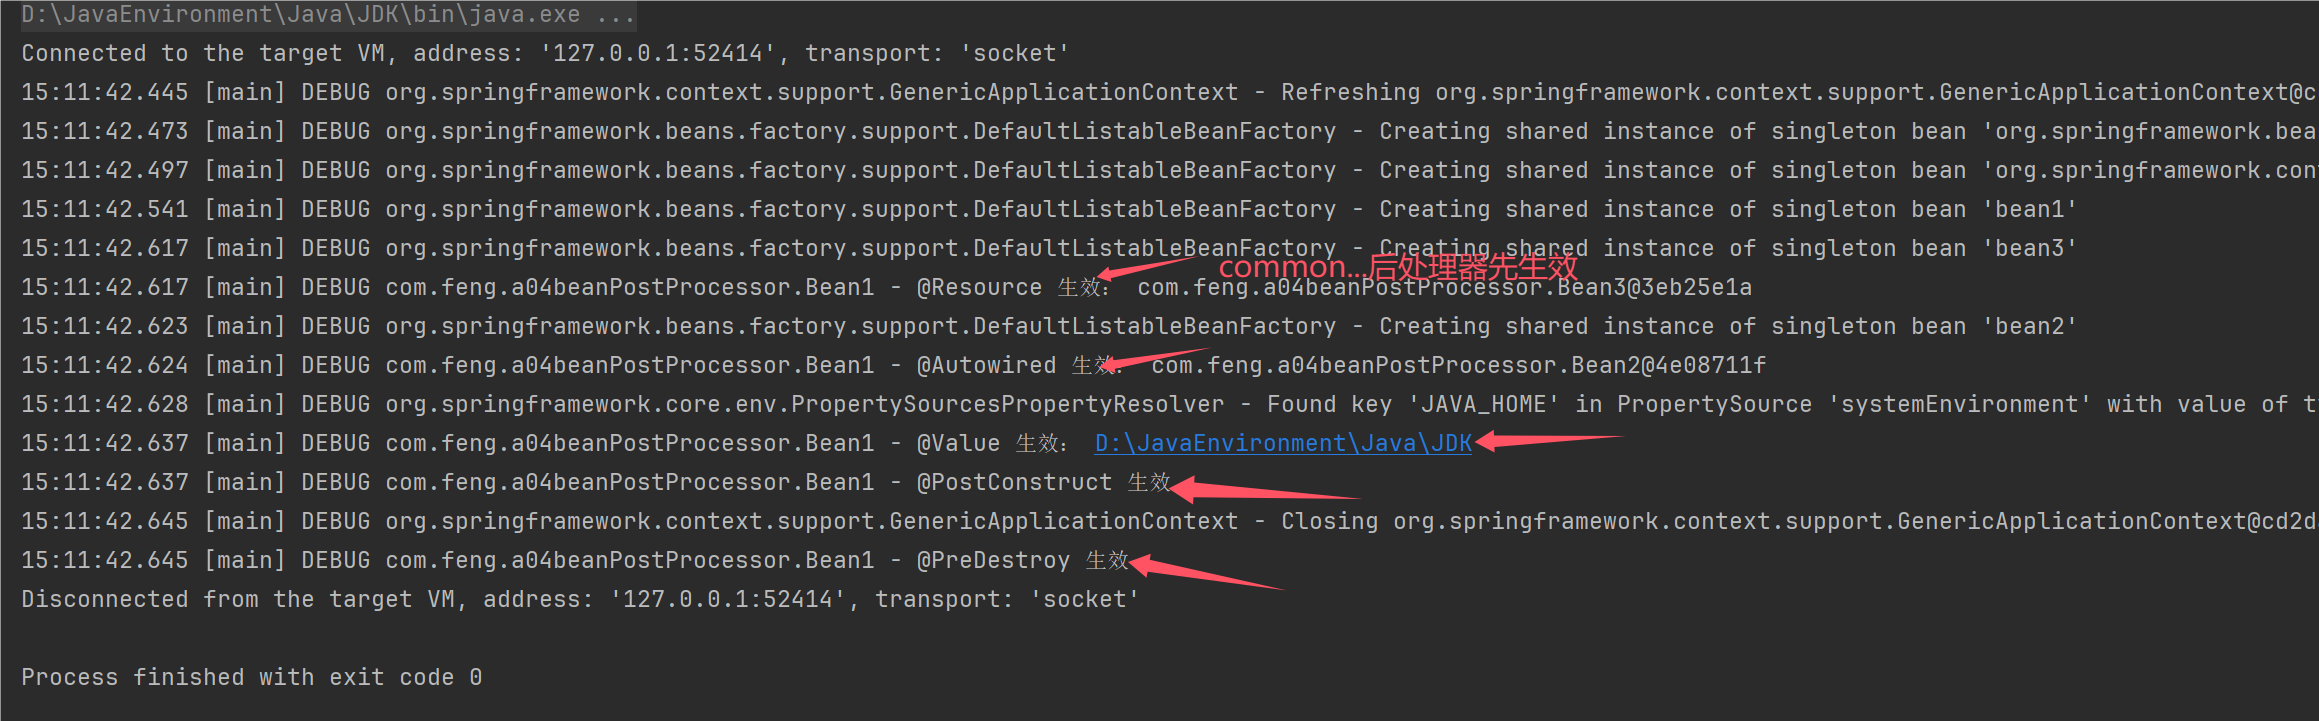
收获💡
- @Autowired 等注解的解析属于 bean 生命周期阶段(依赖注入, 初始化)的扩展功能,这些扩展功能由 bean 后处理器来完成
- 每个后处理器各自增强什么功能
- AutowiredAnnotationBeanPostProcessor 解析 @Autowired 与 @Value
- CommonAnnotationBeanPostProcessor 解析 @Resource、@PostConstruct、@PreDestroy
- ConfigurationPropertiesBindingPostProcessor 解析 @ConfigurationProperties
- 另外 ContextAnnotationAutowireCandidateResolver 负责获取 @Value 的值,解析 @Qualifier、泛型、@Lazy 等
@ConfigurationProperties(prefix = "xxx")作用
Bean4
/**
 * java.home =
 * java.version =
 */
@ConfigurationProperties(prefix = "java")
public class Bean4 {
    private String home;
    private String version;

    public String getHome() {
        return home;
    }

    public void setHome(String home) {
        this.home = home;
    }

    public String getVersion() {
        return version;
    }

    public void setVersion(String version) {
        this.version = version;
    }

    @Override
    public String toString() {
        return "Bean4{" +
                "home='" + home + '\'' +
                ", version='" + version + '\'' +
                '}';
    }
}
A04Application
public class A04Application {
    public static void main(String[] args) {
        //GenericApplicationContext 是一个【干净】的容器
        GenericApplicationContext context = new GenericApplicationContext();

        //用原始的方法注册三个bean
        context.registerBean("bean1", Bean1.class);
        context.registerBean("bean2", Bean2.class);
        context.registerBean("bean3", Bean3.class);
        context.registerBean("bean4", Bean4.class);

        context.getDefaultListableBeanFactory()
                .setAutowireCandidateResolver(new ContextAnnotationAutowireCandidateResolver());//帮助@Value值获取
        context.registerBean(AutowiredAnnotationBeanPostProcessor.class);//@Autowired @Value

        context.registerBean(CommonAnnotationBeanPostProcessor.class); //@Resource  @PostConstruct @PreDestroy

        ConfigurationPropertiesBindingPostProcessor.register(context.getDefaultListableBeanFactory());//@ConfigurationProperties
        //初始化容器
        context.refresh(); //执行beanFactory后处理器,添加bean后处理器,初始化所有单例

        System.out.println(context.getBean(Bean4.class));
        //销毁容器
        context.close();

    }
}
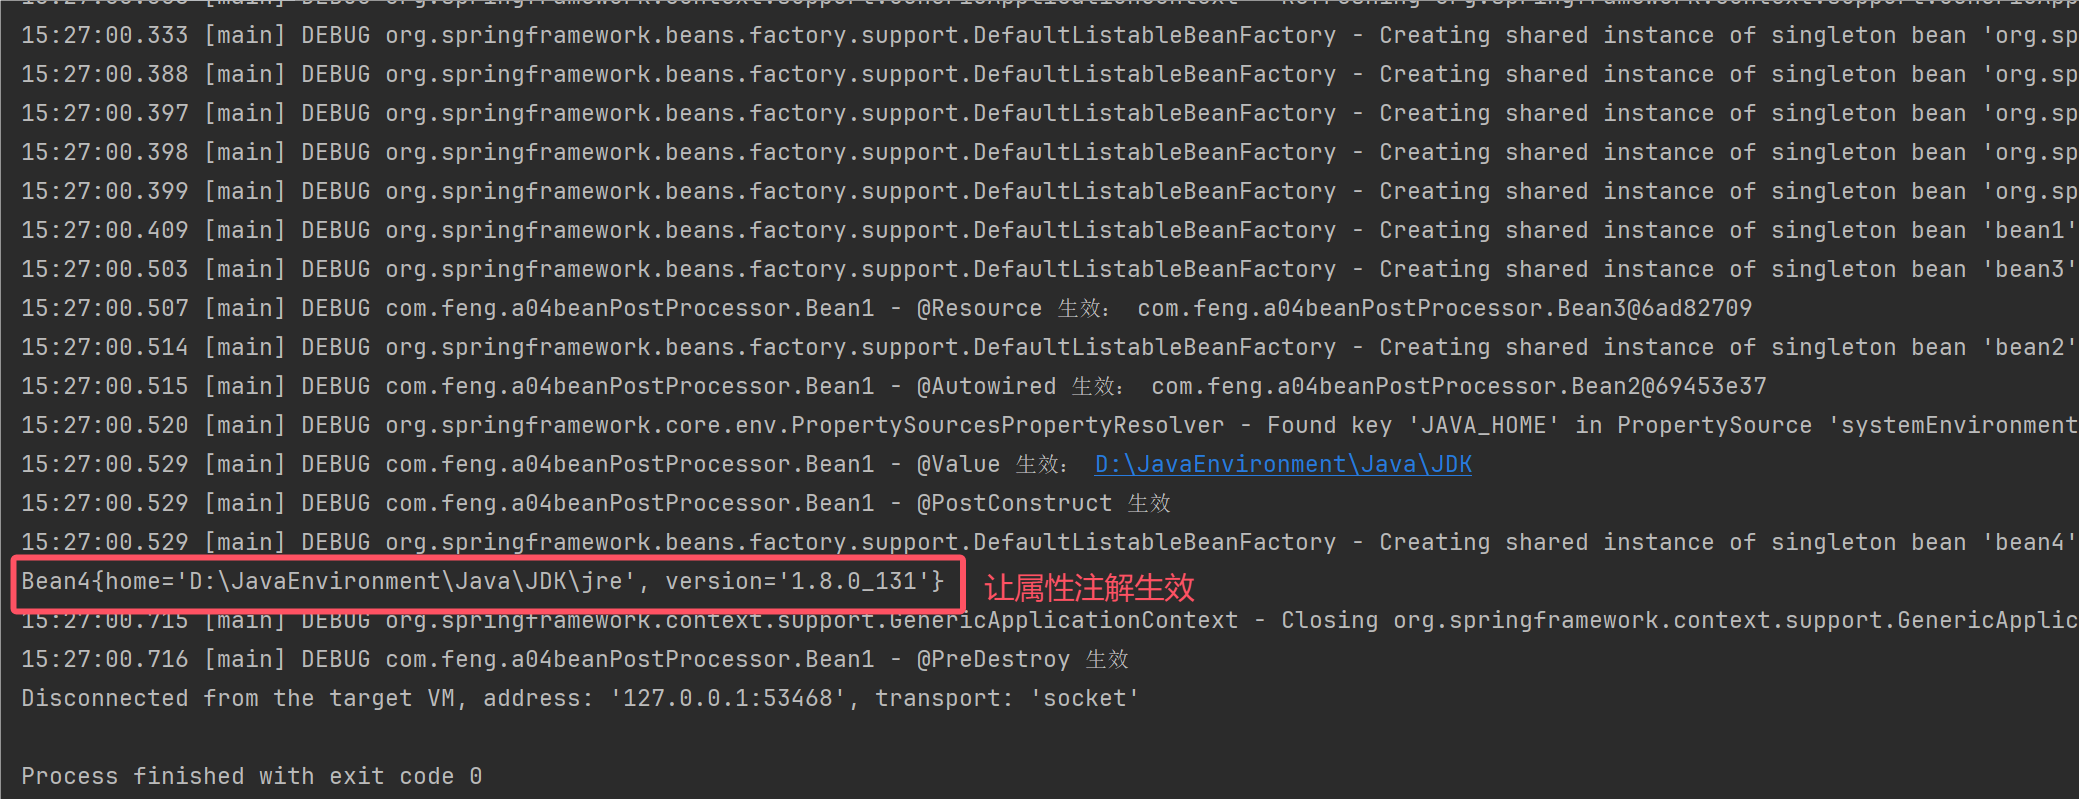
@Autowired bean 后处理器
DigInAutowired
//AutowiredAnnotationBeanPostProcessor 运行分析
public class DigInAutowired {
public static void main(String[] args) {
DefaultListableBeanFactory beanFactory = new DefaultListableBeanFactory();
beanFactory.registerSingleton("bean2", new Bean2()); //new Bean2()表示成型的bean,bean工厂不会再执行创建过程,依赖注入,初始化
beanFactory.registerSingleton("bean3", new Bean3());
beanFactory.setAutowireCandidateResolver(new ContextAnnotationAutowireCandidateResolver()); //@Value
//1.查找了哪些属性,方法加了 @Autowired ,这称之为 InjectionMetadata
AutowiredAnnotationBeanPostProcessor processor = new AutowiredAnnotationBeanPostProcessor();
processor.setBeanFactory(beanFactory);
Bean1 bean1 = new Bean1();
System.out.println(bean1);
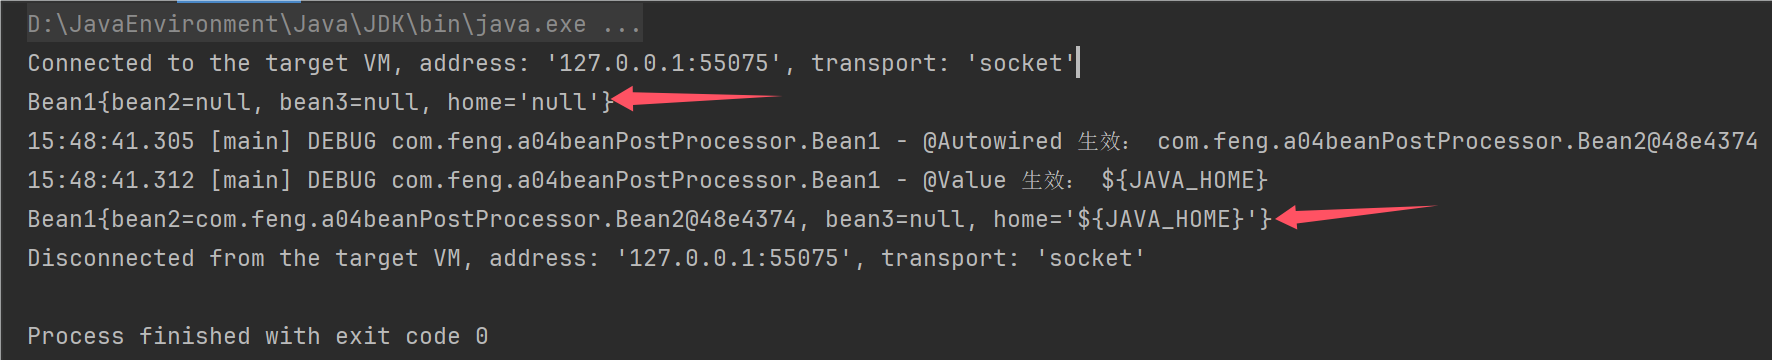
processor.postProcessProperties(null, bean1, "bean1"); //执行依赖注入 @Autowired @Value
System.out.println(bean1);
}
}
#源码解析
processor.postProcessProperties(null, bean1, "bean1"); //执行依赖注入 @Autowired @Value
DigInAutowired
//AutowiredAnnotationBeanPostProcessor 运行分析
public class DigInAutowired {
public static void main(String[] args) throws Throwable {
DefaultListableBeanFactory beanFactory = new DefaultListableBeanFactory();
beanFactory.registerSingleton("bean2", new Bean2()); //new Bean2()表示成型的bean,bean工厂不会再执行创建过程,依赖注入,初始化
beanFactory.registerSingleton("bean3", new Bean3());
beanFactory.setAutowireCandidateResolver(new ContextAnnotationAutowireCandidateResolver()); //@Value
beanFactory.addEmbeddedValueResolver(new StandardEnvironment()::resolvePlaceholders); //${} 的解析器
//1.查找了哪些属性,方法加了 @Autowired ,这称之为 InjectionMetadata
AutowiredAnnotationBeanPostProcessor processor = new AutowiredAnnotationBeanPostProcessor();
processor.setBeanFactory(beanFactory);
Bean1 bean1 = new Bean1();
/*System.out.println(bean1);
processor.postProcessProperties(null, bean1, "bean1"); //执行依赖注入 @Autowired @Value
System.out.println(bean1);*/
/**
* postProcessProperties 实际上两步骤:
* 1.找到@Value @Autowired的成员变量,方法参数信息
* 2.调用 InjectionMetadata 来进行依赖注入,注入时按类型查找值
*/
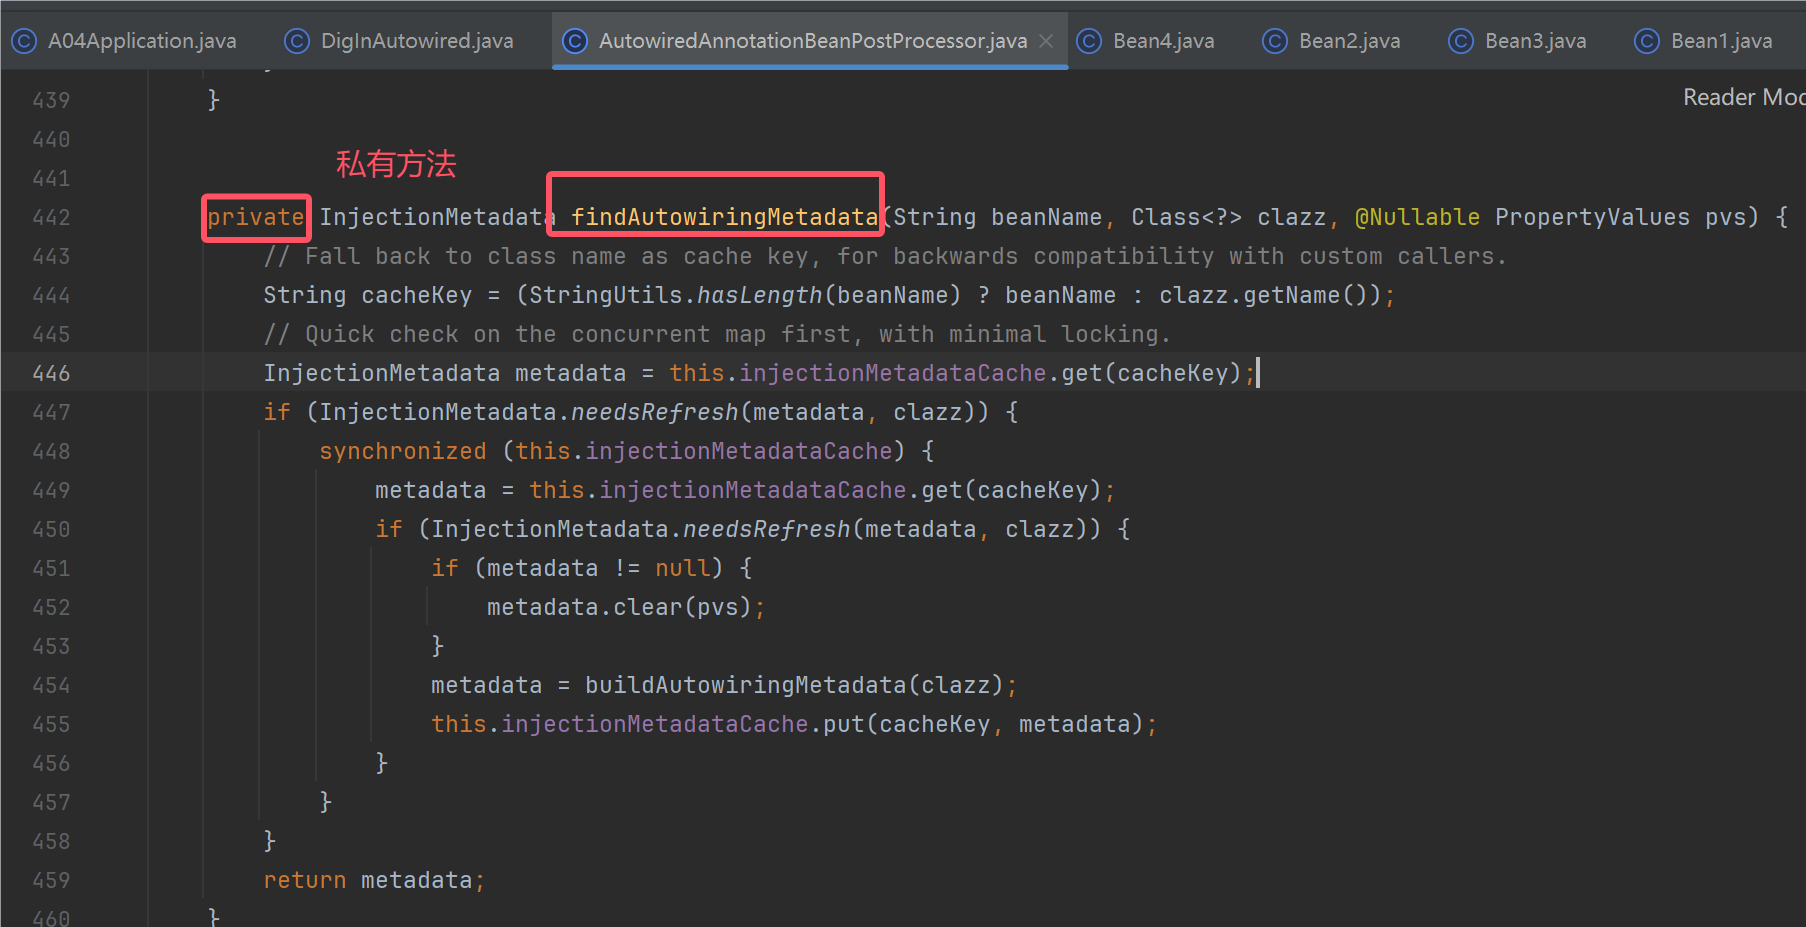
//私有方法,利用反射获取信息
Method findAutowiringMetadata = AutowiredAnnotationBeanPostProcessor.class.getDeclaredMethod("findAutowiringMetadata", String.class, Class.class, PropertyValues.class);
findAutowiringMetadata.setAccessible(true);
//获取 Bean1 上加了 @Value @Autowired的成员变量,方法参数信息
InjectionMetadata metadata = (InjectionMetadata) findAutowiringMetadata.invoke(processor, "bean1", Bean1.class, null);
System.out.println(metadata);
//2. 调用 InjectionMetadata 来进行依赖注入,注入时按类型查找值
metadata.inject(bean1, "bean1", null);
System.out.println(bean1);
}
}
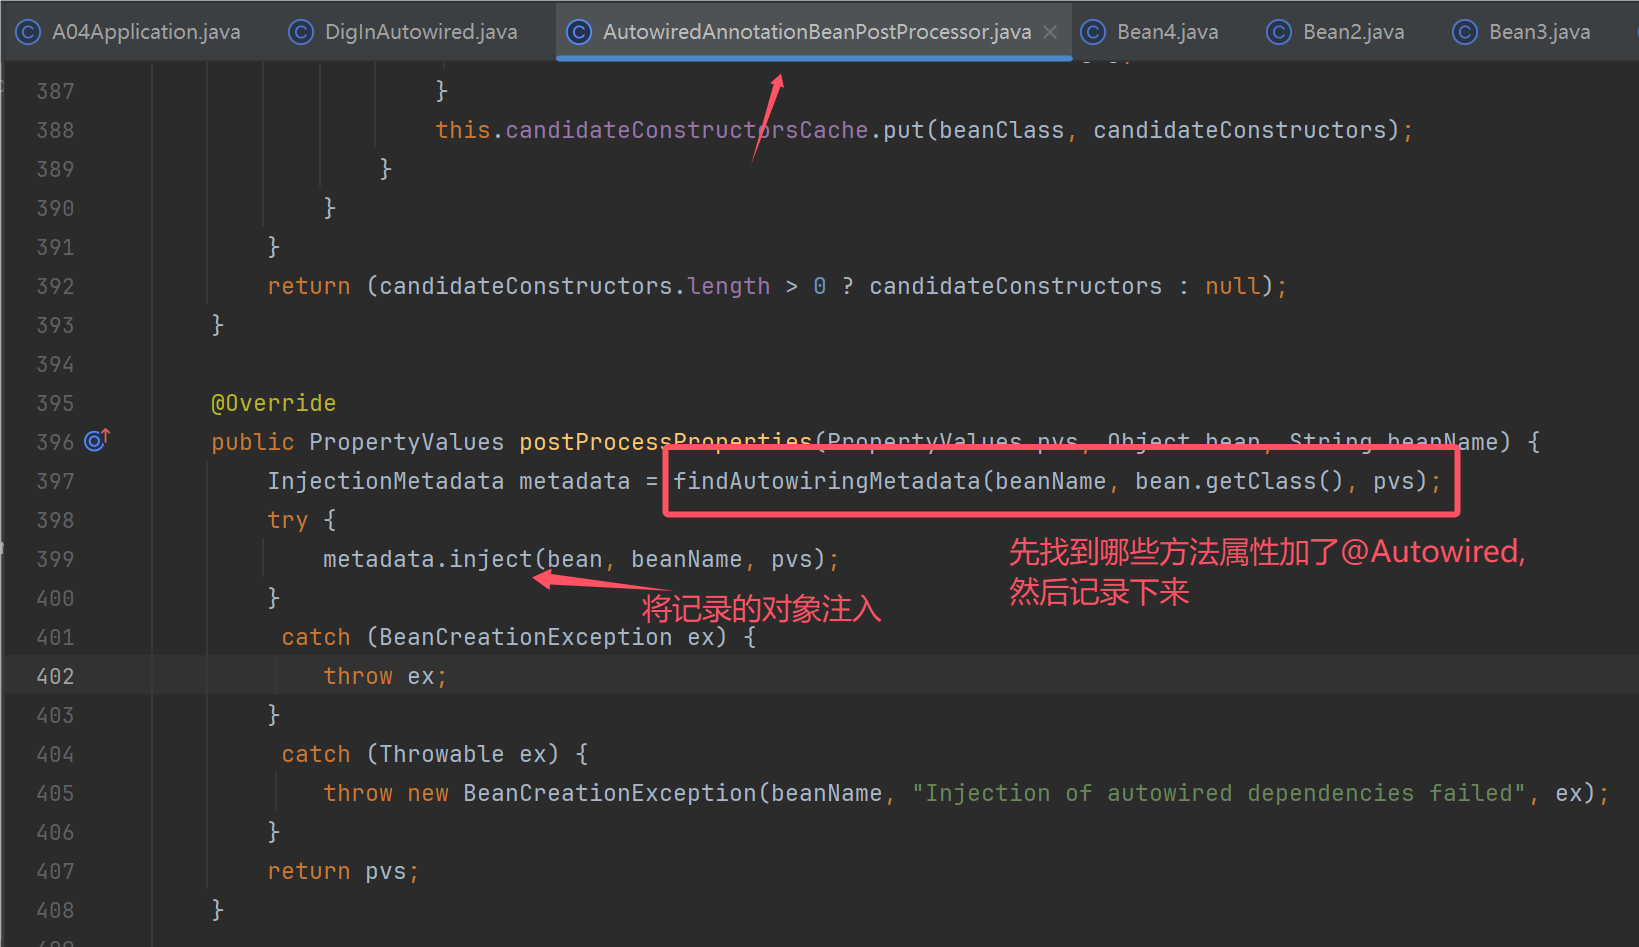
DigInAutowired
//AutowiredAnnotationBeanPostProcessor 运行分析
public class DigInAutowired {
    public static void main(String[] args) throws Throwable {
        DefaultListableBeanFactory beanFactory = new DefaultListableBeanFactory();
        beanFactory.registerSingleton("bean2", new Bean2()); //new Bean2()表示成型的bean,bean工厂不会再执行创建过程,依赖注入,初始化
        beanFactory.registerSingleton("bean3", new Bean3());
        beanFactory.setAutowireCandidateResolver(new ContextAnnotationAutowireCandidateResolver()); //@Value
        beanFactory.addEmbeddedValueResolver(new StandardEnvironment()::resolvePlaceholders); //${} 的解析器

        //1.查找了哪些属性,方法加了 @Autowired ,这称之为 InjectionMetadata
        AutowiredAnnotationBeanPostProcessor processor = new AutowiredAnnotationBeanPostProcessor();
        processor.setBeanFactory(beanFactory);

        Bean1 bean1 = new Bean1();
        /*System.out.println(bean1);
        processor.postProcessProperties(null, bean1, "bean1"); //执行依赖注入 @Autowired @Value
        System.out.println(bean1);*/

        /**
         * postProcessProperties 实际上两步骤:
         * 1.找到@Value @Autowired的成员变量,方法参数信息
         * 2.调用 InjectionMetadata 来进行依赖注入,注入时按类型查找值
         */
        //私有方法,利用反射获取信息
        Method findAutowiringMetadata = AutowiredAnnotationBeanPostProcessor.class.getDeclaredMethod("findAutowiringMetadata", String.class, Class.class, PropertyValues.class);
        findAutowiringMetadata.setAccessible(true);
        //获取 Bean1 上加了 @Value @Autowired的成员变量,方法参数信息
        InjectionMetadata metadata = (InjectionMetadata) findAutowiringMetadata.invoke(processor, "bean1", Bean1.class, null);
        System.out.println(metadata);

        //2. 调用 InjectionMetadata 来进行依赖注入,注入时按类型查找值
        metadata.inject(bean1, "bean1", null);
        System.out.println(bean1);

        /**
         * metadata.inject内部做的事情,按照类型查找值
         */
        //3.如何按类型查找值
        Field bean3 = Bean1.class.getDeclaredField("bean3");
        DependencyDescriptor dd1 = new DependencyDescriptor(bean3, false);
        //根据dd1的信息,找到dd1的类型,然后根据类型找到容器中符合的bean
        Object o = beanFactory.doResolveDependency(dd1, null, null, null);
        System.out.println(o);

        Method setBean2 = Bean1.class.getDeclaredMethod("setBean2", Bean2.class);
        DependencyDescriptor dd2 =
                new DependencyDescriptor(new MethodParameter(setBean2, 0), false); //0:表示setBean2方法的第一个参数
        //根据方法参数的类型Bean2类型,去容器中找bean
        Object o1 = beanFactory.doResolveDependency(dd2, null, null, null);
        System.out.println(o1);

        Method setHome = Bean1.class.getDeclaredMethod("setHome", String.class);
        DependencyDescriptor dd3 = new DependencyDescriptor(new MethodParameter(setHome, 0), true);
        Object o2 = beanFactory.doResolveDependency(dd3, null, null, null);
        System.out.println(o2);
    }
}
收获💡
- AutowiredAnnotationBeanPostProcessor.findAutowiringMetadata 用来获取某个 bean 上加了 @Value @Autowired 的成员变量,方法参数的信息,表示为 InjectionMetadata
- InjectionMetadata 可以完成依赖注入
- InjectionMetadata 内部根据成员变量,方法参数封装为 DependencyDescriptor 类型
- 有了 DependencyDescriptor,就可以利用 beanFactory.doResolveDependency 方法进行基于类型的查找
1.5 BeanFactory 后处理器
BeanFactory 后处理器的作用
@Mapper
public interface Mapper1 {
}
@Mapper
public interface Mapper2 {
}
@Component
public class Bean2 {
    private static final Logger log = LoggerFactory.getLogger(Bean2.class);
    public Bean2(){
        log.debug("我被Spring管理了");
    }
}
public class Bean1 {
    private static final Logger log = LoggerFactory.getLogger(com.feng.a05beanfactorypost.component.Bean2.class);
    public Bean1(){
        log.debug("我被Spring管理了");
    }
}
Config
@Configuration
@ComponentScan("com.feng.a05beanfactorypost.component")
public class Config {

    @Bean
    public Bean1 bean1(){
        return new Bean1();
    }

    @Bean
    public SqlSessionFactoryBean sqlSessionFactoryBean(DataSource dataSource){
        SqlSessionFactoryBean sqlSessionFactoryBean = new SqlSessionFactoryBean();
        sqlSessionFactoryBean.setDataSource(dataSource);
        return sqlSessionFactoryBean;
    }

    @Bean(initMethod = "init")
    public DruidDataSource dataSource(){
        DruidDataSource dataSource = new DruidDataSource();
        dataSource.setUrl("jdbc:mysql://localhost:3306/test");
        dataSource.setUsername("root");
        dataSource.setPassword("123456");
        return dataSource;
    }
}
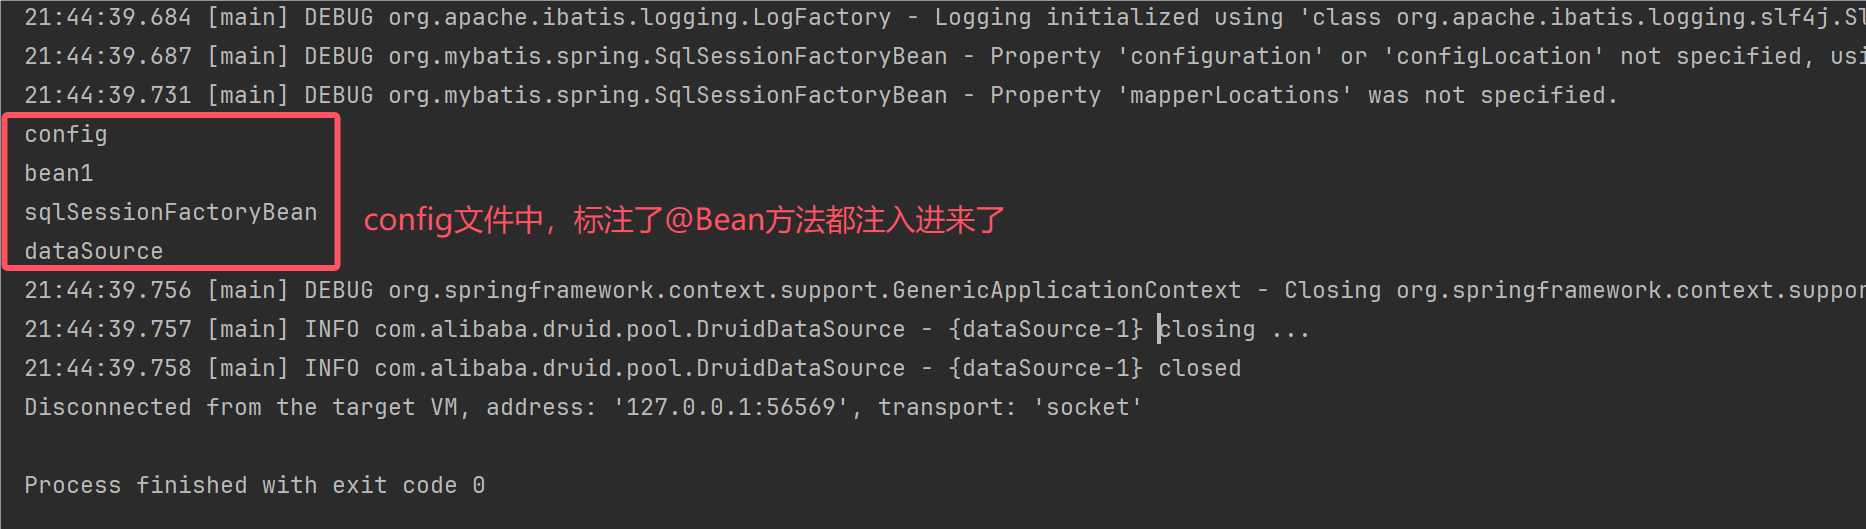
A05Application
public class A05Application {
    private static final Logger log = LoggerFactory.getLogger(A05Application.class);

    public static void main(String[] args) {
        //GenericApplicationContext 是一个【干净】的容器
        GenericApplicationContext context = new GenericApplicationContext();
        context.registerBean("config", Config.class);
        //@ComponentScan @Bean @Import @ImportResource
        context.registerBean(ConfigurationClassPostProcessor.class);
        //@MapperScanner
        context.registerBean(MapperScannerConfigurer.class,bd -> {
            bd.getPropertyValues().add("basePackage","com.feng.a05beanfactorypost.mapper");
        });

        //初始化容器
        context.refresh();

        for (String name : context.getBeanDefinitionNames()) {
            System.out.println(name);
        }

        //销毁容器
        context.close();
    }
}
收获💡
- @ComponentScan, @Bean, @Mapper 等注解的解析属于核心容器(即 BeanFactory)的扩展功能
- 这些扩展功能由不同的 BeanFactory 后处理器来完成,其实主要就是补充了一些 bean 定义
模拟@ComponentScan
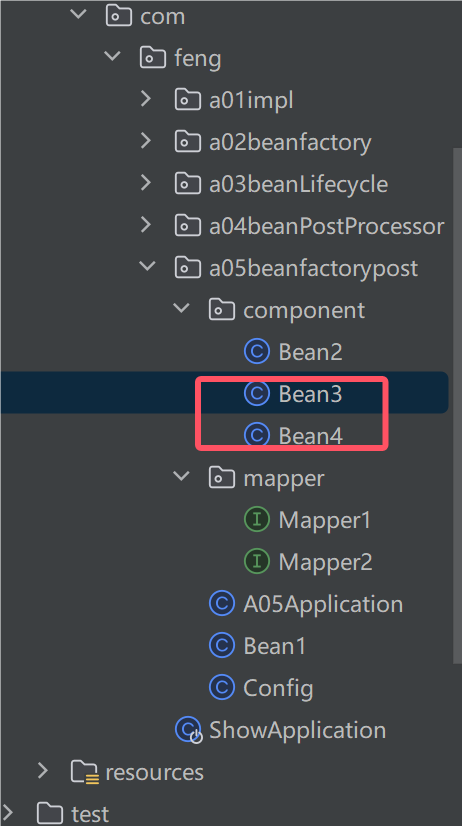
Bean3
@Controller
public class Bean3 {
    private static final Logger log = LoggerFactory.getLogger(Bean3.class);
    public Bean3(){
        log.debug("我被Spring管理了");
    }
}
Bean4
public class Bean4 {
    private static final Logger log = LoggerFactory.getLogger(Bean4.class);
    public Bean4(){
        log.debug("我被Spring管理了");
    }
}
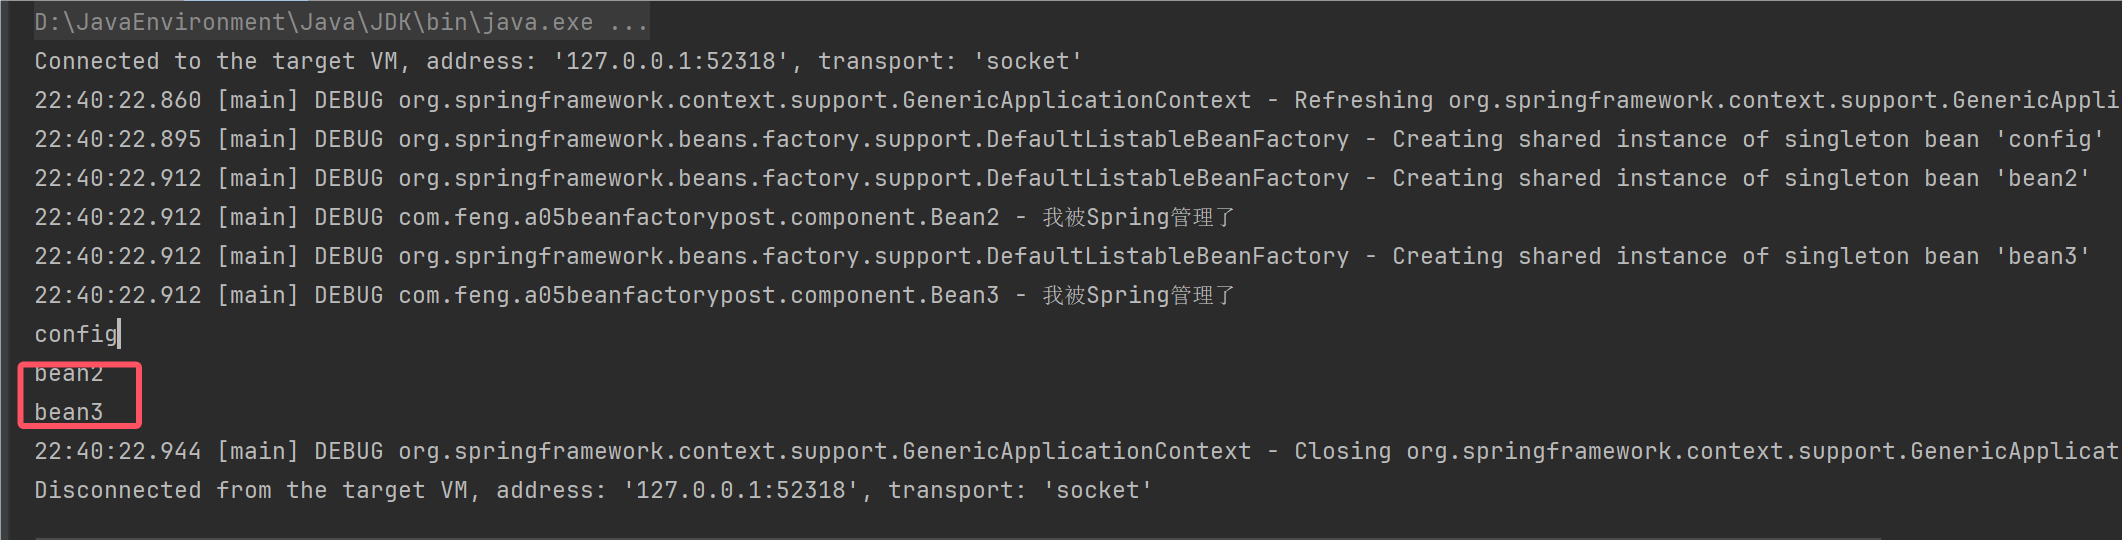
A05Application
public class A05Application {
    private static final Logger log = LoggerFactory.getLogger(A05Application.class);

    public static void main(String[] args) throws IOException {
        //GenericApplicationContext 是一个【干净】的容器
        GenericApplicationContext context = new GenericApplicationContext();
        context.registerBean("config", Config.class);
        //@ComponentScan @Bean @Import @ImportResource
        //context.registerBean(ConfigurationClassPostProcessor.class);
        //@MapperScanner
        /*context.registerBean(MapperScannerConfigurer.class,bd -> {
            bd.getPropertyValues().add("basePackage","com.feng.a05beanfactorypost.mapper");
        });*/

        //模拟ConfigurationClassPostProcessor过程
        ComponentScan componentScan = AnnotationUtils.findAnnotation(Config.class, ComponentScan.class);
        if(componentScan != null){
            for (String p : componentScan.basePackages()) {
                //com.feng.a05beanfactorypost.component  -> classpath*:com/feng/a05beanfactorypost/component/**/*.class
                String path = "classpath*:" + p.replace( ".", "/") + "/**/*.class";
                CachingMetadataReaderFactory factory = new CachingMetadataReaderFactory();
                Resource[] resources = context.getResources(path);
                for (Resource resource : resources) {
                    //结果是file [D:\FengJavaProject\springtheory\show\target\classes\com\feng\a05beanfactorypost\component\Bean2.class]
                    //System.out.println(resource);
                    MetadataReader reader = factory.getMetadataReader(resource);
                    System.out.println("类名:"+reader.getClassMetadata().getClassName());
                    System.out.println("是否加了 @Component: "+reader.getAnnotationMetadata().hasAnnotation(Component.class.getName()));
                    System.out.println("是否加了 @Component 派生: "+reader.getAnnotationMetadata().hasMetaAnnotation(Component.class.getName()));
                }
            }
        }

        //初始化容器
        context.refresh();

        for (String name : context.getBeanDefinitionNames()) {
            System.out.println(name);
        }

        //销毁容器
        context.close();
    }
}

A05Application
public class A05Application {
    private static final Logger log = LoggerFactory.getLogger(A05Application.class);

    public static void main(String[] args) throws IOException {
        //GenericApplicationContext 是一个【干净】的容器
        GenericApplicationContext context = new GenericApplicationContext();
        context.registerBean("config", Config.class);
        //@ComponentScan @Bean @Import @ImportResource
        //context.registerBean(ConfigurationClassPostProcessor.class);
        //@MapperScanner
        /*context.registerBean(MapperScannerConfigurer.class,bd -> {
            bd.getPropertyValues().add("basePackage","com.feng.a05beanfactorypost.mapper");
        });*/

        //模拟ConfigurationClassPostProcessor过程
        /**
         * 先拿到ComponentScan注解,知道扫描哪些包
         */
        ComponentScan componentScan = AnnotationUtils.findAnnotation(Config.class, ComponentScan.class);
        if(componentScan != null){
            for (String p : componentScan.basePackages()) {
                //com.feng.a05beanfactorypost.component  -> classpath*:com/feng/a05beanfactorypost/component/**/*.class
                String path = "classpath*:" + p.replace( ".", "/") + "/**/*.class";
                CachingMetadataReaderFactory factory = new CachingMetadataReaderFactory();
                /**
                 * 利用通配符,拿到二进制资源
                 */
                Resource[] resources = context.getResources(path);
                AnnotationBeanNameGenerator generator = new AnnotationBeanNameGenerator();
                for (Resource resource : resources) {
                    //结果是file [D:\FengJavaProject\springtheory\show\target\classes\com\feng\a05beanfactorypost\component\Bean2.class]
                    //System.out.println(resource);
                    MetadataReader reader = factory.getMetadataReader(resource);
                    //System.out.println("类名:"+reader.getClassMetadata().getClassName());
                    //System.out.println("是否加了 @Component: "+reader.getAnnotationMetadata().hasAnnotation(Component.class.getName()));
                    //System.out.println("是否加了 @Component 派生: "+reader.getAnnotationMetadata().hasMetaAnnotation(Component.class.getName()));

                    /**
                     * 判断类是否加了 @Component 或者 @Component 派生
                     */
                    if(reader.getAnnotationMetadata().hasAnnotation(Component.class.getName())
                            || reader.getAnnotationMetadata().hasMetaAnnotation(Component.class.getName())){
                        //根据类名字得到类定义
                        AbstractBeanDefinition bd = BeanDefinitionBuilder.genericBeanDefinition(reader.getClassMetadata()
                                .getClassName()).getBeanDefinition();
                        DefaultListableBeanFactory beanFactory = context.getDefaultListableBeanFactory();
                        //生成类名称
                        String name = generator.generateBeanName(bd, beanFactory);
                        //注册bean到bean工厂中
                        beanFactory.registerBeanDefinition(name, bd);

                    }
                }
            }
        }

        //初始化容器
        context.refresh();

        for (String name : context.getBeanDefinitionNames()) {
            System.out.println(name);
        }

        //销毁容器
        context.close();
    }
}
自定义Bean工厂后置处理器

ComponentScanPostProcessor
public class ComponentScanPostProcessor implements BeanFactoryPostProcessor {
    @Override //context.refresh 初始化applicationContext 的回调方法
    public void postProcessBeanFactory(ConfigurableListableBeanFactory configurableListableBeanFactory) throws BeansException {
        try {
            /**
             * 先拿到ComponentScan注解,知道扫描哪些包
             */
            ComponentScan componentScan = AnnotationUtils.findAnnotation(Config.class, ComponentScan.class);
            if(componentScan != null){
                for (String p : componentScan.basePackages()) {
                    //com.feng.a05beanfactorypost.component  -> classpath*:com/feng/a05beanfactorypost/component/**/*.class
                    String path = "classpath*:" + p.replace( ".", "/") + "/**/*.class";
                    CachingMetadataReaderFactory factory = new CachingMetadataReaderFactory();
                    /**
                     * 利用通配符,拿到二进制资源
                     */
                    //new PathMatchingResourcePatternResolver() 和new GenericApplicationContext();功能效果                      一样
                    Resource[] resources = new PathMatchingResourcePatternResolver().getResources(path);
                    AnnotationBeanNameGenerator generator = new AnnotationBeanNameGenerator();
                    for (Resource resource : resources) {
                        //结果是file [D:\FengJavaProject\springtheory\show\target\classes\com\feng\a05beanfactorypost\component\Bean2.class]
                        //System.out.println(resource);
                        MetadataReader reader = factory.getMetadataReader(resource);
                        //System.out.println("类名:"+reader.getClassMetadata().getClassName());
                        //System.out.println("是否加了 @Component: "+reader.getAnnotationMetadata().hasAnnotation(Component.class.getName()));
                        //System.out.println("是否加了 @Component 派生: "+reader.getAnnotationMetadata().hasMetaAnnotation(Component.class.getName()));

                        /**
                         * 判断类是否加了 @Component 或者 @Component 派生
                         */
                        if(reader.getAnnotationMetadata().hasAnnotation(Component.class.getName())
                                || reader.getAnnotationMetadata().hasMetaAnnotation(Component.class.getName())){
                            //根据类名字得到类定义
                            AbstractBeanDefinition bd = BeanDefinitionBuilder.genericBeanDefinition(reader.getClassMetadata()
                                    .getClassName()).getBeanDefinition();
                            if(configurableListableBeanFactory instanceof DefaultListableBeanFactory){
                                DefaultListableBeanFactory beanFactory = (DefaultListableBeanFactory) configurableListableBeanFactory;
                                //生成类名称
                                String name = generator.generateBeanName(bd, beanFactory);
                                //注册bean到bean工厂中
                                beanFactory.registerBeanDefinition(name, bd);
                            }
                        }
                    }
                }
            }
        } catch (IOException e) {
            throw new RuntimeException(e);
        }

    }
}
A05Application
public class A05Application {
    private static final Logger log = LoggerFactory.getLogger(A05Application.class);

    public static void main(String[] args) throws IOException {
        //GenericApplicationContext 是一个【干净】的容器
        GenericApplicationContext context = new GenericApplicationContext();
        context.registerBean("config", Config.class);
        //@ComponentScan @Bean @Import @ImportResource
        //context.registerBean(ConfigurationClassPostProcessor.class);
        //@MapperScanner
        /*context.registerBean(MapperScannerConfigurer.class,bd -> {
            bd.getPropertyValues().add("basePackage","com.feng.a05beanfactorypost.mapper");
        });*/

        //模拟ConfigurationClassPostProcessor过程,使用自定义的ComponentScanPostProcessor
        context.registerBean(ComponentScanPostProcessor.class);
        //初始化容器
        context.refresh();

        for (String name : context.getBeanDefinitionNames()) {
            System.out.println(name);
        }

        //销毁容器
        context.close();
    }
}

收获💡
- Spring 操作元数据的工具类 CachingMetadataReaderFactory
- 通过注解元数据(AnnotationMetadata)获取直接或间接标注的注解信息
- 通过类元数据(ClassMetadata)获取类名,AnnotationBeanNameGenerator 生成 bean 名
- 解析元数据是基于 ASM 技术
模拟 @Bean
A05Application
public class A05Application {
    private static final Logger log = LoggerFactory.getLogger(A05Application.class);

    public static void main(String[] args) throws IOException {
        //GenericApplicationContext 是一个【干净】的容器
        GenericApplicationContext context = new GenericApplicationContext();
        //向这个上下文注册一个名为 config 的bean,类型为 Config.class
        context.registerBean("config", Config.class);

        /**
         * 读取Config.class的元数据信息
         */
        CachingMetadataReaderFactory factory = new CachingMetadataReaderFactory();
        //getMetadataReader不走类加载,效率比反射高,推荐使用
        //先读取Config.class的信息
        MetadataReader reader = factory.getMetadataReader(new ClassPathResource("com/feng/a05beanfactorypost/Config.class"));
        //getAnnotationMetadata:所有和注解相关元素  getAnnotatedMethods:获取所有被Bean注解标注的方法
        Set<MethodMetadata> methods = reader.getAnnotationMetadata().getAnnotatedMethods(Bean.class.getName());
        for (MethodMetadata method : methods) {
            System.out.println(method);
            // @Bean(initMethod = "init")标注的方法  获取init值
            String initMethod = method.getAnnotationAttributes(Bean.class.getName()).get("initMethod").toString();

            BeanDefinitionBuilder builder = BeanDefinitionBuilder.genericBeanDefinition();
            //config: 指定工厂对应bean的名字
            builder.setFactoryMethodOnBean(method.getMethodName(),"config"); //指定方法名和所属类
            //方法需要传入参数时,自动装配参数,构造方法或者是工厂方法选AUTOWIRE_CONSTRUCTOR
            builder.setAutowireMode(AbstractBeanDefinition.AUTOWIRE_CONSTRUCTOR);
            if (initMethod.length()>0){
                //设置值为init
                builder.setInitMethodName(initMethod);
            }
            /**
             * 针对每一个方法,生成一个BeanDefinition
             */
            AbstractBeanDefinition bd = builder.getBeanDefinition();
            /**
             * 设置bean的名字是方法名
             * AbstractBeanDefinition:是bean的定义信息,包括类类型、作用域、构造函数参数、属性等元数据。
             *      它告诉Spring容器如何创建bean实例,但本身不是bean。
             * Bean对象:是根据 AbstractBeanDefinition 创建的实际对象,是你在应用程序中使用的具体实例。
             */
            context.getDefaultListableBeanFactory().registerBeanDefinition(method.getMethodName(),bd);
        }

        //初始化容器
        context.refresh();

        for (String name : context.getBeanDefinitionNames()) {
            System.out.println(name);
        }

        //销毁容器
        context.close();
    }
}
封装重构@Bean的方法
AtBeanPostProcessor
public class AtBeanPostProcessor implements BeanFactoryPostProcessor {
    @Override
    public void postProcessBeanFactory(ConfigurableListableBeanFactory configurableListableBeanFactory) throws BeansException {
        try {
            /**
             * 读取Config.class的元数据信息
             */
            CachingMetadataReaderFactory factory = new CachingMetadataReaderFactory();
            //getMetadataReader不走类加载,效率比反射高,推荐使用
            //先读取Config.class的信息
            MetadataReader reader = factory.getMetadataReader(new ClassPathResource("com/feng/a05beanfactorypost/Config.class"));
            //getAnnotationMetadata:所有和注解相关元素  getAnnotatedMethods:获取所有被Bean注解标注的方法
            Set<MethodMetadata> methods = reader.getAnnotationMetadata().getAnnotatedMethods(Bean.class.getName());
            for (MethodMetadata method : methods) {
                System.out.println(method);
                // @Bean(initMethod = "init")标注的方法  获取init值
                String initMethod = method.getAnnotationAttributes(Bean.class.getName()).get("initMethod").toString();

                BeanDefinitionBuilder builder = BeanDefinitionBuilder.genericBeanDefinition();
                /**
                 * 1、指定工厂方法:method.getMethodName() 返回的是方法的名称,它指定了将被用来创建这个bean的工厂方法。
                 * 2、指定工厂bean:"config" 是工厂bean的名称,它指定了哪个bean包含了上述工厂方法。
                 * 更详细的解释:
                 *      在你提供的代码片段中,setFactoryMethodOnBean 方法的调用指定了bean定义的创建方式:
                 *      方法名称:method.getMethodName() 返回被 @Bean 注解标注的方法的名称。例如,
                 *      如果方法名称是 someBean,那么这个方法将被用作工厂方法。
                 *      工厂bean名称:"config" 指定了工厂bean的名称,这个名称对应于 Config 类的实例。
                 *
                 * 通过这样设置,Spring会按照以下步骤创建bean:
                 *      获取名称为 "config" 的bean实例(即 Config 类的实例)。
                 *      调用 Config 类中名称为 someBean 的方法来创建bean实例。
                 */
                builder.setFactoryMethodOnBean(method.getMethodName(),"config"); //指定方法名和所属类
                //方法需要传入参数时,自动装配参数,构造方法或者是工厂方法选AUTOWIRE_CONSTRUCTOR
                builder.setAutowireMode(AbstractBeanDefinition.AUTOWIRE_CONSTRUCTOR);
                if (initMethod.length()>0){
                    //设置值为init
                    builder.setInitMethodName(initMethod);
                }
                /**
                 * 针对每一个方法,生成一个BeanDefinition
                 */
                AbstractBeanDefinition bd = builder.getBeanDefinition();
                /**
                 * 设置bean的名字是方法名
                 * AbstractBeanDefinition:是bean的定义信息,包括类类型、作用域、构造函数参数、属性等元数据。
                 *      它告诉Spring容器如何创建bean实例,但本身不是bean。
                 * Bean对象:是根据 AbstractBeanDefinition 创建的实际对象,是你在应用程序中使用的具体实例。
                 */
                if(configurableListableBeanFactory instanceof DefaultListableBeanFactory){
                    DefaultListableBeanFactory beanFactory = (DefaultListableBeanFactory) configurableListableBeanFactory;
                    beanFactory.registerBeanDefinition(method.getMethodName(),bd);
                }
            }
        } catch (IOException e) {
            throw new RuntimeException(e);
        }
    }
}
A05Application
public class A05Application {
    private static final Logger log = LoggerFactory.getLogger(A05Application.class);

    public static void main(String[] args) throws IOException {
        //GenericApplicationContext 是一个【干净】的容器
        GenericApplicationContext context = new GenericApplicationContext();
        //向这个上下文注册一个名为 config 的bean,类型为 Config.class
        context.registerBean("config", Config.class);

        /** 执行过程
         * 1、Spring容器初始化:当Spring容器初始化时,它会扫描并注册所有的bean定义。
         * 2、注册 BeanFactoryPostProcessor:在你的主方法中,
         *      当你调用 context.registerBean(AtBeanPostProcessor.class) 时,
         *      Spring会将 AtBeanPostProcessor 注册为一个bean。
         *  3、调用 postProcessBeanFactory 方法:Spring容器在bean定义加载完毕但在bean实例化之前,
         *      会自动调用所有 BeanFactoryPostProcessor 的 postProcessBeanFactory 方法。
         *      这允许这些处理器修改bean定义。
         */
        context.registerBean(AtBeanPostProcessor.class);

        //初始化容器
        context.refresh();

        for (String name : context.getBeanDefinitionNames()) {
            System.out.println(name);
        }

        //销毁容器
        context.close();
    }
}

收获💡
- 进一步熟悉注解元数据(AnnotationMetadata)获取方法上注解信息
模拟Mapper接口
Spring底层使用的方式
Config
@Configuration
@ComponentScan("com.feng.a05beanfactorypost.component")
public class Config {

    public Bean2 bean2(){
        return new Bean2();
    }

    @Bean
    public Bean1 bean1(){
        return new Bean1();
    }

    @Bean
    public SqlSessionFactoryBean sqlSessionFactoryBean(DataSource dataSource){
        SqlSessionFactoryBean sqlSessionFactoryBean = new SqlSessionFactoryBean();
        sqlSessionFactoryBean.setDataSource(dataSource);
        return sqlSessionFactoryBean;
    }

    @Bean(initMethod = "init")
    public DruidDataSource dataSource(){
        DruidDataSource dataSource = new DruidDataSource();
        dataSource.setUrl("jdbc:mysql://localhost:3306/test");
        dataSource.setUsername("root");
        dataSource.setPassword("123456");
        return dataSource;
    }

    @Bean
    public MapperFactoryBean<Mapper1> mapper1(SqlSessionFactory sqlSessionFactory){
        //sqlSessionFactory 拿到的是上面注入的SqlSessionFactoryBean
        //MapperFactoryBean:Mapper的bean工厂,根据传入的Mapper接口类型,生成Mapper的代理对象
        MapperFactoryBean<Mapper1> factory = new MapperFactoryBean<>(Mapper1.class);
        //通过Spring的依赖注入机制,将 SqlSessionFactory 注入到 MapperFactoryBean 中,
        // 确保 MapperFactoryBean 可以使用MyBatis的 SqlSession,后续进行crud
        factory.setSqlSessionFactory(sqlSessionFactory);
        return factory;
    }

    @Bean
    public MapperFactoryBean<Mapper2> mapper2(SqlSessionFactory sqlSessionFactory){
        MapperFactoryBean<Mapper2> factory = new MapperFactoryBean<>(Mapper2.class);
        factory.setSqlSessionFactory(sqlSessionFactory);
        return factory;
    }
}
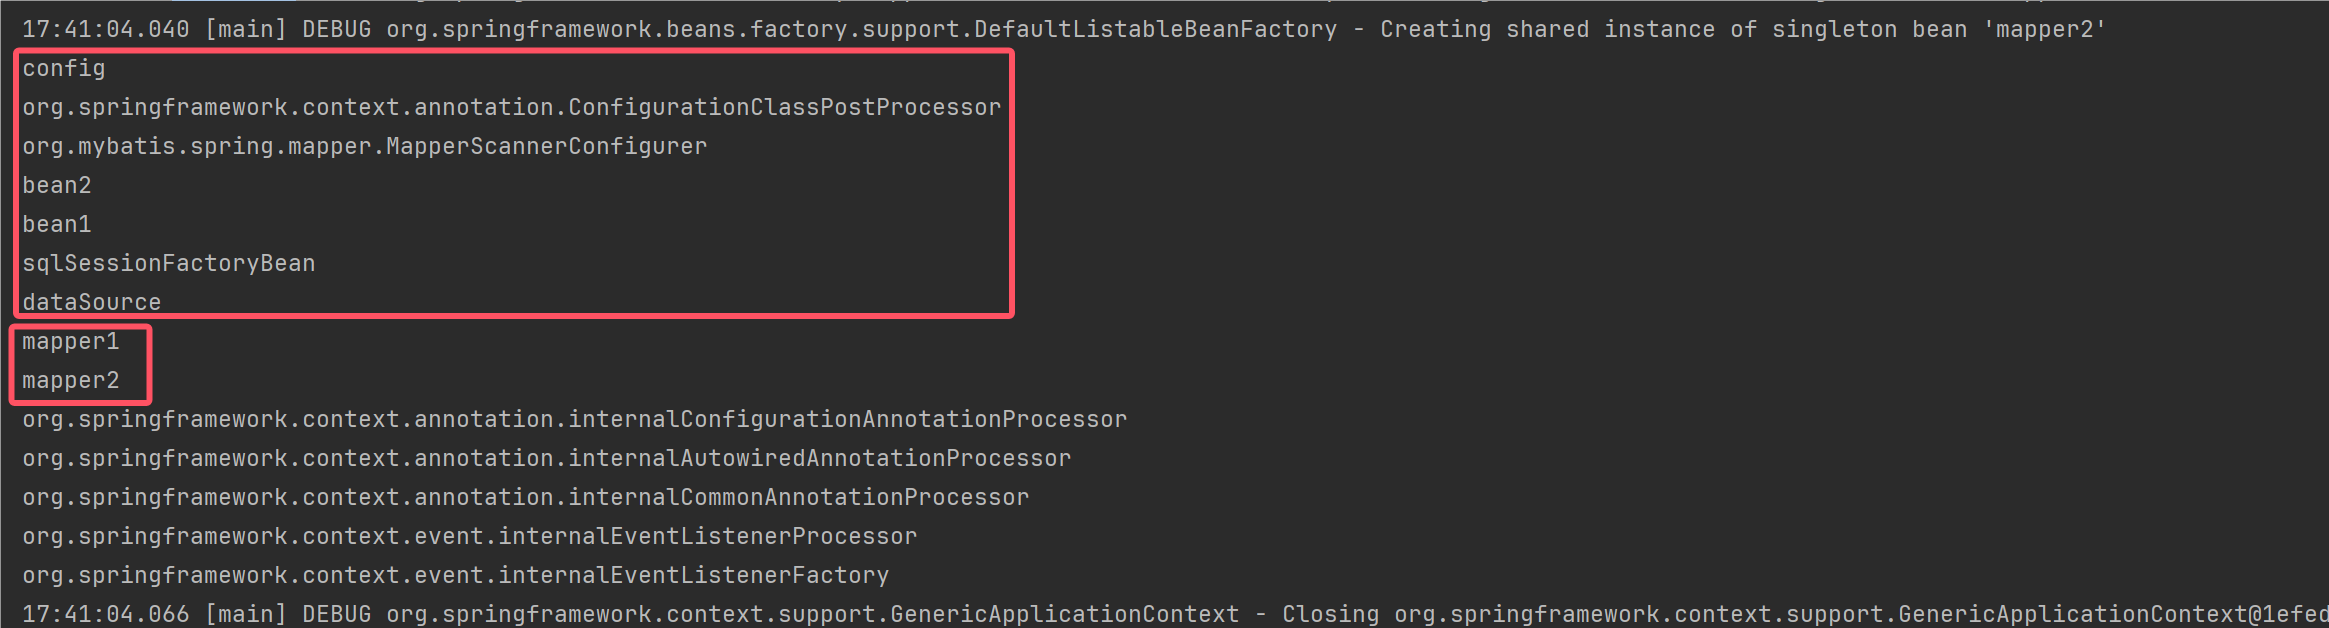
运行A05Application
封装重构@Mapper的方法
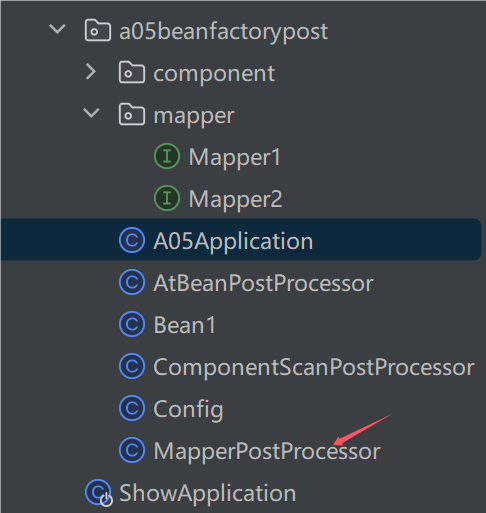
MapperPostProcessor
public class MapperPostProcessor implements BeanDefinitionRegistryPostProcessor {
    @Override
    public void postProcessBeanDefinitionRegistry(BeanDefinitionRegistry beanFactory) throws BeansException {
        try {
            PathMatchingResourcePatternResolver resolver = new PathMatchingResourcePatternResolver();
            Resource[] resources = resolver.getResources("classpath:com/feng/a05beanfactorypost/mapper/**/*.class");
            AnnotationBeanNameGenerator generator = new AnnotationBeanNameGenerator();
            //判断类是否是接口
            CachingMetadataReaderFactory factory = new CachingMetadataReaderFactory();
            for (Resource resource : resources) {
                MetadataReader reader = factory.getMetadataReader(resource);
                ClassMetadata classMetadata = reader.getClassMetadata();
                //判断类如果是接口
                /**
                 * @Bean
                 *     public MapperFactoryBean<Mapper> mapper2(SqlSessionFactory sqlSessionFactory){
                 *         MapperFactoryBean<Mapper> factory = new MapperFactoryBean<>(Mapper2.class);
                 *         factory.setSqlSessionFactory(sqlSessionFactory);
                 *         return factory;
                 *     }
                 */
                if (classMetadata.isInterface()) {
                    //等价于返回值MapperFactoryBean<Mapper>, 所以定义genericBeanDefinition(MapperFactoryBean.class)
                    AbstractBeanDefinition bd = BeanDefinitionBuilder.genericBeanDefinition(MapperFactoryBean.class)
                            //new MapperFactoryBean<>(Mapper2.class);传入构造器参数
                            .addConstructorArgValue(classMetadata.getClassName())
                            //等价于factory.setSqlSessionFactory(sqlSessionFactory); 在Config中注入了sqlSessionFactory对象,这里使用自动装配
                            .setAutowireMode(AbstractBeanDefinition.AUTOWIRE_BY_TYPE)
                            .getBeanDefinition();
                    //根据接口名生成bean名字
                    AbstractBeanDefinition bd2 = BeanDefinitionBuilder.genericBeanDefinition(classMetadata.getClassName()).getBeanDefinition();
                    String beanName = generator.generateBeanName(bd2, beanFactory);
                    /**
                     * beanFactory.registerBeanDefinition(beanName, bd) 这句代码实际注册的是
                     * MapperFactoryBean 对象的定义,而不是 Mapper 接口本身。然而,当你从 Spring 容器中获取这个 Bean 时,
                     * Spring 容器会通过 MapperFactoryBean 创建并返回对应的 Mapper 接口代理实例。
                     * 这是因为 MapperFactoryBean 实现了 FactoryBean 接口。
                     *
                     * 具体过程如下:
                     *
                     * 1.注册 Bean 定义: beanFactory.registerBeanDefinition(beanName, bd);
                     * 这里的 bd 是通过 BeanDefinitionBuilder.genericBeanDefinition(MapperFactoryBean.class)
                     * 构建的 MapperFactoryBean 的定义。也就是说,beanName 对应的 Bean 实际上是 MapperFactoryBean,而不是 Mapper 接口。
                     * 2.FactoryBean 行为:
                     * MapperFactoryBean 实现了 FactoryBean 接口,FactoryBean 接口有一个重要的方法 getObject()。
                     * 当你从 Spring 容器中获取一个由 FactoryBean 创建的 Bean 时,例如通过 context.getBean(beanName),
                     * Spring 容器会调用 MapperFactoryBean 的 getObject() 方法来返回实际的 Bean 实例。
                     * 3.获取 Bean 实例:
                     * 当你请求 Mapper1 或 Mapper2 Bean 时,Spring 实际上调用的是 MapperFactoryBean.getObject() 方法,
                     * 返回的是 Mapper1 或 Mapper2 的代理对象,而不是 MapperFactoryBean 实例本身。
                     * 因此,当你打印所有 Bean 名称时,你看到的是 Mapper1 和 Mapper2,
                     * 因为这些是通过 MapperFactoryBean 创建并注册到容器中的实际 Bean 名称。
                     *
                     * 总结:
                     * beanFactory.registerBeanDefinition(beanName, bd) 注册的是 MapperFactoryBean 的定义。
                     * 但是,通过 MapperFactoryBean 实现的 FactoryBean 接口,Spring 容器实际返回的是对应的 Mapper 接口代理对象。
                     * 所以,你从容器中获取到的是 Mapper1 和 Mapper2 接口的代理对象,而不是 MapperFactoryBean 实例。
                     */
                    beanFactory.registerBeanDefinition(beanName, bd);
                    /**
                     * 为什么看到的是Mapper接口对象而不是MapperFactoryBean对象:
                     * 当你请求一个Bean时,例如context.getBean("mapper1"),Spring容器会检查这个Bean的定义。
                     * 如果这个定义对应的是一个FactoryBean,容器会调用FactoryBean的getObject()方法来返回实际的Bean实例。
                     * 因此,虽然注册的是MapperFactoryBean,但返回的是它创建的Mapper接口的代理对象。
                     */

                }
            }
        } catch (IOException e) {
            throw new RuntimeException(e);
        }
    }

    @Override
    public void postProcessBeanFactory(ConfigurableListableBeanFactory beanFactory) throws BeansException {

    }
}
A05Application
public class A05Application {
    private static final Logger log = LoggerFactory.getLogger(A05Application.class);

    public static void main(String[] args) throws IOException {
        //GenericApplicationContext 是一个【干净】的容器
        GenericApplicationContext context = new GenericApplicationContext();
        //向这个上下文注册一个名为 config 的bean,类型为 Config.class
        context.registerBean("config", Config.class);

        /** 执行过程
         * 1、Spring容器初始化:当Spring容器初始化时,它会扫描并注册所有的bean定义。
         * 2、注册 BeanFactoryPostProcessor:在你的主方法中,
         *      当你调用 context.registerBean(AtBeanPostProcessor.class) 时,
         *      Spring会将 AtBeanPostProcessor 注册为一个bean。
         *  3、调用 postProcessBeanFactory 方法:Spring容器在bean定义加载完毕但在bean实例化之前,
         *      会自动调用所有 BeanFactoryPostProcessor 的 postProcessBeanFactory 方法。
         *      这允许这些处理器修改bean定义。
         */
        context.registerBean(AtBeanPostProcessor.class);//解析@Bean
        context.registerBean(MapperPostProcessor.class);//解析 Mapper接口

        //初始化容器
        context.refresh();

        for (String name : context.getBeanDefinitionNames()) {
            System.out.println(name);
        }

        //销毁容器
        context.close();
    }
}
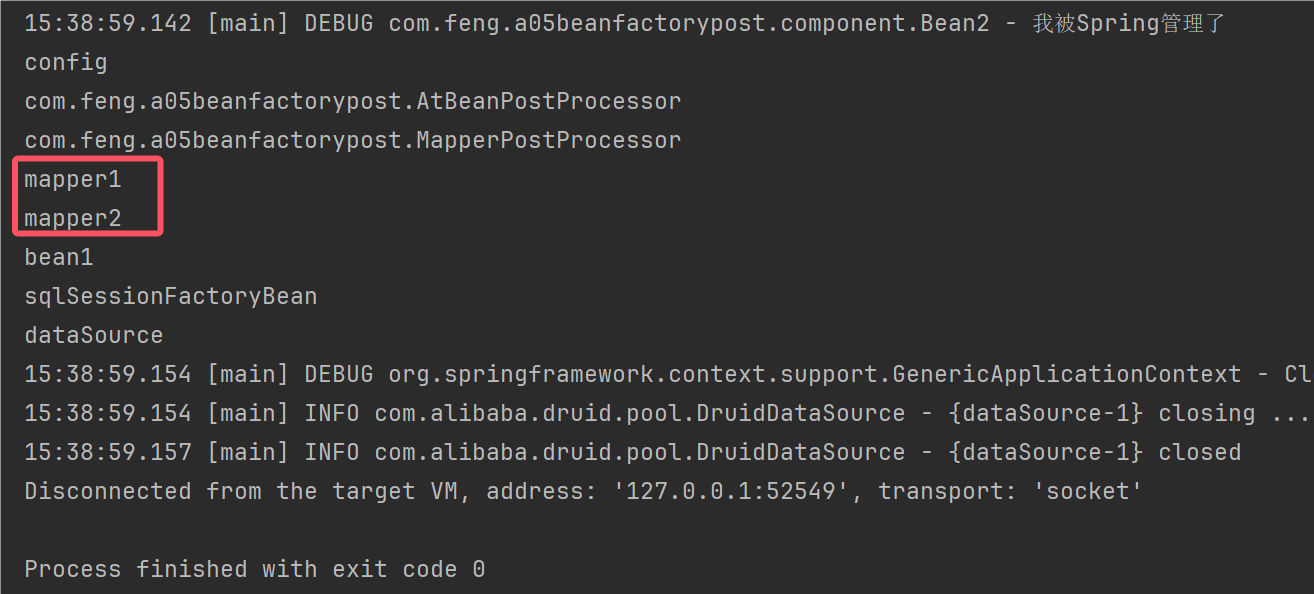
收获💡
- Mapper 接口被 Spring 管理的本质:实际是被作为 MapperFactoryBean 注册到容器中
- Spring 的诡异做法,根据接口生成的 BeanDefinition 仅为根据接口名生成 bean 名
1.6 Aware 接口
失效
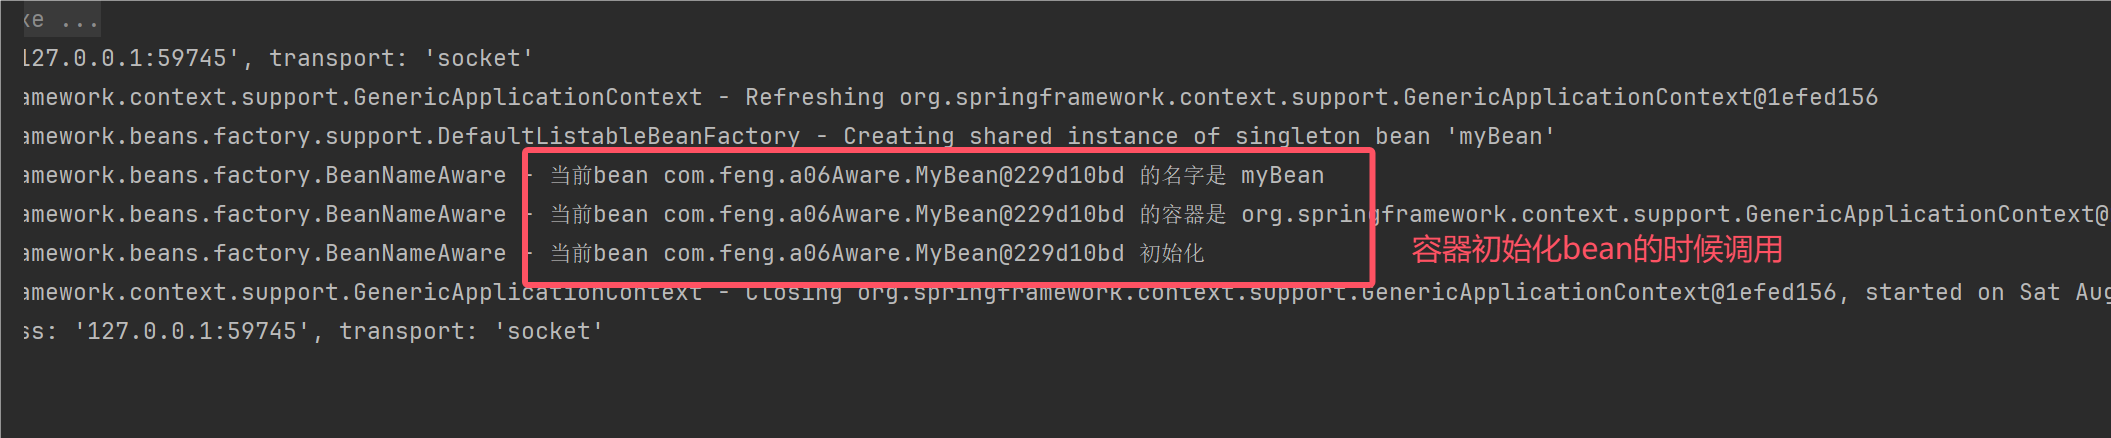
MyBean
public class MyBean implements BeanNameAware , ApplicationContextAware, InitializingBean {
    private static final Logger log = LoggerFactory.getLogger(BeanNameAware.class);
    @Override
    public void setBeanName(String name) {
        log.debug("当前bean " +this+ " 的名字是 " + name);
    }

    @Override
    public void setApplicationContext(ApplicationContext applicationContext) throws BeansException {
        log.debug("当前bean " +this+ " 的容器是 " + applicationContext);
    }

    @Override
    public void afterPropertiesSet() throws Exception {
        log.debug("当前bean " +this+ " 初始化 ");
    }
}
A06Application
public class A06Application {
    private static final Logger log = LoggerFactory.getLogger(A06Application.class);

    public static void main(String[] args) {

        /**
         * 1.Aware 接口用于注入一些与容器相关信息,例如
         *      a:BeanNameAware 注入bean 的名字
         *      b.BeanFactoryAware 注入BeanFactory 容器
         *      c.ApplicationContextAware 注入ApplicationContext 容器
         *      d.EmbeddedValueResolverAware ${}
         */
        GenericApplicationContext context = new GenericApplicationContext();
        context.registerBean("myBean", MyBean.class);
        //初始化时MyBean,会调用setBeanName
        context.refresh();
        context.close();

        /**
         * 2.有同学说:b、c、d 的功能用 @Autowired 就能实现啊,为啥还要用 Aware 接口
         * 简单地说:
         *      a:@Autowired 的解析需要用到 bean 后处理器,属于扩展功能
         *      b.而Aware 接口属于内置功能,不加任何扩展,Spring 就能识别
         * 某些情况下,护展功能会失效,而内置功能不会失效
         *      例1:你会发现用 Aware 注入 ApplicationContext 成功,而@Autowired 注入 ApplicationContext 失败
         */

    }
}
测试@Autowired
public class MyBean implements BeanNameAware , ApplicationContextAware, InitializingBean {
    private static final Logger log = LoggerFactory.getLogger(BeanNameAware.class);
    @Override
    public void setBeanName(String name) {
        log.debug("当前bean " +this+ " 的名字是 " + name);
    }

    @Override
    public void setApplicationContext(ApplicationContext applicationContext) throws BeansException {
        log.debug("当前bean " +this+ " 的容器是 " + applicationContext);
    }

    @Override
    public void afterPropertiesSet() throws Exception {
        log.debug("当前bean " +this+ " 初始化 ");
    }

    @Autowired
    public void aaa(ApplicationContext applicationContext){
        log.debug("当前bean " +this+ " 使用@Autowired的容器是 " + applicationContext);
    }

    @PostConstruct
    public void init(){
        log.debug("当前bean " +this+ " 使用@PostConstruct 初始化");
    }
}

public class A06Application {
    private static final Logger log = LoggerFactory.getLogger(A06Application.class);

    public static void main(String[] args) {

        /**
         * 1.Aware 接口用于注入一些与容器相关信息,例如
         *      a:BeanNameAware 注入bean 的名字
         *      b.BeanFactoryAware 注入BeanFactory 容器
         *      c.ApplicationContextAware 注入ApplicationContext 容器
         *      d.EmbeddedValueResolverAware ${}
         */
        GenericApplicationContext context = new GenericApplicationContext();
        context.registerBean("myBean", MyBean.class);
        //加入对应的后置处理器
        context.registerBean(AutowiredAnnotationBeanPostProcessor.class);
        context.registerBean(CommonAnnotationBeanPostProcessor.class);
        //初始化时MyBean,会调用setBeanName
        context.refresh();
        context.close();

        /**
         * 2.有同学说:b、c、d 的功能用 @Autowired 就能实现啊,为啥还要用 Aware 接口
         * 简单地说:
         *      a:@Autowired 的解析需要用到 bean 后处理器,属于扩展功能
         *      b.而Aware 接口属于内置功能,不加任何扩展,Spring 就能识别
         * 某些情况下,护展功能会失效,而内置功能不会失效
         *      例1:你会发现用 Aware 注入 ApplicationContext 成功,而@Autowired 注入 ApplicationContext 失败
         */

    }
}
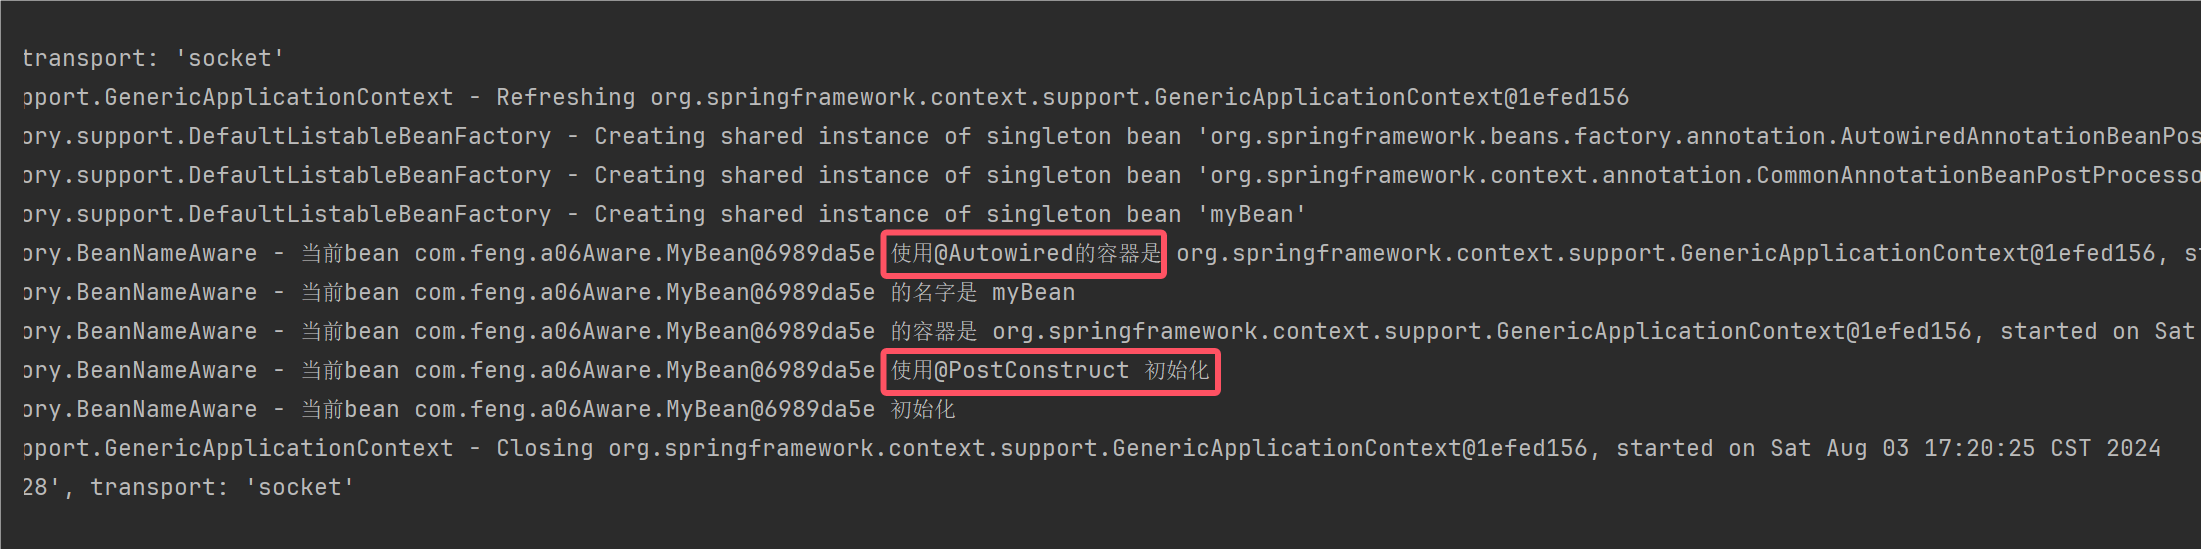
收获💡
- Aware 接口提供了一种【内置】 的注入手段,例如
- BeanNameAware 注入 bean 的名字
- BeanFactoryAware 注入 BeanFactory 容器
- ApplicationContextAware 注入 ApplicationContext 容器
- EmbeddedValueResolverAware 注入 ${} 解析器
- InitializingBean 接口提供了一种【内置】的初始化手段
- 对比
- 内置的注入和初始化不受扩展功能的影响,总会被执行
- 而扩展功能受某些情况影响可能会失效
- 因此 Spring 框架内部的类常用内置注入和初始化
配置类 @Autowired 失效分析
Java 配置类不包含 BeanFactoryPostProcessor 的情况
Java 配置类包含 BeanFactoryPostProcessor 的情况,因此要创建其中的 BeanFactoryPostProcessor 必须提前创建 Java 配置类,而此时的 BeanPostProcessor 还未准备好,导致 @Autowired 等注解失效
对应代码
@Configuration
public class MyConfig1 {

    private static final Logger log = LoggerFactory.getLogger(MyConfig1.class);

    @Autowired
    public void setApplicationContext(ApplicationContext applicationContext) {
        log.debug("注入 ApplicationContext");
    }

    @PostConstruct
    public void init() {
        log.debug("初始化");
    }

    @Bean //  ⬅️ 注释或添加 beanFactory 后处理器对应上方两种情况
    public BeanFactoryPostProcessor processor1() {
        return beanFactory -> {
            log.debug("执行 processor1");
        };
    }

}
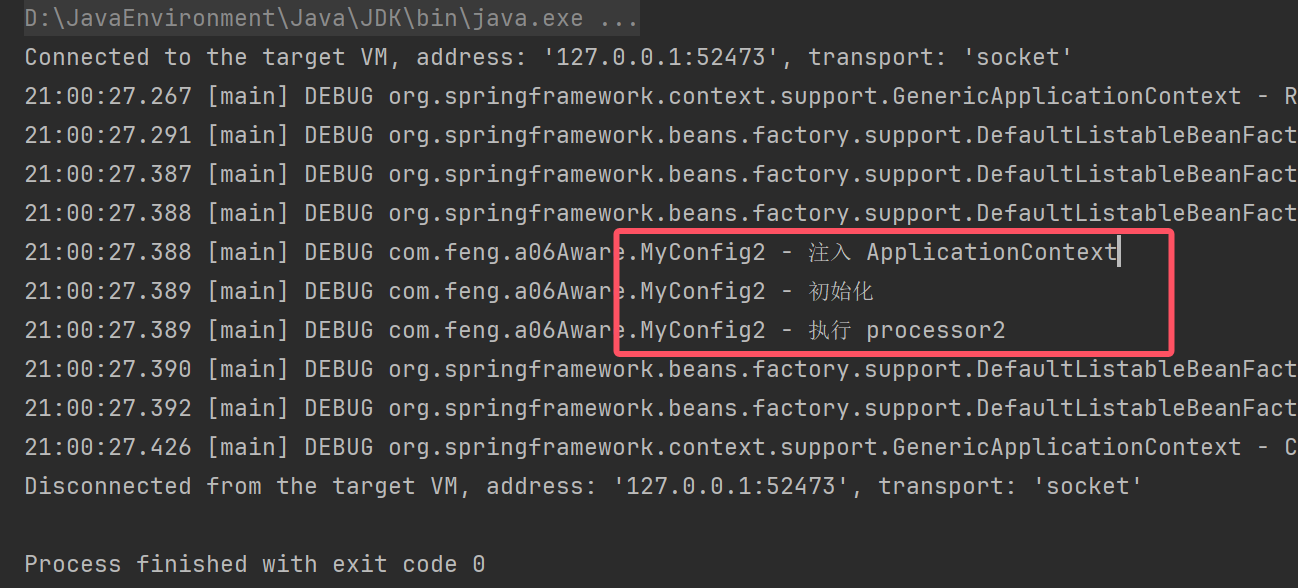
注意
解决方法:
- 用内置依赖注入和初始化取代扩展依赖注入和初始化
- 用静态工厂方法代替实例工厂方法,避免工厂对象提前被创建
内置方法
public class MyConfig2 implements InitializingBean, ApplicationContextAware {
    private static final Logger log = LoggerFactory.getLogger(MyConfig2.class);
    @Override
    public void afterPropertiesSet() throws Exception {
        log.debug("初始化");
    }

    @Override
    public void setApplicationContext(ApplicationContext applicationContext) throws BeansException {
        log.debug("注入 ApplicationContext");
    }

    @Bean //beanFactory 后处理器
    public BeanFactoryPostProcessor processor2(){
        return beanFactory -> log.debug("执行 processor2");
    }
}
public class A06Application {
    private static final Logger log = LoggerFactory.getLogger(A06Application.class);

    public static void main(String[] args) {

        /**
         * 1.Aware 接口用于注入一些与容器相关信息,例如
         *      a:BeanNameAware 注入bean 的名字
         *      b.BeanFactoryAware 注入BeanFactory 容器
         *      c.ApplicationContextAware 注入ApplicationContext 容器
         *      d.EmbeddedValueResolverAware ${}
         */
        GenericApplicationContext context = new GenericApplicationContext();
        //context.registerBean("myBean", MyBean.class);
        //context.registerBean("MyConfig1", MyConfig1.class);
        context.registerBean("MyConfig2", MyConfig2.class);
        //加入对应的后置处理器
        context.registerBean(AutowiredAnnotationBeanPostProcessor.class);
        context.registerBean(CommonAnnotationBeanPostProcessor.class);
        context.registerBean(ConfigurationClassPostProcessor.class);//解析 @ConfigurationScan、@Bean、@Import、@ImportResource 等注解
        //初始化时MyBean,会调用setBeanName
        context.refresh(); // 1.beanFactory 后处理器, 2.添加bean 后处理器, 3.初始化单例
        context.close();

        /**
         * 2.有同学说:b、c、d 的功能用 @Autowired 就能实现啊,为啥还要用 Aware 接口
         * 简单地说:
         *      a:@Autowired 的解析需要用到 bean 后处理器,属于扩展功能
         *      b.而Aware 接口属于内置功能,不加任何扩展,Spring 就能识别
         * 某些情况下,护展功能会失效,而内置功能不会失效
         *      例1:你会发现用 Aware 注入 ApplicationContext 成功,而@Autowired 注入 ApplicationContext 失败
         */

    }
}
1.7 初始化与销毁
Bean1
public class Bean1 implements InitializingBean {
    private static final Logger log = LoggerFactory.getLogger(Bean1.class);

    @PostConstruct
    public void init1(){
        log.info("初始化1");
    }

    @Override
    public void afterPropertiesSet() throws Exception {
        log.info("初始化2");
    }

    public void init3(){
        log.info("初始化3");
    }
}
Bean2
public class Bean2 implements DisposableBean {
    private static final Logger log = LoggerFactory.getLogger(Bean2.class);

    @PreDestroy
    public void destroy1()  {
        log.info("销毁1");
    }

    @Override
    public void destroy() throws Exception {
        log.info("销毁2");
    }

    public void destroy3(){
        log.info("销毁3");
    }
}
A07Application
@SpringBootApplication
public class A07Application {
    public static void main(String[] args) {
        ConfigurableApplicationContext context = SpringApplication.run(A07Application.class, args);
        context.close();
    }

    @Bean(initMethod = "init3")
    public Bean1 bean1(){
        return new Bean1();
    }

    @Bean(destroyMethod = "destroy3")
    public Bean2 bean2(){
        return new Bean2();
    }
}
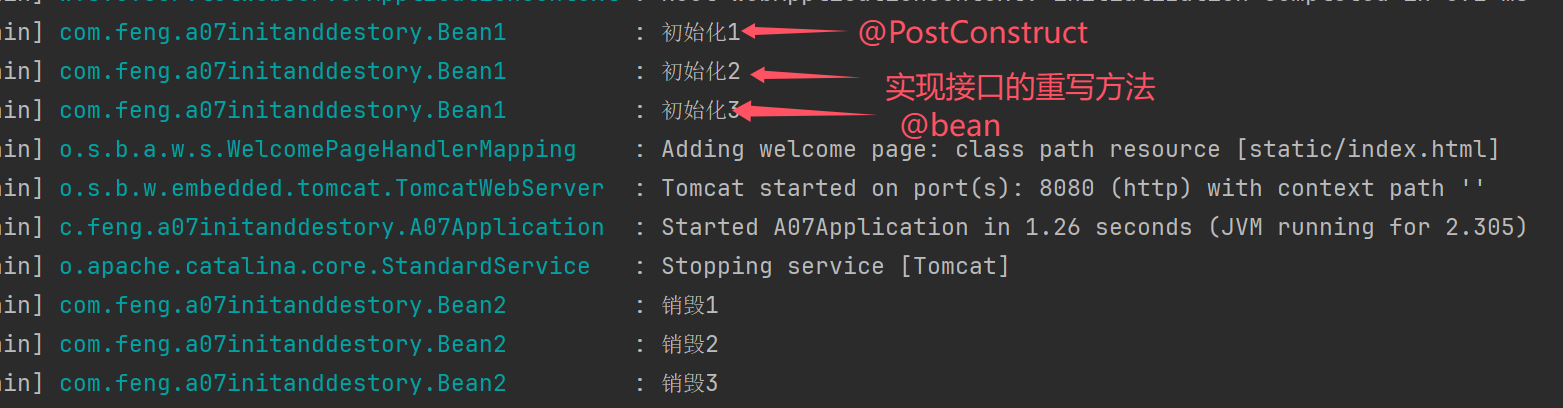
收获💡
Spring 提供了多种初始化手段,除了课堂上讲的 @PostConstruct,@Bean(initMethod) 之外,还可以实现 InitializingBean 接口来进行初始化,如果同一个 bean 用了以上手段声明了 3 个初始化方法,那么它们的执行顺序是
- @PostConstruct 标注的初始化方法
- InitializingBean 接口的初始化方法
- @Bean(initMethod) 指定的初始化方法
与初始化类似,Spring 也提供了多种销毁手段,执行顺序为
- @PreDestroy 标注的销毁方法
- DisposableBean 接口的销毁方法
- @Bean(destroyMethod) 指定的销毁方法
1.8 Scope
比较
BeanForApplication
@Scope("application")
@Component
public class BeanForApplication {
    private static final Logger log = LoggerFactory.getLogger(BeanForApplication.class);

    @PreDestroy
    public void destroy(){
        log.info("destory");
    }
}
BeanForRequest
@Scope("request")
@Component
public class BeanForRequest {
    private static final Logger log = LoggerFactory.getLogger(BeanForRequest.class);

    @PreDestroy
    public void destroy(){
        log.info("destory");
    }
}
BeanForSession
@Scope("session")
@Component
public class BeanForSession {
    private static final Logger log = LoggerFactory.getLogger(BeanForSession.class);

    @PreDestroy
    public void destroy(){
        log.info("destory");
    }
}
MyController
@RestController
public class MyController {

    @Lazy
    @Autowired
    private BeanForRequest beanForRequest;

    @Lazy
    @Autowired
    private BeanForSession beanForSession;

    @Lazy
    @Autowired
    private BeanForApplication beanForApplication;

    @GetMapping(value = "/test", produces = "text/html;charset=utf-8")
    public String test(HttpServletRequest request, HttpSession session){
        ServletContext sc = request.getServletContext();
        String sb = "<ul>" +
                    "<li>request scope " + beanForRequest + "</li>" +
                    "<li>session scope " + beanForSession + "</li>" +
                    "<li>application scope " + beanForApplication + "</li>" +
                   "</ul>";

        return sb;
    }
}
A08Application
/**
 *  singleton, prototype, request, session, application
 *  演示 request, session, application 作用域
 *  打开不同浏览器窗口,访问 http://localhost:8080/test 即可看到效果
 */
@SpringBootApplication
public class A08Application {
    public static void main(String[] args) {
        SpringApplication.run(A08Application.class, args);
    }
}
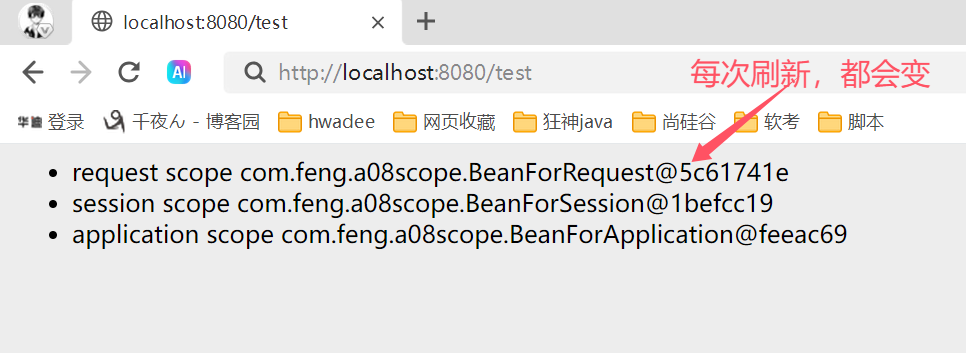
在当前版本的 Spring 和 Spring Boot 程序中,支持五种 Scope
- singleton,容器启动时创建(未设置延迟),容器关闭时销毁
- prototype,每次使用时创建,不会自动销毁,需要调用 DefaultListableBeanFactory.destroyBean(bean) 销毁
- request,每次请求用到此 bean 时创建,请求结束时销毁
- session,每个会话用到此 bean 时创建,会话结束时销毁
- application,web 容器用到此 bean 时创建,容器停止时销毁
有些文章提到有 globalSession 这一 Scope,也是陈旧的说法,目前 Spring 中已废弃
但要注意,如果在 singleton 注入其它 scope 都会有问题,解决方法有
- @Lazy
- @Scope(proxyMode = ScopedProxyMode.TARGET_CLASS)
- ObjectFactory
- ApplicationContext.getBean
演示1 - request, session, application 作用域
代码参考
com.itheima.a08 包
- 打开不同的浏览器, 刷新 http://localhost:8080/test 即可查看效果
- 如果 jdk > 8, 运行时请添加 --add-opens java.base/java.lang=ALL-UNNAMED
收获💡
- 有几种 scope
- 在 singleton 中使用其它几种 scope 的方法
- 其它 scope 的销毁时机
- 可以将通过 server.servlet.session.timeout=30s 观察 session bean 的销毁
- ServletContextScope 销毁机制疑似实现有误
分析 - singleton 注入其它 scope 失效
以单例注入多例为例
有一个单例对象 E
@Component
public class E {
    private static final Logger log = LoggerFactory.getLogger(E.class);

    private F f;

    public E() {
        log.info("E()");
    }

    @Autowired
    public void setF(F f) {
        this.f = f;
        log.info("setF(F f) {}", f.getClass());
    }

    public F getF() {
        return f;
    }
}
要注入的对象 F 期望是多例
@Component
@Scope("prototype")
public class F {
    private static final Logger log = LoggerFactory.getLogger(F.class);

    public F() {
        log.info("F()");
    }
}
测试
E e = context.getBean(E.class);
F f1 = e.getF();
F f2 = e.getF();
System.out.println(f1);
System.out.println(f2);
输出
com.itheima.demo.cycle.F@6622fc65
com.itheima.demo.cycle.F@6622fc65
发现它们是同一个对象,而不是期望的多例对象
对于单例对象来讲,依赖注入仅发生了一次,后续再没有用到多例的 F,因此 E 用的始终是第一次依赖注入的 F
第一种解决办法
解决
- 仍然使用 @Lazy 生成代理
- 代理对象虽然还是同一个,但当每次使用代理对象的任意方法时,由代理创建新的 f 对象
@Component
public class E {

    @Autowired
    @Lazy
    public void setF(F f) {
        this.f = f;
        log.info("setF(F f) {}", f.getClass());
    }

    // ...
}
注意
- @Lazy 加在也可以加在成员变量上,但加在 set 方法上的目的是可以观察输出,加在成员变量上就不行了
- @Autowired 加在 set 方法的目的类似
加到成员变量上,和加到setF上,效果相同
@Component
public class E {
    @Lazy
    @Autowired
    private F1 f1;
    public F1 getF1() {
        return f1;
    }
}
输出
E: setF(F f) class com.itheima.demo.cycle.F$$EnhancerBySpringCGLIB$$8b54f2bc
F: F()
com.itheima.demo.cycle.F@3a6f2de3
F: F()
com.itheima.demo.cycle.F@56303b57
从输出日志可以看到调用 setF 方法时,f 对象F$$EnhancerBySpringCGLIB$$8b54f2bc的类型是代理类型
第二种解决方法
F2
@Scope(value = "prototype",proxyMode = ScopedProxyMode.TARGET_CLASS)
@Component
public class F2 {
}
@Component
public class E {
    @Lazy
    @Autowired
    private F1 f1;

    @Autowired
    private F2 f2;

    public F1 getF1() {
        return f1;
    }

    public F2 getF2() {
        return f2;
    }
}
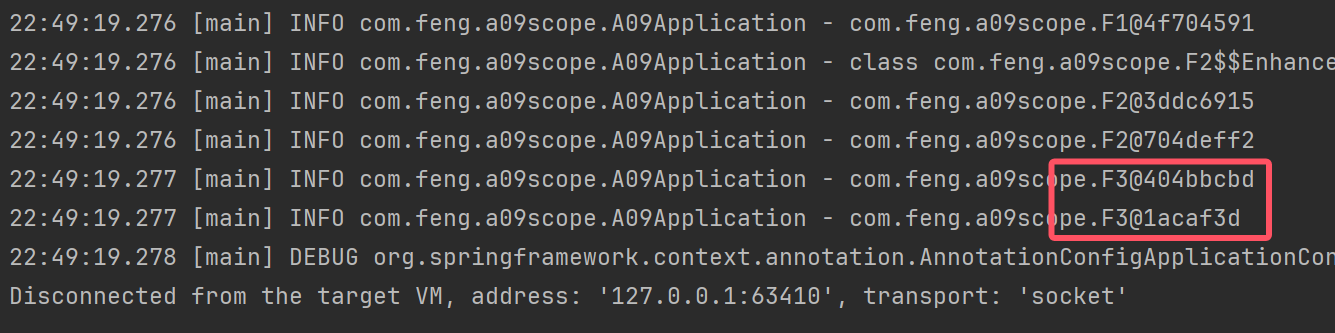
@ComponentScan("com.feng.a09scope")
public class A09Application {
    private static final Logger log = LoggerFactory.getLogger(A09Application.class);
    public static void main(String[] args) {
        AnnotationConfigApplicationContext context = new AnnotationConfigApplicationContext(A09Application.class);

        E e = context.getBean(E.class);
        log.info("{}",e.getF1().getClass());
        log.info("{}",e.getF1());
        log.info("{}",e.getF1());

        log.info("{}",e.getF2().getClass());
        log.info("{}",e.getF2());
        log.info("{}",e.getF2());

        context.close();
    }
}

第三种解决办法
@Scope("prototype")
@Component
public class F3 {
}
@Component
public class E {
    @Lazy
    @Autowired
    private F1 f1;

    @Autowired
    private F2 f2;

    @Autowired
    private ObjectFactory<F3> f3;

    public F1 getF1() {
        return f1;
    }

    public F2 getF2() {
        return f2;
    }

    public F3 getF3() {
        return f3.getObject();
    }
}
A09Application
log.info("{}",e.getF3());
log.info("{}",e.getF3());
第四种解决办法
@Scope("prototype")
@Component
public class F4 {
}
@Component
public class E {
    @Lazy
    @Autowired
    private F1 f1;

    @Autowired
    private F2 f2;

    @Autowired
    private ObjectFactory<F3> f3;

    @Autowired
    private ApplicationContext context;

    public F1 getF1() {
        return f1;
    }

    public F2 getF2() {
        return f2;
    }

    public F3 getF3() {
        return f3.getObject();
    }

    public F4 getF4() {
        return context.getBean(F4.class);
    }
}
A09Application
log.info("{}",e.getF4());
log.info("{}",e.getF4());

演示2 - 4种解决方法
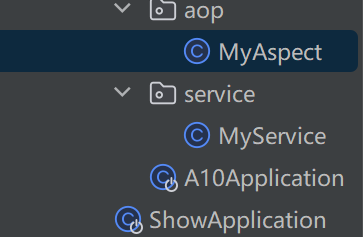
代码参考
com.itheima.a08.sub 包
- 如果 jdk > 8, 运行时请添加 --add-opens java.base/java.lang=ALL-UNNAMED
收获💡
- 单例注入其它 scope 的四种解决方法
- @Lazy
- @Scope(value = "prototype", proxyMode = ScopedProxyMode.TARGET_CLASS)
- ObjectFactory
- ApplicationContext
- 解决方法虽然不同,但理念上殊途同归: 都是推迟其它 scope bean 的获取
2 AOP
2.1 ajc编译器
<dependency>
    <groupId>org.springframework.boot</groupId>
    <artifactId>spring-boot-starter-aop</artifactId>
</dependency>

<build>
    <plugins>
        <plugin>
            <groupId>org.codehaus.mojo</groupId>
            <artifactId>aspectj-maven-plugin</artifactId>
            <version>1.14.0</version>
            <configuration>
                <complianceLevel>1.8</complianceLevel>
                <source>8</source>
                <target>8</target>
                <showWeaveInfo>true</showWeaveInfo>
                <verbose>true</verbose>
                <Xlint>ignore</Xlint>
                <encoding>UTF-8</encoding>
            </configuration>
            <executions>
                <execution>
                    <goals>
                        <goal>compile</goal>
                        <goal>test-compile</goal>
                    </goals>
                </execution>
            </executions>
        </plugin>
MyService
@Service
public class MyService {
    private static final Logger log = LoggerFactory.getLogger(MyService.class);

    public void foo(){
        log.info("foo");
    }
}
MyAspect
@Aspect
public class MyAspect {
    private static final Logger log = LoggerFactory.getLogger(MyAspect.class);

    @Before("execution(* com.feng.a10aop.service.MyService.foo())")
    public void before(){
        log.info("before");
    }
}
A10Application
@SpringBootApplication
public class A10Application {
    private static final Logger log = LoggerFactory.getLogger(A10Application.class);

    public static void main(String[] args) {
        new MyService().foo();
    }
}
在编译时,进行了增强

收获💡
- 编译器也能修改 class 实现增强
- 编译器增强能突破代理仅能通过方法重写增强的限制:可以对构造方法、静态方法等实现增强
注意
- 版本选择了 java 8, 因为目前的 aspectj-maven-plugin 1.14.0 最高只支持到 java 16
- 一定要用 maven 的 compile 来编译, idea 不会调用 ajc 编译器
2.2 agent 类加载
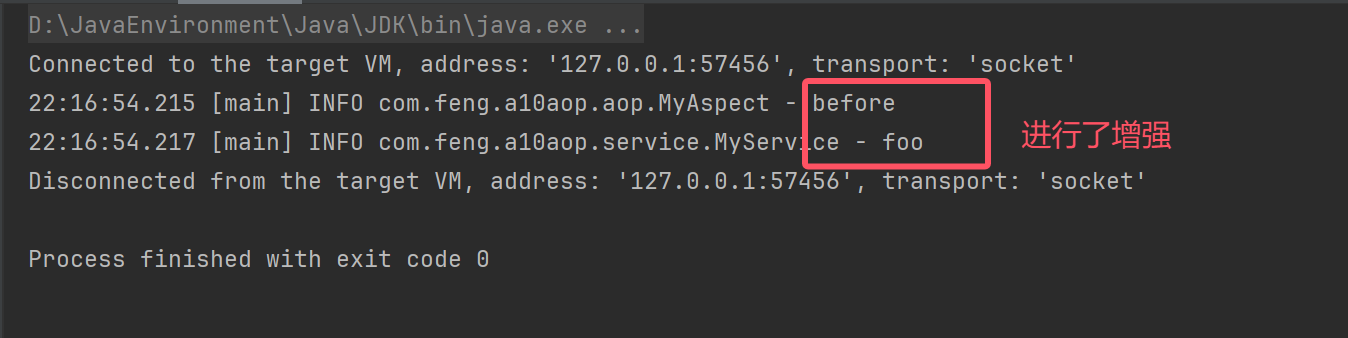
MyService
@Service
public class MyService {
    private static final Logger log = LoggerFactory.getLogger(MyService.class);

    final public void foo(){
        log.info("foo");
        bar();
    }

    public void bar(){
        log.info("bar");
    }
}
MyAspect
@Aspect
public class MyAspect {
    private static final Logger log = LoggerFactory.getLogger(MyAspect.class);

    @Before("execution(* com.feng.a10aop02agent.service.MyService.*())")
    public void before(){
        log.info("before");
    }
}
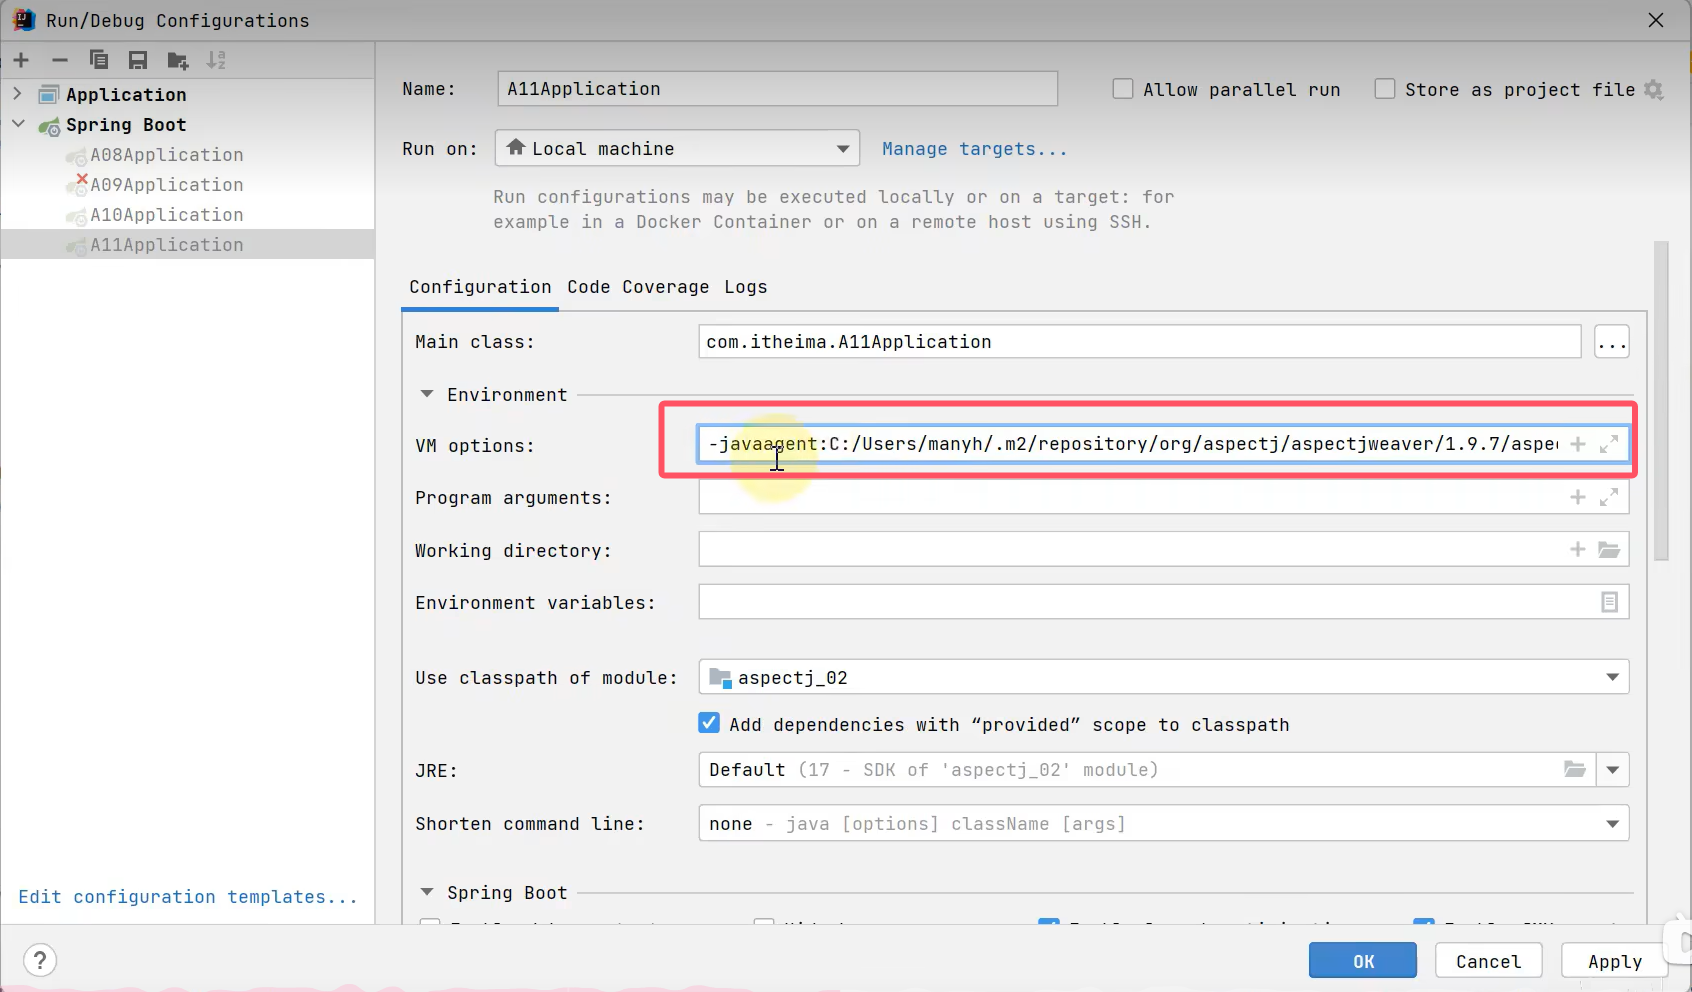
A10Application
/**
 * 注意:
 *  1.版本选择了 java8 因为目前的 aspectj-maven-plugin 1.14.0 最高只支持 到java 16
 *  2.运行时,需要再VM options 添加 -javaagent:D:/MavenRepository/org/aspectj/aspectjweaver/1.9.7/aspectjweaver-1.9.7.jar
 */
@SpringBootApplication
public class A10Application {
    private static final Logger log = LoggerFactory.getLogger(A10Application.class);

    public static void main(String[] args) {
        ConfigurableApplicationContext context = SpringApplication.run(A10Application.class, args);
        MyService myService = context.getBean(MyService.class);

        //MyService 并非代理,但 foo 方法也被增强了,做增强的 java agent ,在加载类时, 修改了 class 字节码
        log.debug("service class: {}", myService.getClass());
        myService.foo();

    }
}

收获💡
- 类加载时可以通过 agent 修改 class 实现增强
2.3 AOP 实现之 proxy
演示1 - jdk 动态代理
public class JdkProxyDemo {
    interface Foo{
        void foo();
    }

    static final class Target implements Foo{
        @Override
        public void foo() {
            System.out.println("foo");
        }
    }

    //jdk  只能针对接口代理
    //cglib
    public static void main(String[] param) {
        //目标对象
        Target target = new Target();

        ClassLoader classLoader = JdkProxyDemo.class.getClassLoader();
        /**
         *  classLoader: 用来加载在运行期间动态生成的字节码
         *  new Class[]{Foo.class}: 将来代理类要实现哪些接口
         *  new InvocationHandler(): 代理类将来调用代理方法时,要执行的一些行为
         *  Proxy.newProxyInstance 创建的代理对象实现了Foo接口,所以可以强转Foo
         */

        Foo proxy = (Foo) Proxy.newProxyInstance(classLoader, new Class[]{Foo.class}, new InvocationHandler() {
            @Override
            public Object invoke(Object proxy, Method method, Object[] args) throws Throwable{
                System.out.println("before");
                //正常方式: 目标.方法(参数)
                //利用反射: 方法.invoke(目标,参数)
                Object result = method.invoke(target, args);
                System.out.println("after");
                return result; //让代理也返回目标方法执行的结果
            }
        });

        proxy.foo();
    }
}
运行结果
before
foo
after
收获💡
- jdk 动态代理要求目标必须实现接口,生成的代理类实现相同接口,因此代理与目标之间是平级兄弟关系
演示2 - cglib 代理
public class CglibProxyDemo {

    static class Target {
        public void foo() {
            System.out.println("target foo");
        }
    }

    //代理类是子类型,目标是父类型
    public static void main(String[] args) {
        //被代理对象
        Target target = new Target();
        //Cglib代理对象是目标对象的子类型,所有可以转成父类
        Target proxy = (Target)Enhancer.create(Target.class, new MethodInterceptor() {
            @Override
            public Object intercept(Object proxy, Method method, Object[] args, MethodProxy methodProxy) throws Throwable {
                //前置增强
                System.out.println("before");
                //利用反射调用被代理对象的方法
                Object result = method.invoke(target, args);
                //methodProxy 它可以避免反射调用
                //Object result = methodProxy.invoke(target, args); //内部没有用反射,需要目标(Spring使用这种)
                //Object result = methodProxy.invokeSuper(proxy, args);//内部没有用反射,需要代理
                //后置增强
                System.out.println("after");
                return result;
            }
        });

        proxy.foo();
    }
}
运行结果
before
target foo
after
收获💡
-
cglib 不要求目标实现接口,它生成的代理类是目标的子类,因此代理与目标之间是子父关系
-
限制⛔:根据上述分析 final 类无法被 cglib 增强
2.4 jdk 动态代理进阶
演示1 - 模拟 jdk 动态代理
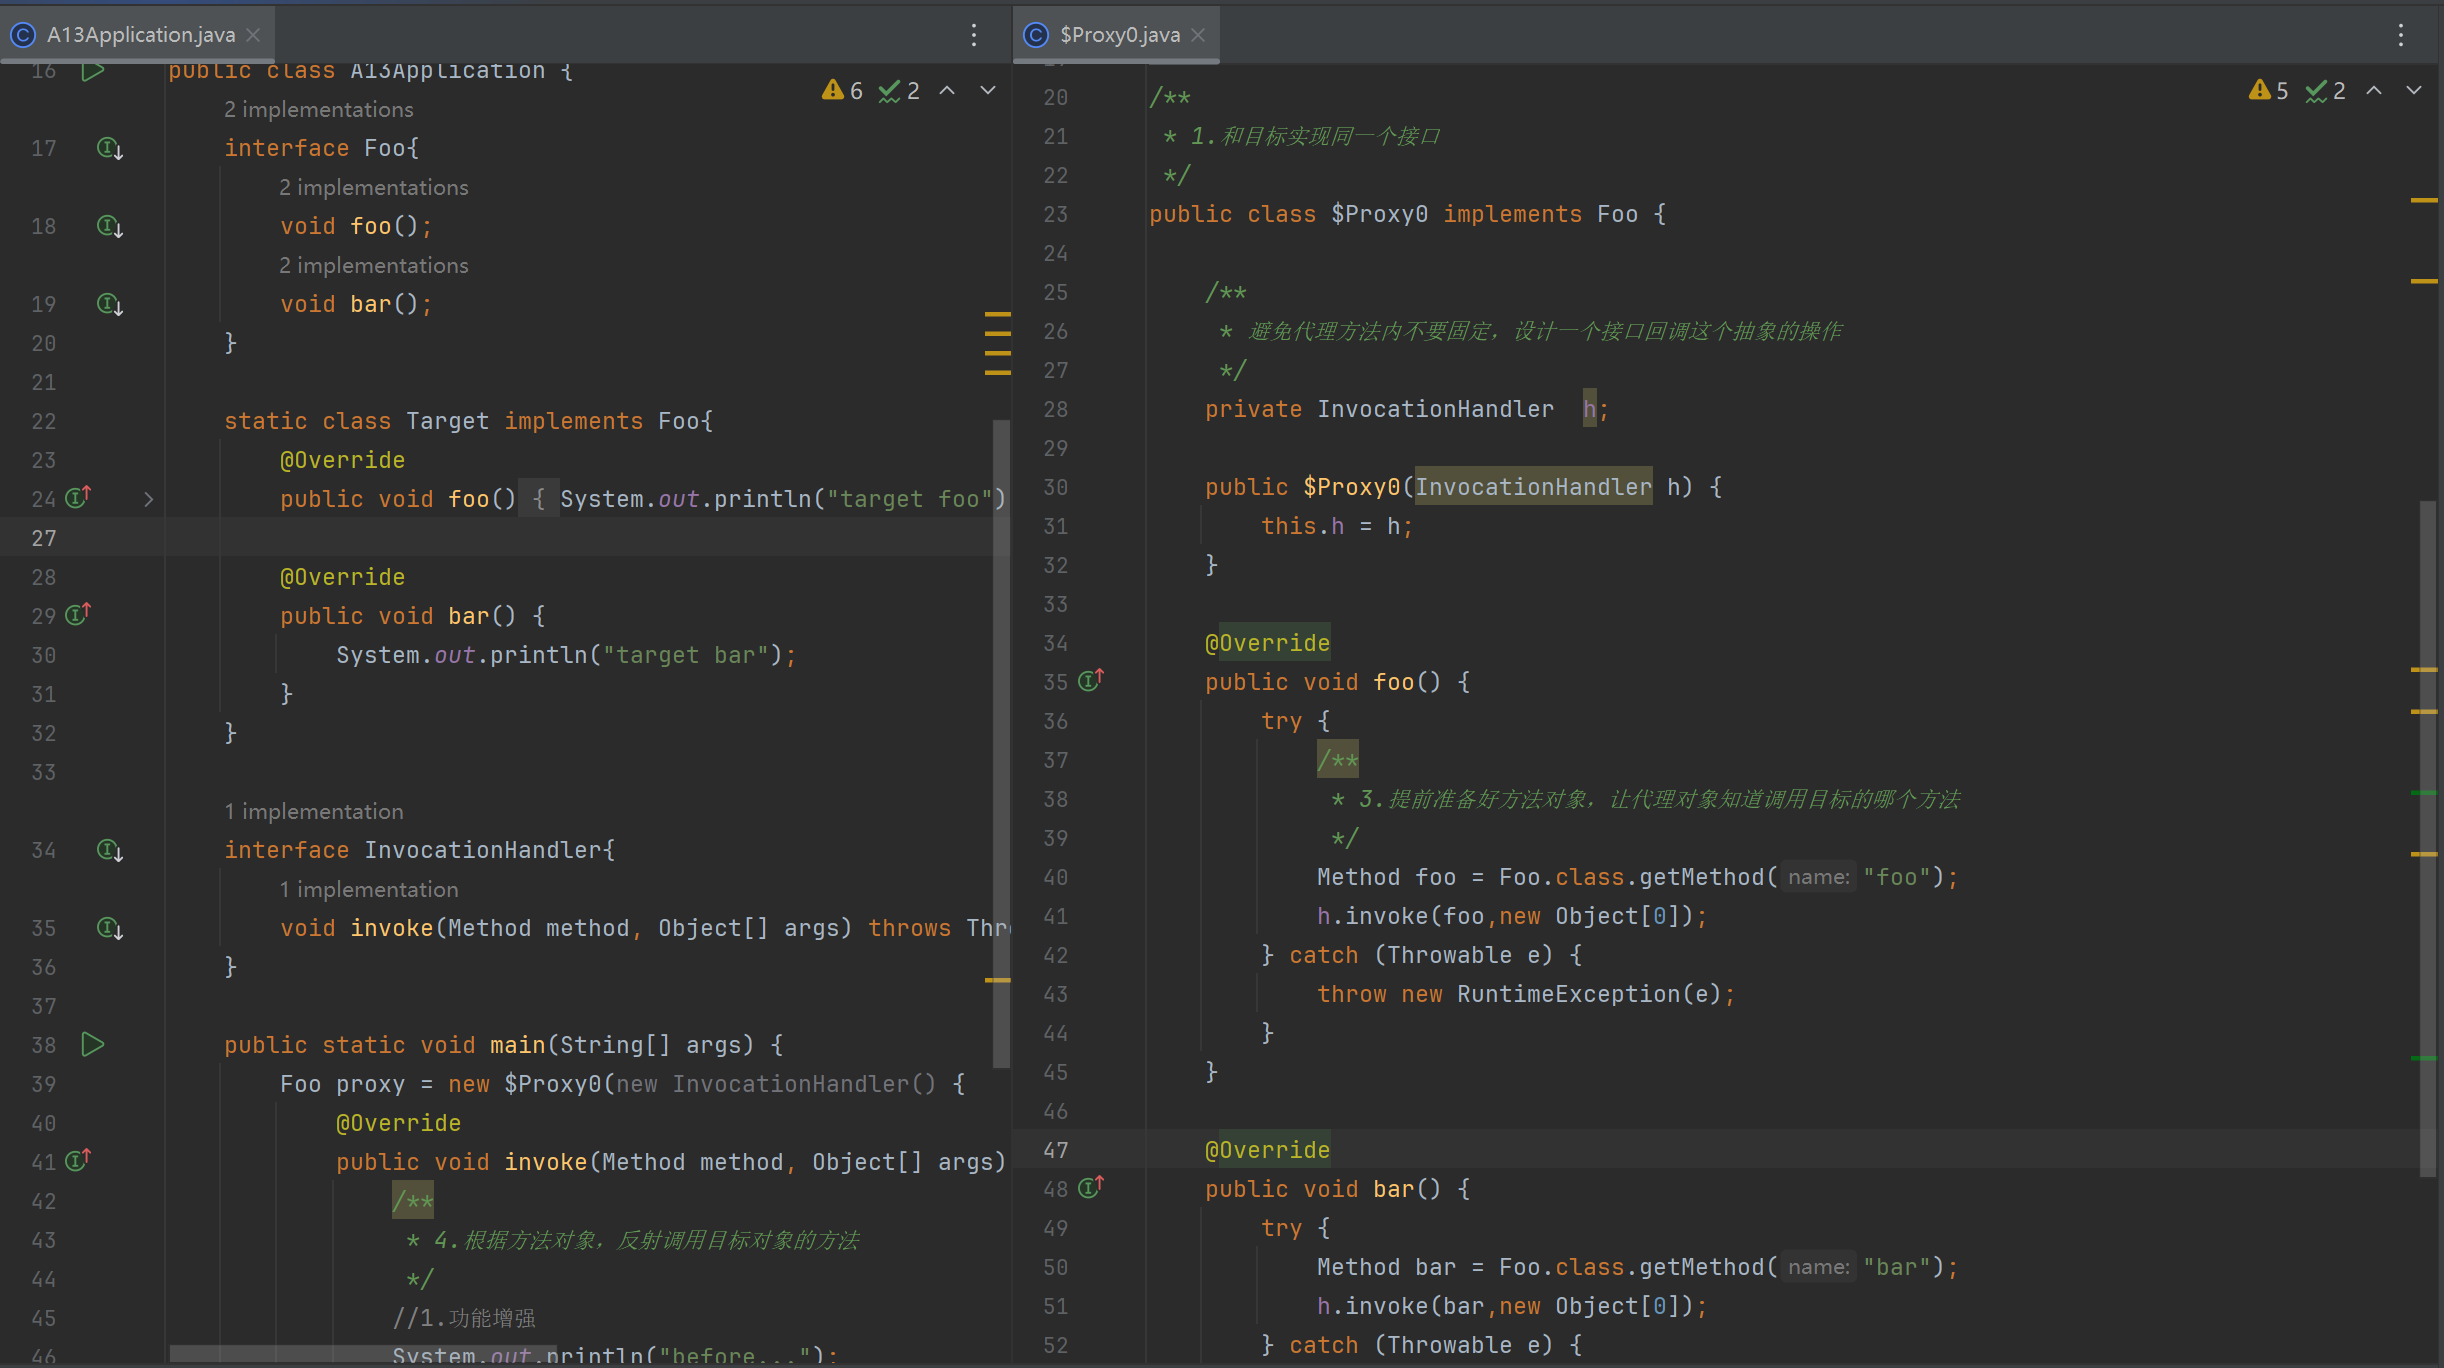
public class A13Application {
    interface Foo{
        void foo();
        void bar();
    }

    static class Target implements Foo{
        @Override
        public void foo() {
            System.out.println("target foo");
        }

        @Override
        public void bar() {
            System.out.println("target bar");
        }
    }

    interface InvocationHandler{
        void invoke(Method method, Object[] args) throws Throwable;
    }

    public static void main(String[] args) {
        Foo proxy = new $Proxy0(new InvocationHandler() {
            @Override
            public void invoke(Method method, Object[] args) throws InvocationTargetException, IllegalAccessException {
                /**
                 * 4.根据方法对象,反射调用目标对象的方法
                 */
                //1.功能增强
                System.out.println("before...");
                //2.调用目标方法
                //new Target().foo();
                method.invoke(new Target(),args);
            }
        });
        proxy.foo();
        proxy.bar();
    }
}
/**
 * 1.和目标实现同一个接口
 */
public class $Proxy0 implements Foo {

    /**
     * 避免代理方法内不要固定,设计一个接口回调这个抽象的操作
     */
    private InvocationHandler  h;

    public $Proxy0(InvocationHandler h) {
        this.h = h;
    }

    @Override
    public void foo() {
        try {
            /**
             * 3.提前准备好方法对象,让代理对象知道调用目标的哪个方法
             */
            Method foo = Foo.class.getMethod("foo");
            h.invoke(foo,new Object[0]);
        } catch (Throwable e) {
            throw new RuntimeException(e);
        }
    }

    @Override
    public void bar() {
        try {
            Method bar = Foo.class.getMethod("bar");
            h.invoke(bar,new Object[0]);
        } catch (Throwable e) {
            throw new RuntimeException(e);
        }
    }
}
运行结果
before...
target foo
before...
target bar
改进一下
public class A13Application {
    interface Foo{
        void foo();
        int bar();
    }

    static class Target implements Foo{
        @Override
        public void foo() {
            System.out.println("target foo");
        }

        @Override
        public int bar() {
            System.out.println("target bar");
            return 100;
        }
    }

    interface InvocationHandler{
        /**
         * 改进一下,获取到目标的返回结果
         * @param proxy
         * @param method
         * @param args
         * @return
         * @throws Throwable
         */
        Object invoke(Object proxy,Method method, Object[] args) throws Throwable;
    }

    public static void main(String[] args) {
        Foo proxy = new $Proxy0(new InvocationHandler() {

            @Override
            public Object invoke(Object proxy,Method method, Object[] args) throws InvocationTargetException, IllegalAccessException {
                /**
                 * 4.根据方法对象,反射调用目标对象的方法
                 */
                //1.功能增强
                System.out.println("before...");
                //2.调用目标方法
                //new Target().foo();
                return method.invoke(new Target(),args);
            }
        });
        proxy.foo();
        proxy.bar();
    }
}
/**
 * 1.和目标实现同一个接口
 */
public class $Proxy0 implements Foo {

    /**
     * 避免代理方法内不要固定,设计一个接口回调这个抽象的操作
     */
    private InvocationHandler  h;

    public $Proxy0(InvocationHandler h) {
        this.h = h;
    }

    @Override
    public void foo() {
        try {
            /**
             * 3.提前准备好方法对象,让代理对象知道调用目标的哪个方法
             */
            h.invoke(this,foo,new Object[0]);
        } catch (RuntimeException | Error e) {
            throw e;
        } catch (Throwable e) {//检查时异常
            throw new UndeclaredThrowableException(e);
        }
    }

    @Override
    public int bar() {
        try {
            /**
             * 代理方法使用目标的返回结果
             */
            Object result = h.invoke(this,bar, new Object[0]);
            return (int)result;
        } catch (RuntimeException | Error e) {//运行时异常
            throw e;
        } catch (Throwable e) {//检查时异常
            throw new UndeclaredThrowableException(e);
        }
    }

    //静态代码块,提前准备好方法对象,只获取一次
    static Method foo;
    static Method bar;
    static {
        try {
            foo = Foo.class.getMethod("foo");
            bar = Foo.class.getMethod("bar");
        } catch (NoSuchMethodException e) {
            throw new NoSuchMethodError(e.getMessage());
        }
    }
}
运行结果
before...
target foo
before...
target bar
老师代码
public class A12 {

    interface Foo {
        void foo();
        int bar();
    }

    static class Target implements Foo {
        public void foo() {
            System.out.println("target foo");
        }

        public int bar() {
            System.out.println("target bar");
            return 100;
        }
    }

    public static void main(String[] param) {
        // ⬇️1. 创建代理,这时传入 InvocationHandler
        Foo proxy = new $Proxy0(new InvocationHandler() {
            // ⬇️5. 进入 InvocationHandler
            public Object invoke(Object proxy, Method method, Object[] args) throws Throwable{
                // ⬇️6. 功能增强
                System.out.println("before...");
                // ⬇️7. 反射调用目标方法
                return method.invoke(new Target(), args);
            }
        });
        // ⬇️2. 调用代理方法
        proxy.foo();
        proxy.bar();
    }
}
模拟代理实现
import java.lang.reflect.InvocationHandler;
import java.lang.reflect.Method;
import java.lang.reflect.Proxy;
import java.lang.reflect.UndeclaredThrowableException;

// ⬇️这就是 jdk 代理类的源码, 秘密都在里面
public class $Proxy0 extends Proxy implements A12.Foo {

    public $Proxy0(InvocationHandler h) {
        super(h);
    }
    // ⬇️3. 进入代理方法
    public void foo() {
        try {
            // ⬇️4. 回调 InvocationHandler
            h.invoke(this, foo, new Object[0]);
        } catch (RuntimeException | Error e) {
            throw e;
        } catch (Throwable e) {
            throw new UndeclaredThrowableException(e);
        }
    }

    @Override
    public int bar() {
        try {
            Object result = h.invoke(this, bar, new Object[0]);
            return (int) result;
        } catch (RuntimeException | Error e) {
            throw e;
        } catch (Throwable e) {
            throw new UndeclaredThrowableException(e);
        }
    }

    static Method foo;
    static Method bar;
    static {
        try {
            foo = A12.Foo.class.getMethod("foo");
            bar = A12.Foo.class.getMethod("bar");
        } catch (NoSuchMethodException e) {
            throw new NoSuchMethodError(e.getMessage());
        }
    }
}
收获💡
代理一点都不难,无非就是利用了多态、反射的知识
- 方法重写可以增强逻辑,只不过这【增强逻辑】千变万化,不能写死在代理内部
- 通过接口回调将【增强逻辑】置于代理类之外
- 配合接口方法反射(是多态调用),就可以再联动调用目标方法
- 会用 arthas 的 jad 工具反编译代理类
- 限制⛔:代理增强是借助多态来实现,因此成员变量、静态方法、final 方法均不能通过代理实现
演示2 - 方法反射优化
TestMethodInvoke
public class TestMethodInvoke {
    public static void main(String[] args) throws Exception {
        Method foo = TestMethodInvoke.class.getMethod("foo", int.class);
        for (int i = 0; i < 17; i++) {
            show(i,foo);
            foo.invoke(null,i);
        }
        System.in.read();
    }

    //方法反射调用,底层MethodAccessor 的实现类
    public static void show(int i,Method foo){
        System.out.println(foo);
    }

    public static void foo(int i){
        System.out.println(i + ":" +"foo");
    }
}
收获💡
- 前 16 次反射性能较低
- 第 17 次调用会生成代理类,优化为非反射调用
- 会用 arthas 的 jad 工具反编译第 17 次调用生成的代理类
注意
运行时请添加 --add-opens java.base/java.lang.reflect=ALL-UNNAMED --add-opens java.base/jdk.internal.reflect=ALL-UNNAMED
2.5 cglib 代理进阶
演示 - 模拟 cglib 代理
Target
public class Target {
    public void save() {
        System.out.println("save");
    }

    public void save(int i) {
        System.out.println("save(int)");
    }

    public void save(long j) {
        System.out.println("save(long)");
    }

}
Proxy
public class Proxy extends Target{

    private MethodInterceptor methodInterceptor;

    public void setMethodInterceptor(MethodInterceptor methodInterceptor) {
        this.methodInterceptor = methodInterceptor;
    }

    static Method save0;
    static Method save1;
    static Method save2;

    static {
        try {
            save0 = Target.class.getMethod("save");
            save1 = Target.class.getMethod("save", int.class);
            save2 = Target.class.getMethod("save", long.class);
        } catch (NoSuchMethodException e) {
            throw new NoSuchMethodError(e.getMessage());
        }
    }

    @Override
    public void save() {
        try {
            methodInterceptor.intercept(this, save0, new Object[0], null);
        } catch (Throwable e) {
            throw new UndeclaredThrowableException(e);
        }
    }

    @Override
    public void save(int i) {
        try {
            methodInterceptor.intercept(this, save1, new Object[]{i}, null);
        } catch (Throwable e) {
            throw new UndeclaredThrowableException(e);
        }
    }

    @Override
    public void save(long j) {
        try {
            methodInterceptor.intercept(this, save2, new Object[]{j}, null);
        } catch (Throwable e) {
            throw new UndeclaredThrowableException(e);
        }
    }
}
A14
public class A14 {
    public static void main(String[] args) {
        Proxy proxy = new Proxy();
        Target target = new Target();
        proxy.setMethodInterceptor(new MethodInterceptor() {
            @Override
            public Object intercept(Object o, Method method, Object[] objects, MethodProxy methodProxy) throws Throwable {
                System.out.println("before");
                //这个 method 参数在实际运行时代表的是拦截到的那个方法
                return method.invoke(target,objects);
            }
        });

        proxy.save();
        proxy.save(1);
        proxy.save(2L);
    }
}
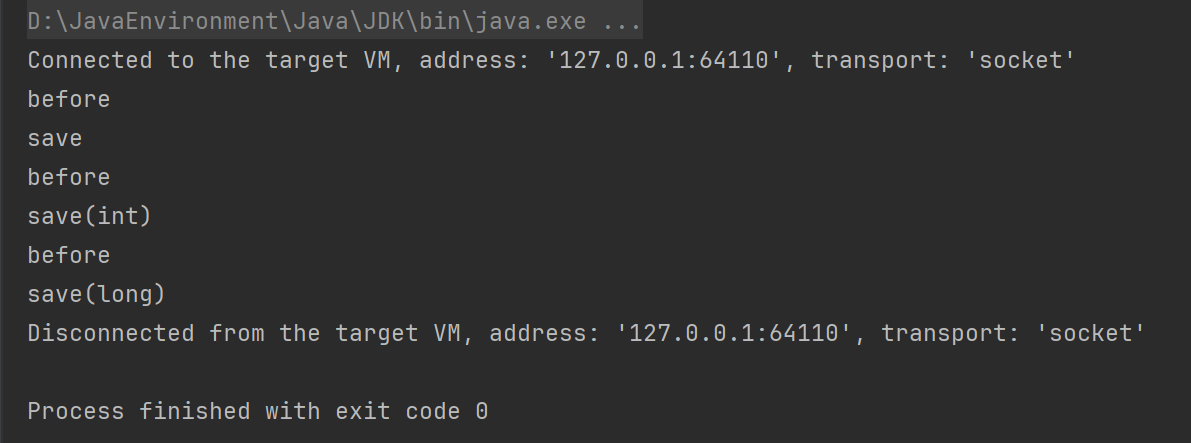
收获💡
和 jdk 动态代理原理查不多
- 回调的接口换了一下,InvocationHandler 改成了 MethodInterceptor
- 调用目标时有所改进,见下面代码片段
- method.invoke 是反射调用,必须调用到足够次数才会进行优化
- methodProxy.invoke 是不反射调用,它会正常(间接)调用目标对象的方法(Spring 采用)
- methodProxy.invokeSuper 也是不反射调用,它会正常(间接)调用代理对象的方法,可以省略目标对象
public class A14Application {
    public static void main(String[] args) throws InvocationTargetException {

        Target target = new Target();
        Proxy proxy = new Proxy();

        proxy.setCallbacks(new Callback[]{(MethodInterceptor) (p, m, a, mp) -> {
            System.out.println("proxy before..." + mp.getSignature());
            // ⬇️调用目标方法(三种)
//            Object result = m.invoke(target, a);  // ⬅️反射调用
//            Object result = mp.invoke(target, a); // ⬅️非反射调用, 结合目标用
            Object result = mp.invokeSuper(p, a);   // ⬅️非反射调用, 结合代理用
            System.out.println("proxy after..." + mp.getSignature());
            return result;
        }});

        // ⬇️调用代理方法
        proxy.save();
    }
}
注意
- 调用 Object 的方法, 后两种在 jdk >= 9 时都有问题, 需要 --add-opens java.base/java.lang=ALL-UNNAMED
不使用反射,实现代理
Target
public class Target {
    public void save() {
        System.out.println("save");
    }

    public void save(int i) {
        System.out.println("save(int)");
    }

    public void save(long j) {
        System.out.println("save(long)");
    }

}
Proxy
public class Proxy extends Target{

    private MethodInterceptor methodInterceptor;

    public void setMethodInterceptor(MethodInterceptor methodInterceptor) {
        this.methodInterceptor = methodInterceptor;
    }

    static Method save0;
    static Method save1;
    static Method save2;

    static MethodProxy save0Proxy;
    static MethodProxy save1Proxy;
    static MethodProxy save2Proxy;

    static {
        try {
            save0 = Target.class.getMethod("save");
            save1 = Target.class.getMethod("save", int.class);
            save2 = Target.class.getMethod("save", long.class);
            //()V : 其中() 代表无参, V代表返回值是void
            save0Proxy = MethodProxy.create(Target.class, Proxy.class,"()V","save","saveSuper");
            save1Proxy = MethodProxy.create(Target.class, Proxy.class,"(I)V","save","saveSuper");
            save2Proxy = MethodProxy.create(Target.class, Proxy.class,"(J)V","save","saveSuper");
        } catch (NoSuchMethodException e) {
            throw new NoSuchMethodError(e.getMessage());
        }
    }

    // >>>>>>>>>>>>>>>>>>>>>>>>>>带原始功能的方法
    public void saveSuper(){
        super.save();
    }

    public void saveSuper(int i){
        super.save(i);
    }

    public void saveSuper(long j){
        super.save(j);
    }

    // >>>>>>>>>>>>>>>>>>>>>>>>>>带增强功能的方法
    @Override
    public void save() {
        try {
            methodInterceptor.intercept(this, save0, new Object[0], save0Proxy);
        } catch (Throwable e) {
            throw new UndeclaredThrowableException(e);
        }
    }

    @Override
    public void save(int i) {
        try {
            methodInterceptor.intercept(this, save1, new Object[]{i}, save1Proxy);
        } catch (Throwable e) {
            throw new UndeclaredThrowableException(e);
        }
    }

    @Override
    public void save(long j) {
        try {
            methodInterceptor.intercept(this, save2, new Object[]{j}, save2Proxy);
        } catch (Throwable e) {
            throw new UndeclaredThrowableException(e);
        }
    }
}
A14
public class A14 {
    public static void main(String[] args) {
        Proxy proxy = new Proxy();
        Target target = new Target();
        proxy.setMethodInterceptor(new MethodInterceptor() {
            @Override
            public Object intercept(Object p, Method method, Object[] args, MethodProxy methodProxy) throws Throwable {
                System.out.println("before");
                //这个 method 参数在实际运行时代表的是拦截到的那个方法
                //return method.invoke(target,args);//反射调用
                //return methodProxy.invoke(target,args);//内部无反射,结合目标用
               return methodProxy.invokeSuper(p,args);//内部无反射,结合代理用
            }
        });

        proxy.save();
        proxy.save(1);
        proxy.save(2L);
    }
}
运行结果
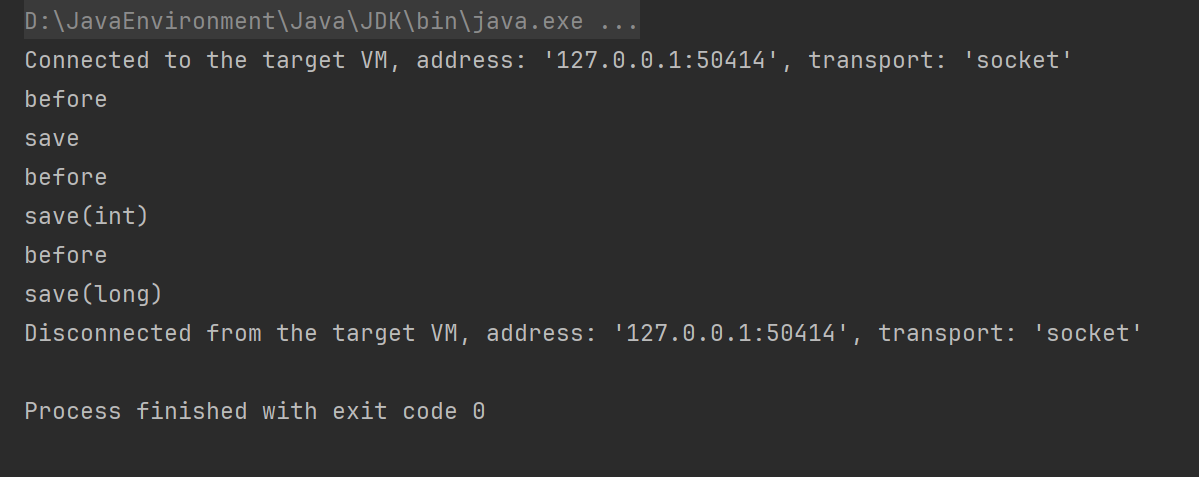
2.6 cglib 避免反射调用
演示 - cglib 如何避免反射
TargetFastClass
/**
 * save0Proxy = MethodProxy.create(Target.class, Proxy.class,"()V","save","saveSuper");
 * 调用这个方法创建MethodProxy对象的时候,底层就会创建一个TargetFastClass类型(本身也是一个代理类,作用是避免反射调用)
 * 根据(Target.class, Proxy.class,"()V","save","saveSuper") 得到方法的签名,调用getIndex(),记录方法的编号
 * 在后续测试 methodProxy.invoke(target,args),就知道自己方法的编号是什么,
 * 然后找到TargetFastClass中的invoke方法,根据传入的(target,args),根据已知的方法编号,直接调用目标对象的方法,避免反射调用。
 */
public class TargetFastClass {

    static Signature S0 = new Signature("save", "()V");
    static Signature S1 = new Signature("save", "(I)V");
    static Signature S2 = new Signature("save", "(J)V");

    //获取目标方法的编号
    /**
     * Target
     *     save()         编号0
     *     save(int)      编号1
     *     save(long)     编号2
     * signature 包括方法名字、参数返回值
     */
    public int getIndex(Signature signature){
        if(signature.equals(S0)){
            return 0;
        }else if(signature.equals(S1)){
            return 1;
        }else if(signature.equals(S2)){
            return 2;
        }
         return -1;
    }

    //根据方法编号,正常调用目标对象方法
    public Object invoke(int index, Object target, Object[] args){
        if (index == 0){
            ((Target)target).save();
            return null;
        }else if (index == 1){
            ((Target)target).save((int)args[0]);
            return null;
        }else if (index == 2){
            ((Target)target).save((long)args[0]);
            return null;
        }else {
            throw new RuntimeException("No such method");
        }
    }

    //演示一下methodProxy.invoke(target,args)的本质代码流程
    public static void main(String[] args) {
        TargetFastClass targetFastClass = new TargetFastClass();
        int index = targetFastClass.getIndex(new Signature("save", "()V"));
        System.out.println(index);
        targetFastClass.invoke(index,new Target(),new Object[0]);
    }
}
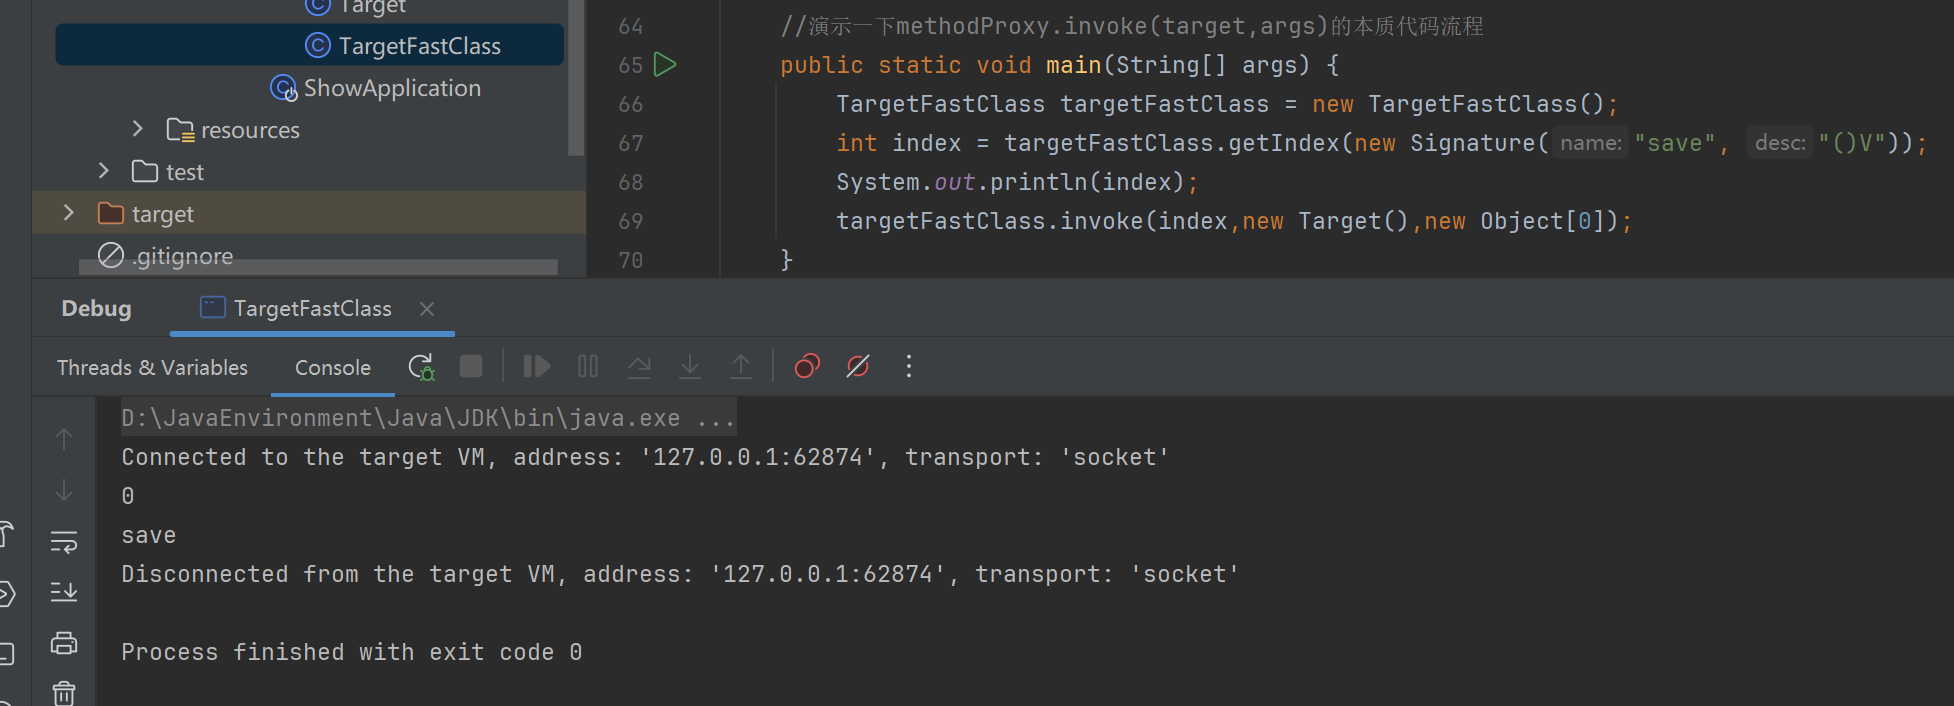
ProxyFastClass
public class ProxyFastClass {
    //saveSuper: 带原始功能的方法
    static Signature S0 = new Signature("saveSuper", "()V");
    static Signature S1 = new Signature("saveSuper", "(I)V");
    static Signature S2 = new Signature("saveSuper", "(J)V");

    //获取代理方法的编号
    /**
     * Proxy
     *     saveSuper()         编号0
     *     saveSuper(int)      编号1
     *     saveSuper(long)     编号2
     * signature 包括方法名字、参数返回值
     */
    public int getIndex(Signature signature){
        if(signature.equals(S0)){
            return 0;
        }else if(signature.equals(S1)){
            return 1;
        }else if(signature.equals(S2)){
            return 2;
        }
        return -1;
    }

    //根据方法编号,正常调用目标对象方法
    public Object invoke(int index, Object proxy, Object[] args){
        if (index == 0){
            ((Proxy)proxy).saveSuper();
            return null;
        }else if (index == 1){
            ((Proxy)proxy).saveSuper((int)args[0]);
            return null;
        }else if (index == 2){
            ((Proxy)proxy).saveSuper((long)args[0]);
            return null;
        }else {
            throw new RuntimeException("No such method");
        }
    }

    //演示一下methodProxy.invoke(target,args)的本质代码流程
    public static void main(String[] args) {
        ProxyFastClass proxyFastClass = new ProxyFastClass();
        int index = proxyFastClass.getIndex(new Signature("saveSuper", "()V"));
        System.out.println(index);
        proxyFastClass.invoke(index,new Proxy(),new Object[0]);
    }
}
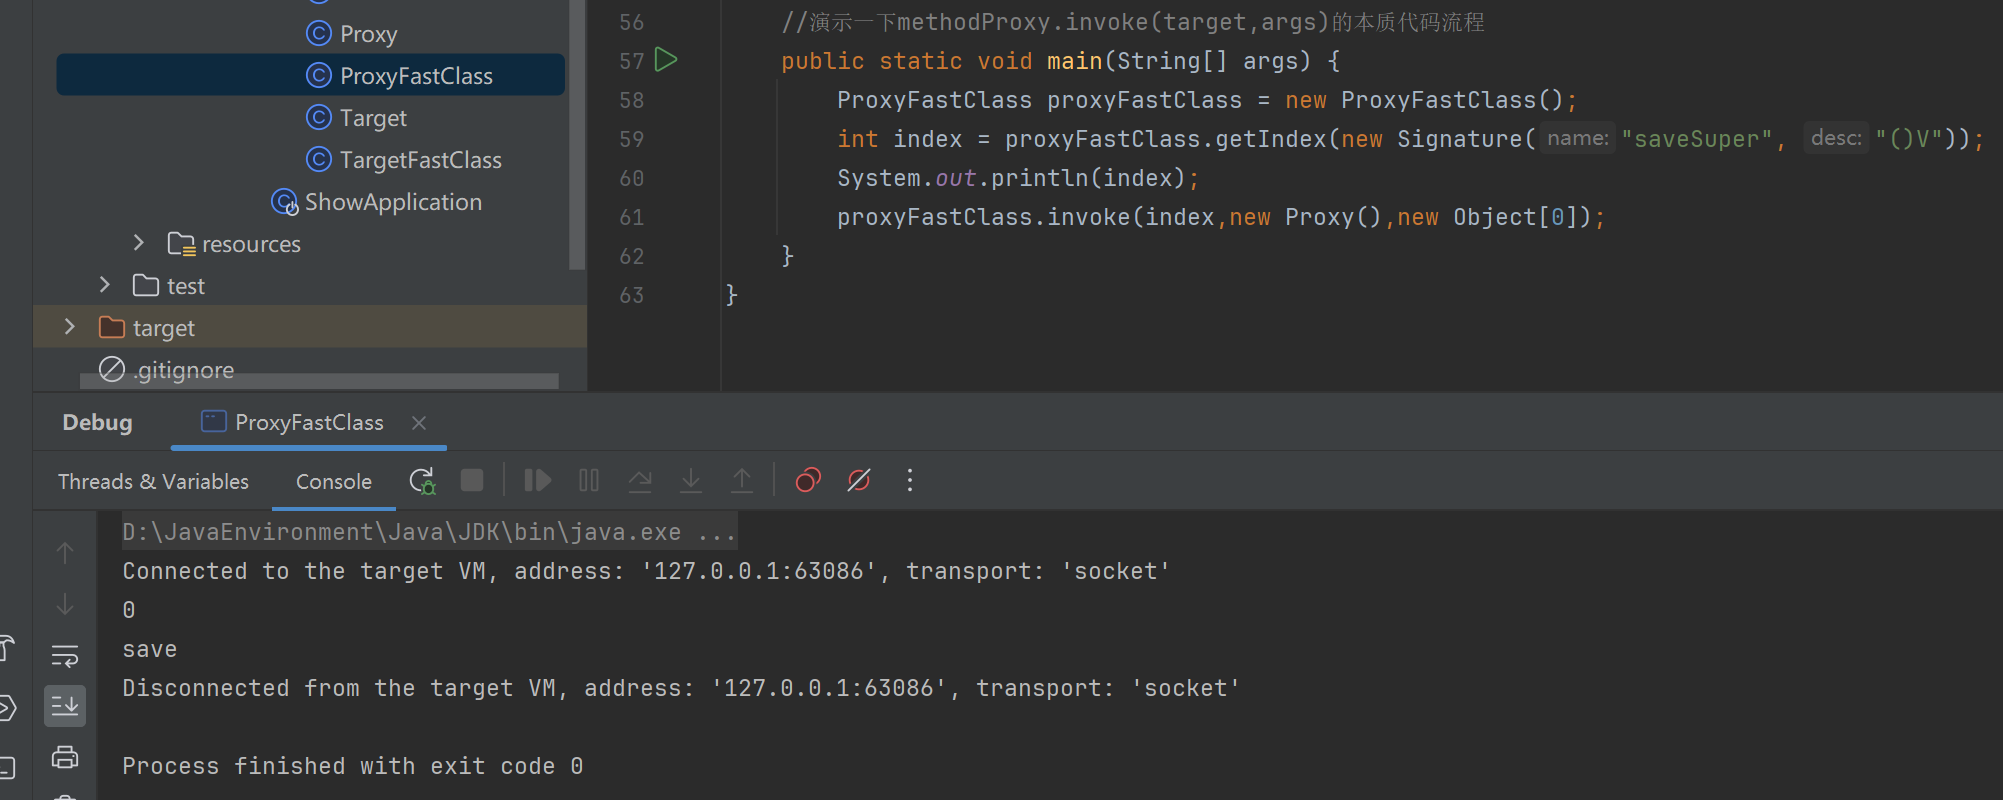
收获💡
- 当调用 MethodProxy 的 invoke 或 invokeSuper 方法时, 会动态生成两个类
- ProxyFastClass 配合代理对象一起使用, 避免反射
- TargetFastClass 配合目标对象一起使用, 避免反射 (Spring 用的这种)
- TargetFastClass 记录了 Target 中方法与编号的对应关系
- save(long) 编号 2
- save(int) 编号 1
- save() 编号 0
- 首先根据方法名和参数个数、类型, 用 switch 和 if 找到这些方法编号
- 然后再根据编号去调用目标方法, 又用了一大堆 switch 和 if, 但避免了反射
- ProxyFastClass 记录了 Proxy 中方法与编号的对应关系,不过 Proxy 额外提供了下面几个方法
- saveSuper(long) 编号 2,不增强,仅是调用 super.save(long)
- saveSuper(int) 编号 1,不增强, 仅是调用 super.save(int)
- saveSuper() 编号 0,不增强, 仅是调用 super.save()
- 查找方式与 TargetFastClass 类似
- 为什么有这么麻烦的一套东西呢?
- 避免反射, 提高性能, 代价是一个代理类配两个 FastClass 类, 代理类中还得增加仅调用 super 的一堆方法
- 用编号处理方法对应关系比较省内存, 另外, 最初获得方法顺序是不确定的, 这个过程没法固定死
2.7 jdk和cglib在Spring 中的统一
Spring 中对切点、通知、切面的抽象如下
- 切点:接口 Pointcut,典型实现 AspectJExpressionPointcut
- 通知:典型接口为 MethodInterceptor 代表环绕通知
- 切面:Advisor,包含一个 Advice 通知,PointcutAdvisor 包含一个 Advice 通知和一个 Pointcut
代理相关类图
- AopProxyFactory 根据 proxyTargetClass 等设置选择 AopProxy 实现
- AopProxy 通过 getProxy 创建代理对象
- 图中 Proxy 都实现了 Advised 接口,能够获得关联的切面集合与目标(其实是从 ProxyFactory 取得)
- 调用代理方法时,会借助 ProxyFactory 将通知统一转为环绕通知:MethodInterceptor
演示 - 底层切点、通知、切面
public class A15 {

    @Aspect
    static class MyAspect {

        /**
         * 1.切面(Aspect):
         * 切面是一个模块化的关注点,封装了横切关注点的逻辑。它是你用来定义“在什么地方执行什么行为”的地方。
         * 切面通常使用 @Aspect 注解来定义。
         * 在你的代码中,MyAspect 类就是一个切面,它定义了在调用 foo() 方法之前应该执行的逻辑。
         *
         * 2.切点(Pointcut):
         * 切点是指在哪些连接点上应用切面的通知。简单来说,切点决定了哪些方法或代码块应该被切面拦截。
         * 在你的例子中,execution(* foo()) 就是一个切点表达式,它定义了哪些方法应该被拦截。
         * 具体而言,execution(* foo()) 匹配所有名为 foo 的方法,不管其返回类型是什么。
         * 这里的 execution(* foo()) 就是切点,它表示所有名为 foo 的方法的执行。
         *
         * 3.通知(Advice)
         * 是指切面中的具体操作,即当某个切点匹配时,实际要执行的代码逻辑。换句话说,通知定义了在切点处要执行的行为或动作。
         *
         * 通知与切点的关系:
         * 切点(Pointcut):定义在哪里应用通知。
         * 通知(Advice):定义在这些切点上做什么,即执行什么样的操作。
         *
         * @Before 是通知的类型(前置通知),execution(* foo()) 是切点,
         * before() 方法就是通知的具体实现,它定义了在 foo() 方法执行之前要执行的操作。
         */

        //第一个位置的 * 代表返回值类型
        @Before("execution(* foo())")
        public void before() {
            System.out.println("前置增强");
        }

        @After("execution(* foo())")
        public void after() {
            System.out.println("后置增强");
        }
    }


    public static void main(String[] args) {
        /**
         * 两个切面概念
         * aspect =
         *    通知1(advice) + 切点1(pointcut)
         *    通知2(advice) + 切点2(pointcut)
         *    通知3(advice) + 切点3(pointcut)
         *    ...
         * advisor = 更细粒度的切面,包含一个通知和切点
         */

        // 1.备好切点
        AspectJExpressionPointcut pointcut = new AspectJExpressionPointcut();
        pointcut.setExpression("execution(* foo())");
        // 2.备好通知  import org.aopalliance.intercept.MethodInterceptor;
        MethodInterceptor advice = new MethodInterceptor() {
            @Override
            public Object invoke(MethodInvocation invocation) throws Throwable {
                System.out.println("before ...");
                Object result = invocation.proceed();
                System.out.println("after ...");
                return result;
            }
        };
        // 3.备好切面
        DefaultPointcutAdvisor advisor = new DefaultPointcutAdvisor(pointcut, advice);

        /**
         * 4.创建代理   proxyTargetClass在ProxyFactory的顶层父类ProxyConfig中
         *      a. proxyTargetClass = false, 目标实现了接口, 用jdk 实现
         *      b. proxyTargetClass = false, 目标没有实现接口, 用cglib实现
         *      c. proxyTargetClass = true, 总是使用 cglib 实现
         */
        Target1 target = new Target1();
        ProxyFactory factory = new ProxyFactory();
        factory.setTarget(target);
        factory.addAdvisor(advisor);
        factory.setInterfaces(target.getClass().getInterfaces());//判断目标是否实现接口
        factory.setProxyTargetClass(true);//即使实现了接口,也用cglib实现
        I1 proxy = (I1) factory.getProxy();
        System.out.println(proxy.getClass());
        proxy.foo();
        proxy.bar();
        /**
         * 学到了什么
         *   a.Spring 的代理选择规则
         *   b.底层的切点实现
         *   c.底层的通知实现
         *   d. ProxyFactory 是用来创建代理的核心实现,用 AopProxyFactory 选择具体代理实现
         *      - JdkDynamicAopProxy
         *      - ObjenesisCglibAopProxy
         */
    }


    interface  I1{
        void foo();

        void bar();
    }

    static class Target1 implements I1{
        @Override
        public void foo() {
            System.out.println("target1 foo");
        }

        @Override
        public void bar() {
            System.out.println("target1 bar");
        }
    }

    static class Target2 {

        public void foo() {
            System.out.println("target2 foo");
        }

        public void bar() {
            System.out.println("target2 bar");
        }
    }
}
收获💡
- 底层的切点实现
- 底层的通知实现
- 底层的切面实现
- ProxyFactory 用来创建代理
- 如果指定了接口,且 proxyTargetClass = false,使用 JdkDynamicAopProxy
- 如果没有指定接口,或者 proxyTargetClass = true,使用 ObjenesisCglibAopProxy
- 例外:如果目标是接口类型或已经是 Jdk 代理,使用 JdkDynamicAopProxy
注意
- 要区分本章节提到的 MethodInterceptor,它与之前 cglib 中用的的 MethodInterceptor 是不同的接口
2.8 切点匹配
演示 - 切点匹配
public class A16 {
    public static void main(String[] args) throws NoSuchMethodException {
        /**
         * AspectJExpressionPointcut 只能对方法实现增强,无法对类和接口实现增强
         */
        AspectJExpressionPointcut pt1 = new AspectJExpressionPointcut();
        pt1.setExpression("execution(* bar())");
        System.out.println(pt1.matches(T1.class.getMethod("foo"), T1.class));
        System.out.println(pt1.matches(T1.class.getMethod("bar"), T1.class));
        System.out.println("=====================");

        AspectJExpressionPointcut pt2 = new AspectJExpressionPointcut();
        pt2.setExpression("@annotation(org.springframework.transaction.annotation.Transactional)");
        System.out.println(pt2.matches(T1.class.getMethod("foo"), T1.class));
        System.out.println(pt2.matches(T1.class.getMethod("bar"), T1.class));
        System.out.println("=====================");

        StaticMethodMatcherPointcut pt3 = new StaticMethodMatcherPointcut(){
            @Override
            public boolean matches(Method method, Class<?> targetClass) {
                //targetClass 匹配的类
                //检查方法上是否加了 Transactional注解
                MergedAnnotations annotations = MergedAnnotations.from(method);
                if(annotations.isPresent(Transactional.class)){
                    return true;
                }

                //检查类上是否加了 Transactional注解
                //TYPE_HIERARCHY 搜索策略,不仅会搜索本类,也回搜索父类,以及继承的接口
                annotations = MergedAnnotations.from(targetClass, MergedAnnotations.SearchStrategy.TYPE_HIERARCHY);
                if(annotations.isPresent(Transactional.class)){
                    return true;
                }
                return false;
            }
        };

        System.out.println(pt3.matches(T1.class.getMethod("foo"), T1.class));
        System.out.println(pt3.matches(T1.class.getMethod("bar"), T1.class));
        System.out.println(pt3.matches(T2.class.getMethod("foo"), T2.class));
        System.out.println(pt3.matches(T3.class.getMethod("foo"), T3.class));

        /**
         * 学到了什么
         *      a.底层切点实现是如何匹配的: 调用了 aspectj 的匹配方法
         *      b.比较关键的是它实现了 MethodMatcher 接口,用来执行方法的匹配
         */
    }

    static class T1 {
        @Transactional
        public void foo(){

        }

        public void bar(){

        }
    }


    @Transactional //标注在类上,类中的所有方法都会被增强
    static class T2 {
        public void foo(){

        }
    }

    @Transactional //标注在接口上,接口的实现类中的所有和接口匹配方法都会被增强
    interface I3{
        void foo();
    }

    static class T3 implements I3{
        @Override
        public void foo(){

        }
    }
}
运行结果
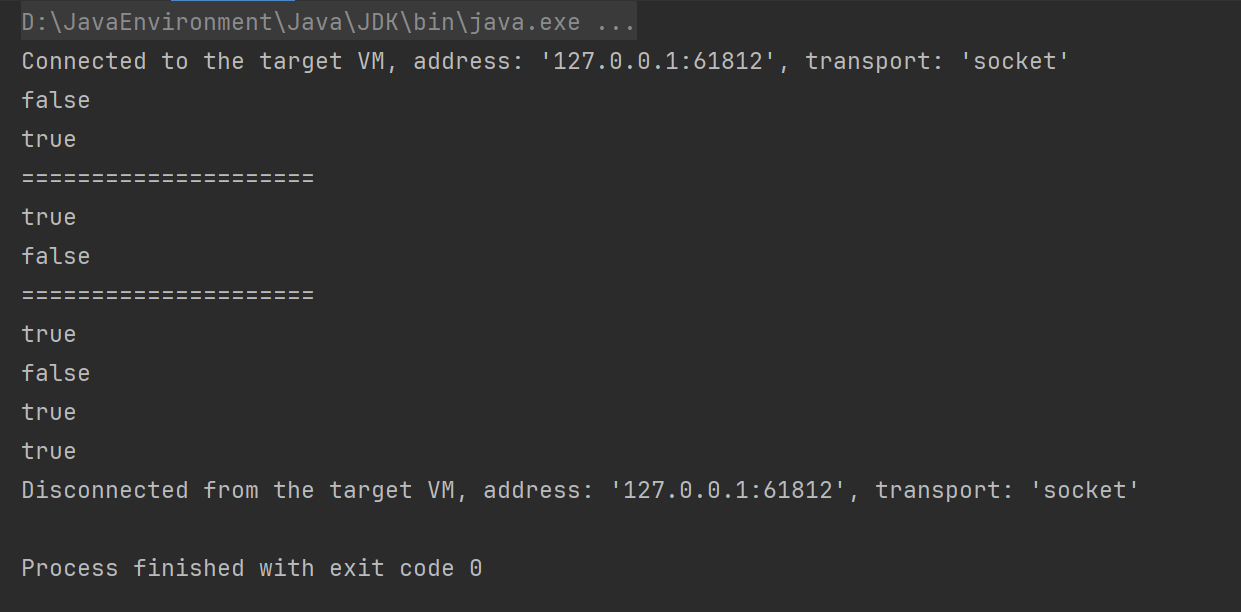
收获💡
- 常见 aspectj 切点用法
- aspectj 切点的局限性,实际的 @Transactional 切点实现
2.9 从 @Aspect 到 Advisor
演示1 - 代理创建器
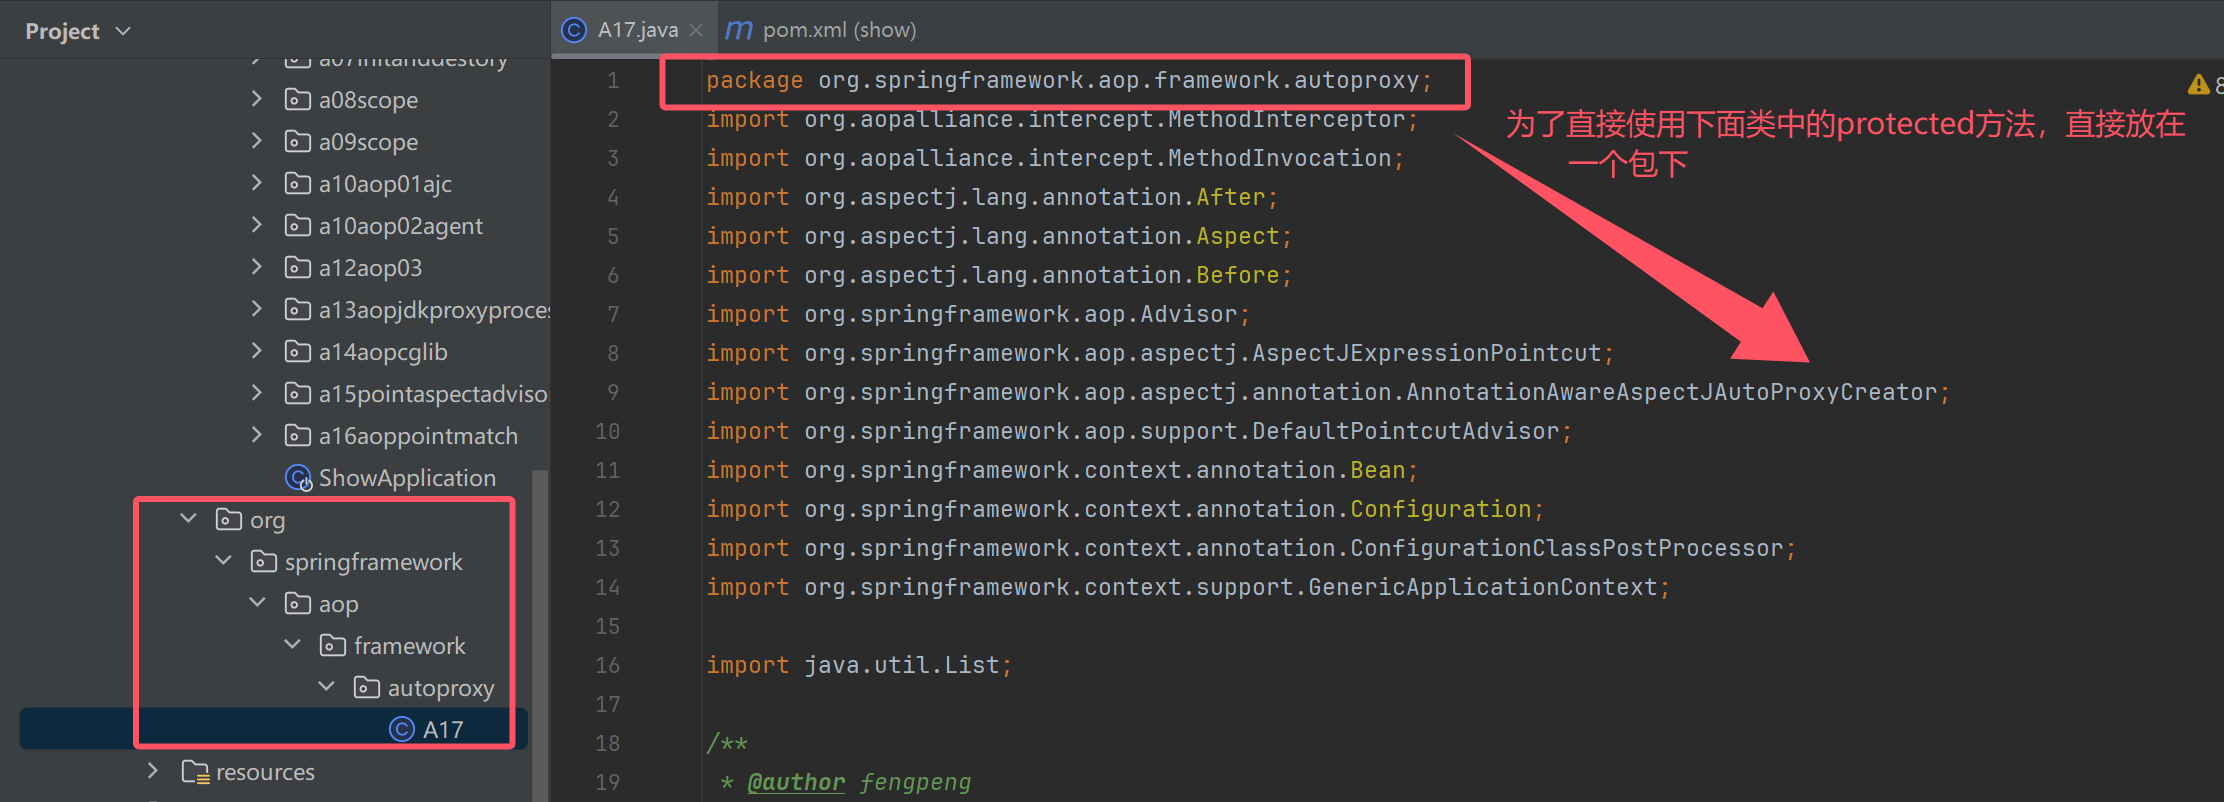
public class A17 {
    public static void main(String[] args) {
        GenericApplicationContext context = new GenericApplicationContext();
        context.registerBean("aspect1", Aspect1.class);
        context.registerBean("config", Config.class);
        context.registerBean(ConfigurationClassPostProcessor.class);
        context.registerBean(AnnotationAwareAspectJAutoProxyCreator.class);
        // BeanPostProcessor
        // 创建 -> (*) 依赖注入 -> 初始化(*)

        context.refresh();
        /*for (String name : context.getBeanDefinitionNames()) {
            System.out.println(name);
        }*/

        /**
         * 第一个重要方法 findCandidateAdvisors 找到有【资格】的Advisors
         *      a.有【资格】的Advisor 一部分是低级的,可以由自己编写,如下例中的 advisor3
         *      b.有【资格】的Advisor 一部分是高级的,由本章的主角解析 @Aspect 后获得
         */
        AnnotationAwareAspectJAutoProxyCreator creator = context.getBean(AnnotationAwareAspectJAutoProxyCreator.class);
        //参数Target1.class  代表把所有可以用于Target1的Advisor全部收集起来
        List<Advisor> advisors = creator.findEligibleAdvisors(Target1.class, "Target1");
        for (Advisor advisor : advisors) {
            System.out.println(advisor);
        }
    }

    static class Target1{
        public void foo(){
            System.out.println("target1 foo");
        }
    }

    static class Target2{
        public void bar(){
            System.out.println("target2 bar");
        }
    }

    @Aspect //高级切面类
    static class Aspect1{
        @Before("execution(* foo(..))")
        public void before(){
            System.out.println("aspect1 before");
        }

        @After("execution(* foo(..))")
        public void after(){
            System.out.println("aspect1 after");
        }
    }

    @Configuration
    static class Config {

        @Bean //低级切面
        public Advisor advisor3(MethodInterceptor advice3) {
            AspectJExpressionPointcut pointcut = new AspectJExpressionPointcut();
            pointcut.setExpression("execution(* foo(..))");
            return new DefaultPointcutAdvisor(pointcut, advice3);
        }

        @Bean
        public MethodInterceptor advice3() {
            return new MethodInterceptor() {
                @Override
                public Object invoke(MethodInvocation invocation) throws Throwable {
                    System.out.println("advisor3 before");
                    Object result = invocation.proceed();
                    System.out.println("advisor3 after");
                    return result;
                }
            };
        }
    }

}
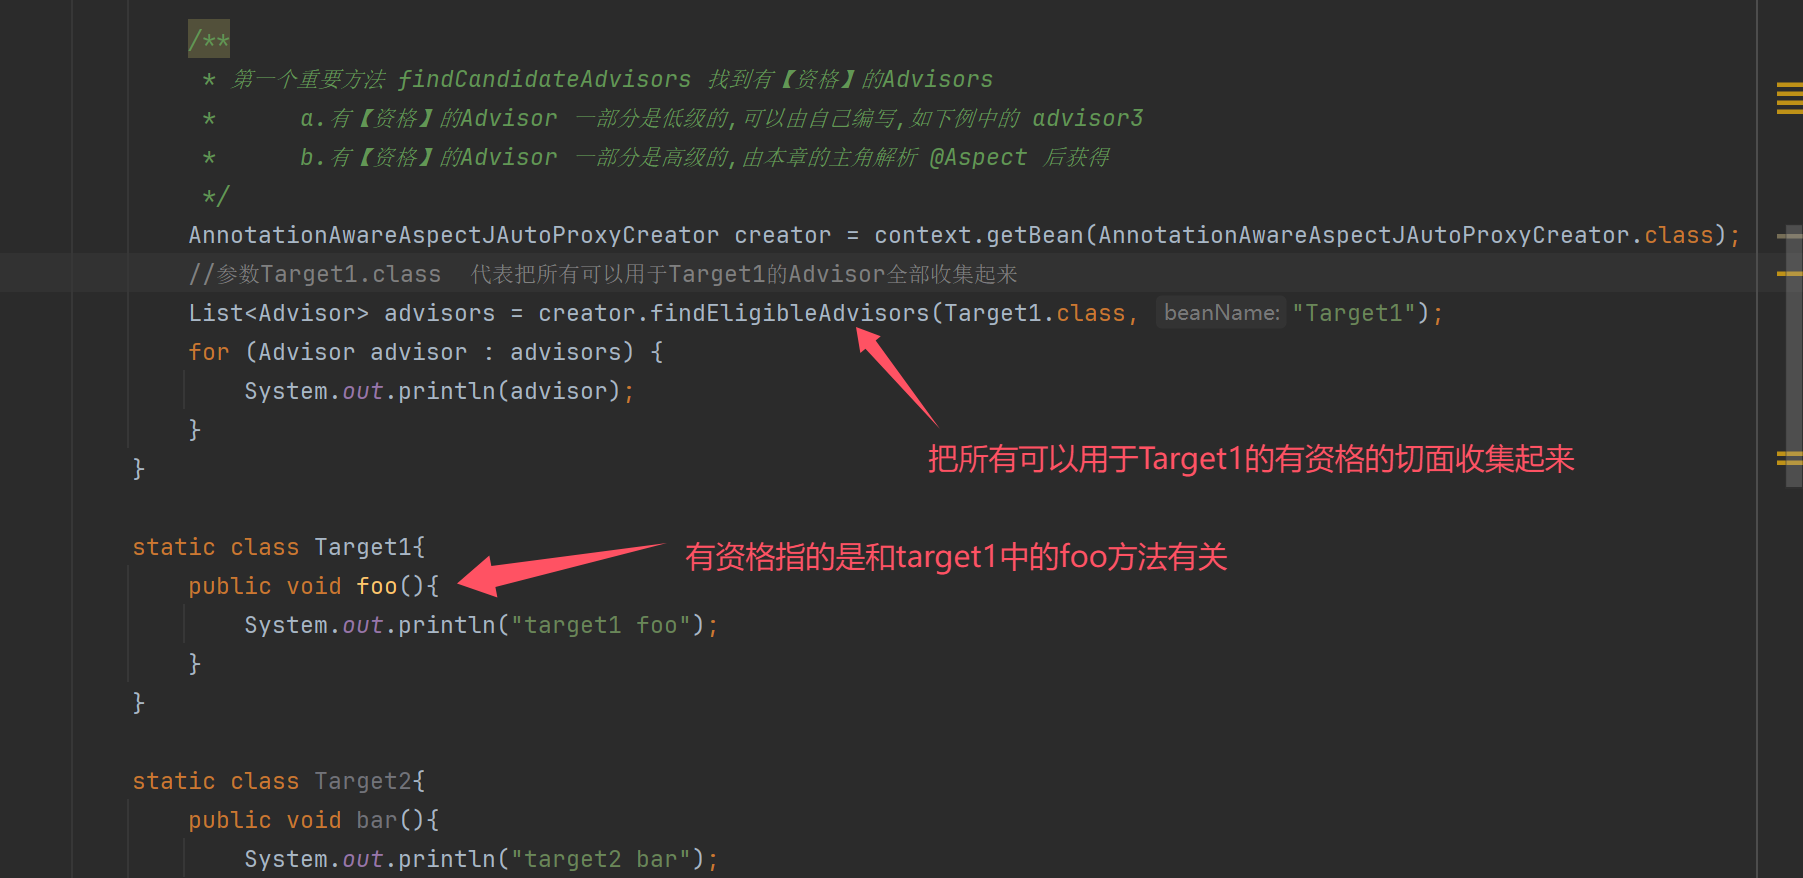
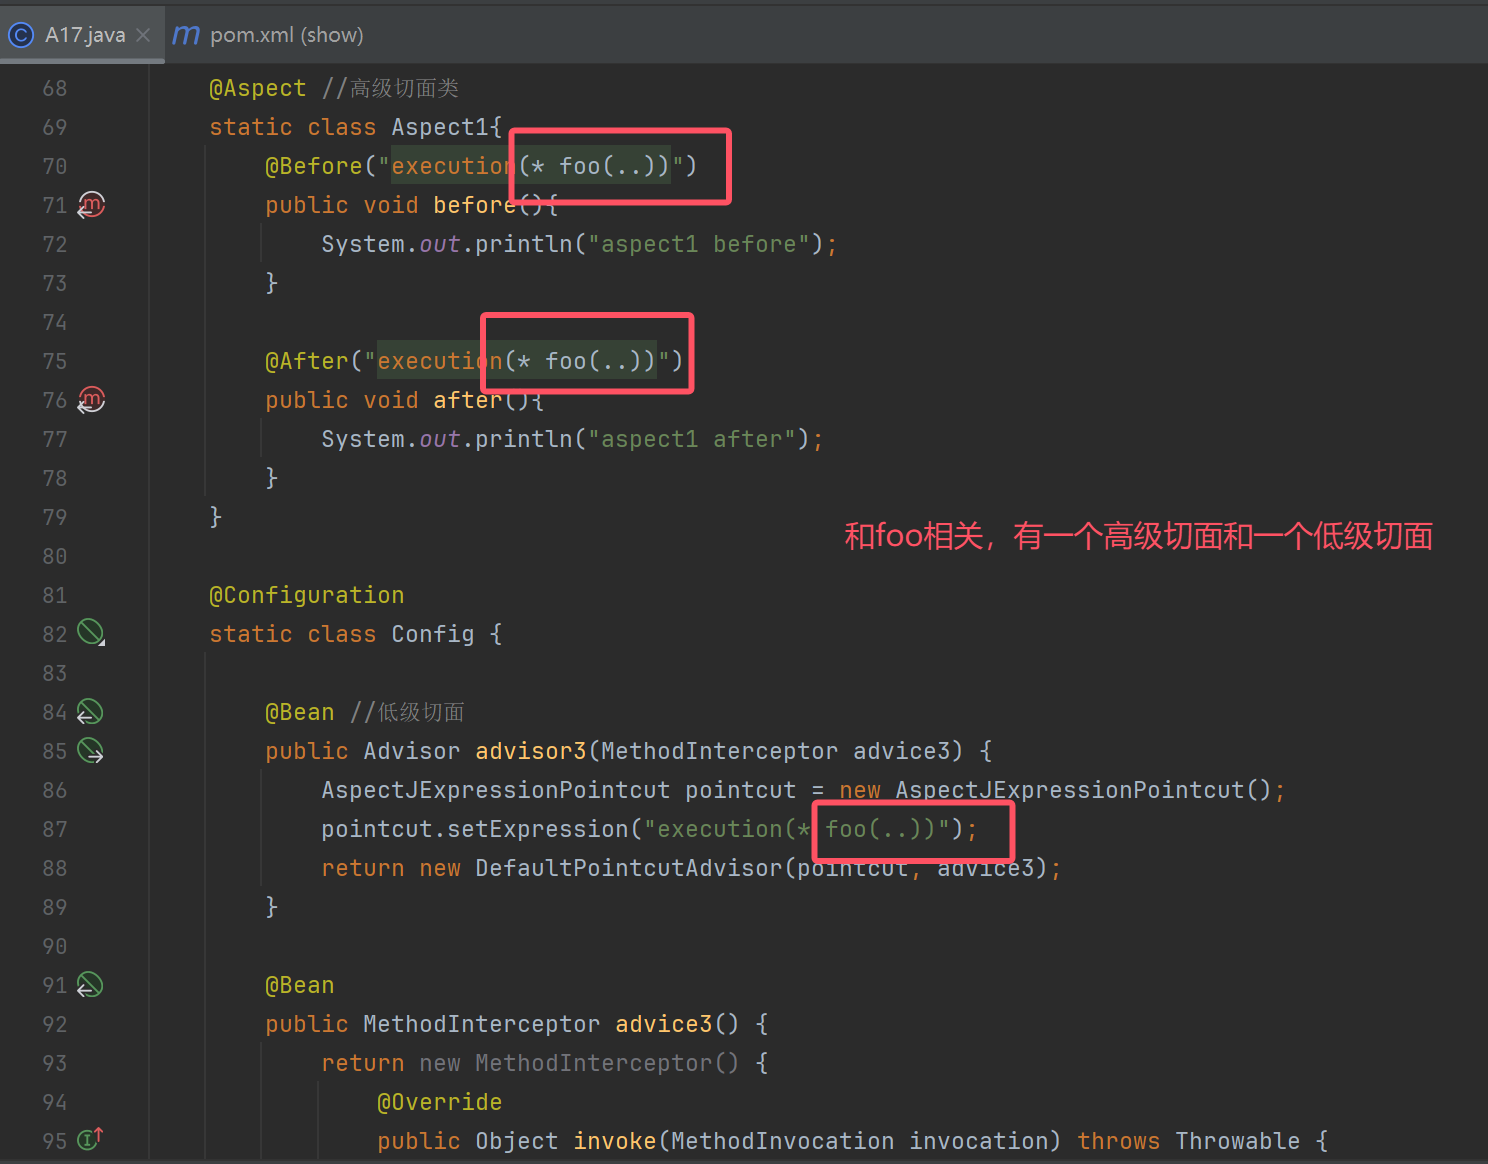

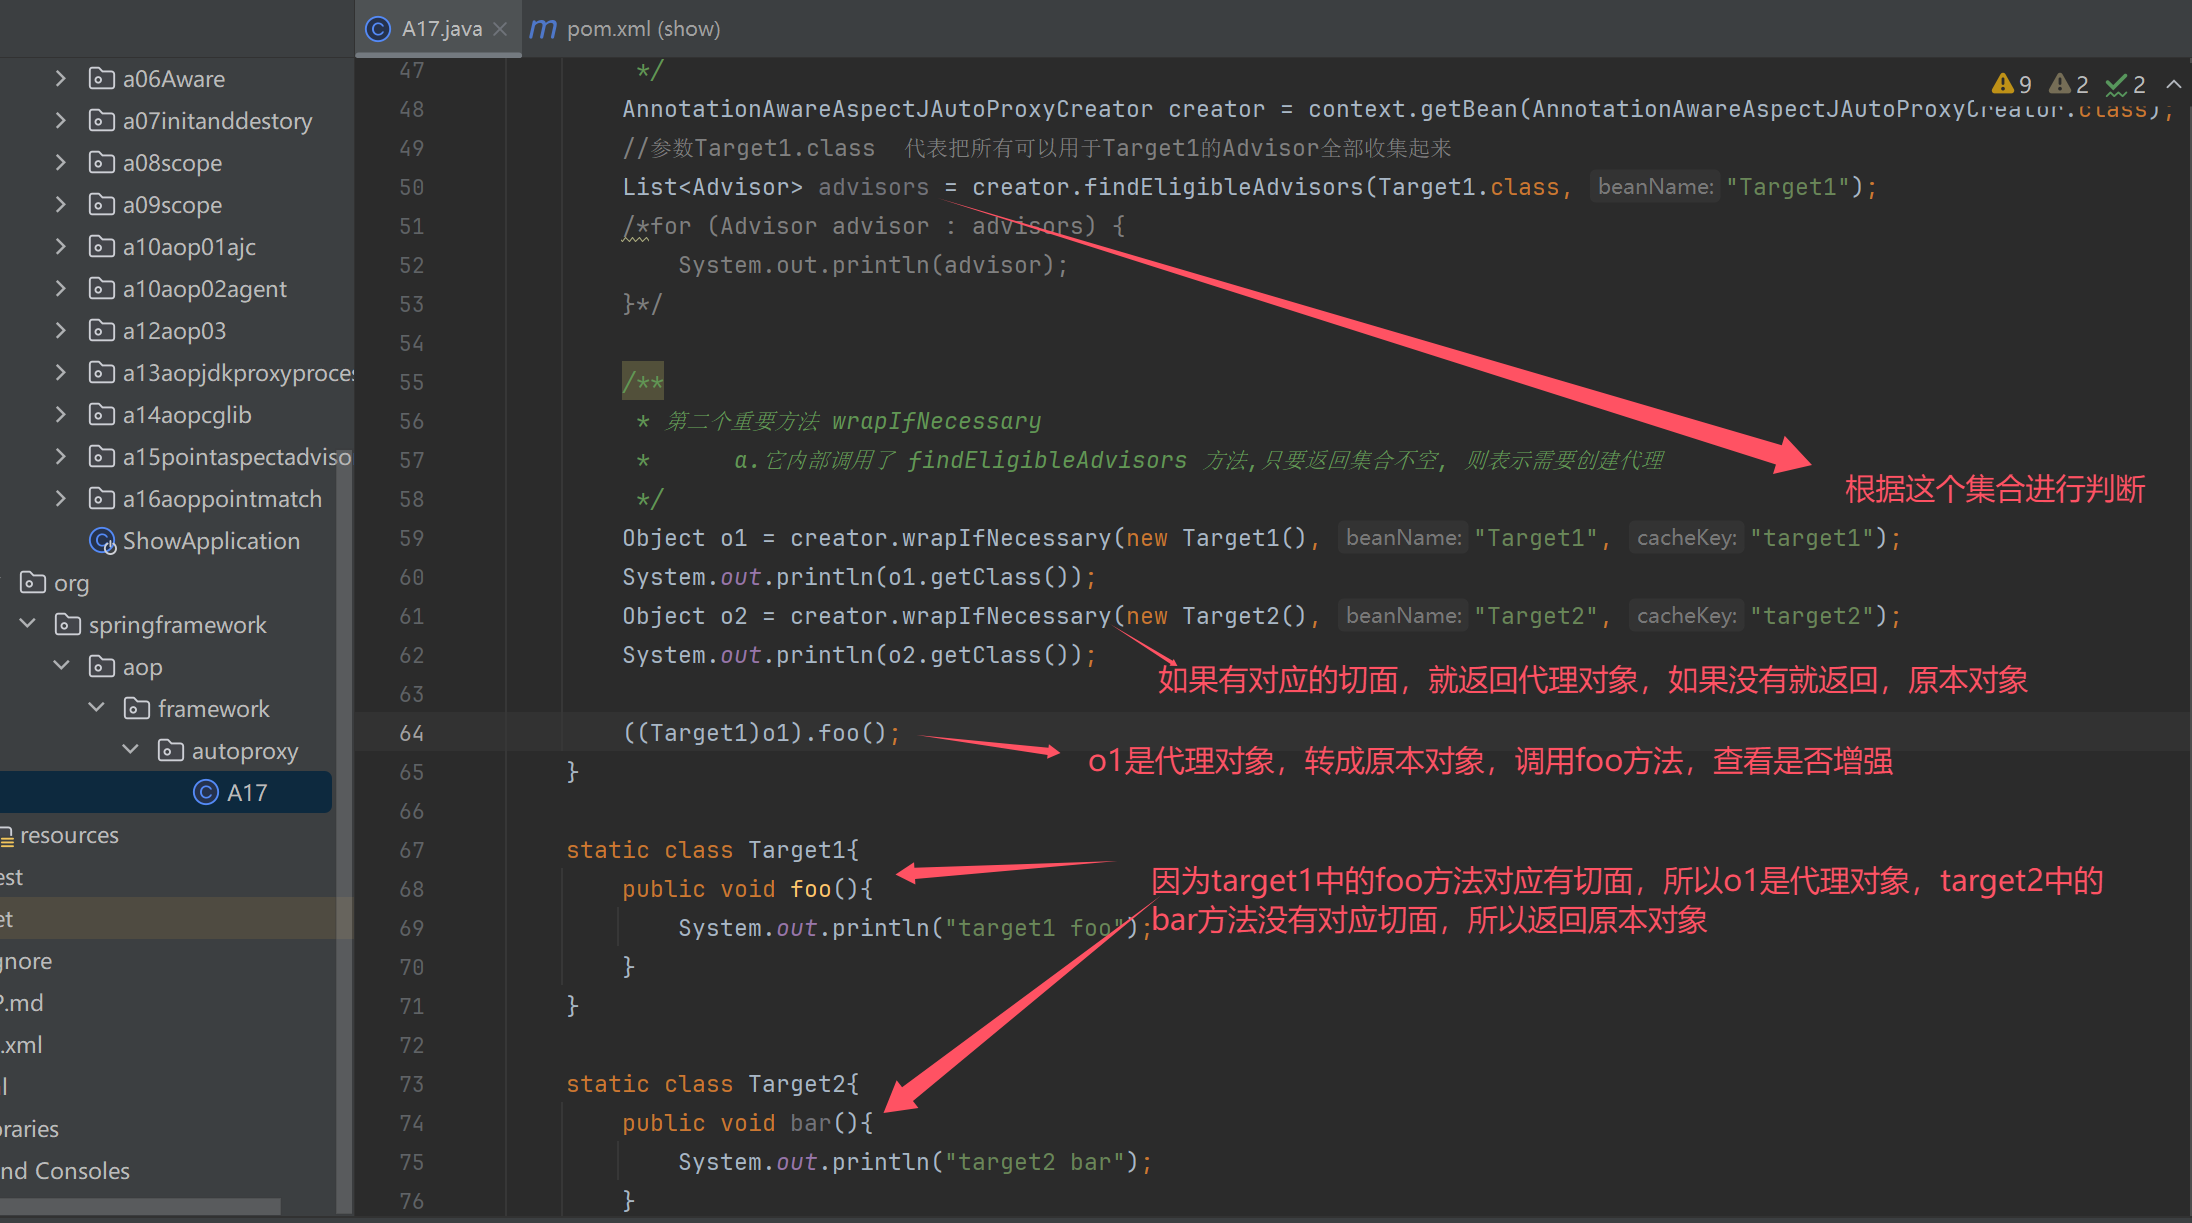

public class A17 {
    public static void main(String[] args) {
        GenericApplicationContext context = new GenericApplicationContext();
        context.registerBean("aspect1", Aspect1.class);
        context.registerBean("config", Config.class);
        context.registerBean(ConfigurationClassPostProcessor.class);
        context.registerBean(AnnotationAwareAspectJAutoProxyCreator.class);
        // BeanPostProcessor
        // 创建 -> (*) 依赖注入 -> 初始化(*)

        context.refresh();
        /*for (String name : context.getBeanDefinitionNames()) {
            System.out.println(name);
        }*/

        /**
         * 第一个重要方法 findCandidateAdvisors 找到有【资格】的Advisors
         *      a.有【资格】的Advisor 一部分是低级的,可以由自己编写,如下例中的 advisor3
         *      b.有【资格】的Advisor 一部分是高级的,由本章的主角解析 @Aspect 后获得
         */
        AnnotationAwareAspectJAutoProxyCreator creator = context.getBean(AnnotationAwareAspectJAutoProxyCreator.class);
        //参数Target1.class  代表把所有可以用于Target1的Advisor全部收集起来
        List<Advisor> advisors = creator.findEligibleAdvisors(Target1.class, "Target1");
        /*for (Advisor advisor : advisors) {
            System.out.println(advisor);
        }*/

        /**
         * 第二个重要方法 wrapIfNecessary
         *      a.它内部调用了 findEligibleAdvisors 方法,只要返回集合不空, 则表示需要创建代理
         */
        Object o1 = creator.wrapIfNecessary(new Target1(), "Target1", "target1");
        System.out.println(o1.getClass());
        Object o2 = creator.wrapIfNecessary(new Target2(), "Target2", "target2");
        System.out.println(o2.getClass());

        ((Target1)o1).foo();
    }

    static class Target1{
        public void foo(){
            System.out.println("target1 foo");
        }
    }

    static class Target2{
        public void bar(){
            System.out.println("target2 bar");
        }
    }

    @Aspect //高级切面类
    static class Aspect1{
        @Before("execution(* foo(..))")
        public void before(){
            System.out.println("aspect1 before");
        }

        @After("execution(* foo(..))")
        public void after(){
            System.out.println("aspect1 after");
        }
    }

    @Configuration
    static class Config {

        @Bean //低级切面
        public Advisor advisor3(MethodInterceptor advice3) {
            AspectJExpressionPointcut pointcut = new AspectJExpressionPointcut();
            pointcut.setExpression("execution(* foo(..))");
            return new DefaultPointcutAdvisor(pointcut, advice3);
        }

        @Bean
        public MethodInterceptor advice3() {
            return new MethodInterceptor() {
                @Override
                public Object invoke(MethodInvocation invocation) throws Throwable {
                    System.out.println("advisor3 before");
                    Object result = invocation.proceed();
                    System.out.println("advisor3 after");
                    return result;
                }
            };
        }
    }

}
收获💡
- AnnotationAwareAspectJAutoProxyCreator 的作用
- 将高级 @Aspect 切面统一为低级 Advisor 切面
- 在合适的时机创建代理
- findEligibleAdvisors 找到有【资格】的 Advisors
- 有【资格】的 Advisor 一部分是低级的, 可以由自己编写, 如本例 A17 中的 advisor3
- 有【资格】的 Advisor 另一部分是高级的, 由解析 @Aspect 后获得
- wrapIfNecessary
- 它内部调用 findEligibleAdvisors, 只要返回集合不空, 则表示需要创建代理
- 它的调用时机通常在原始对象初始化后执行, 但碰到循环依赖会提前至依赖注入之前执行
演示2 - 代理创建时机
public class A17_1 {
    public static void main(String[] args) {
        GenericApplicationContext context = new GenericApplicationContext();
        context.registerBean(ConfigurationClassPostProcessor.class);
        context.registerBean(Config.class);
        context.refresh();
        context.close();

        //创建 -> (*)依赖注入 -> 初始化(*)
    }


    @Configuration
    static class Config{
        @Bean //解析 @Aspect 、产生代理
        public AnnotationAwareAspectJAutoProxyCreator annotationAwareAspectJAutoProxyCreator(){
            return new AnnotationAwareAspectJAutoProxyCreator();
        }

        @Bean //解析@Autowired
        public AutowiredAnnotationBeanPostProcessor autowiredAnnotationBeanPostProcessor(){
            return new AutowiredAnnotationBeanPostProcessor();
        }
        @Bean //解析  @PostConstruct
        public CommonAnnotationBeanPostProcessor commonAnnotationBeanPostProcessor(){
            return new CommonAnnotationBeanPostProcessor();
        }

        @Bean
        public Advisor advisor(MethodInterceptor advice){
            AspectJExpressionPointcut pointcut = new AspectJExpressionPointcut();
            pointcut.setExpression("execution(* foo())");
            return new DefaultPointcutAdvisor(pointcut,advice);
        }

        @Bean
        public MethodInterceptor advice(){
            return new MethodInterceptor() {
                @Override
                public Object invoke(MethodInvocation invocation) throws Throwable {
                    System.out.println("before");
                    return invocation.proceed();
                }
            };
        }

        @Bean
        public Bean1 bean1(){
            return new Bean1();
        }

        @Bean
        public Bean2 bean2(){
            return new Bean2();
        }

    }

    static class Bean1 {
        public void foo(){}
        public Bean1(){
            System.out.println("Bean1()");
        }
        @PostConstruct
        public void init(){
            System.out.println("Bean1 init");
        }
    }

    static class Bean2 {
        public Bean2(){
            System.out.println("Bean2()");
        }
        @Autowired
        public void setBean1(Bean1 bean1){
            System.out.println("Bean2 setBean1(bean1) class is :" + bean1.getClass());
        }
        @PostConstruct
        public void init(){
            System.out.println("Bean2 init");
        }
    }
}
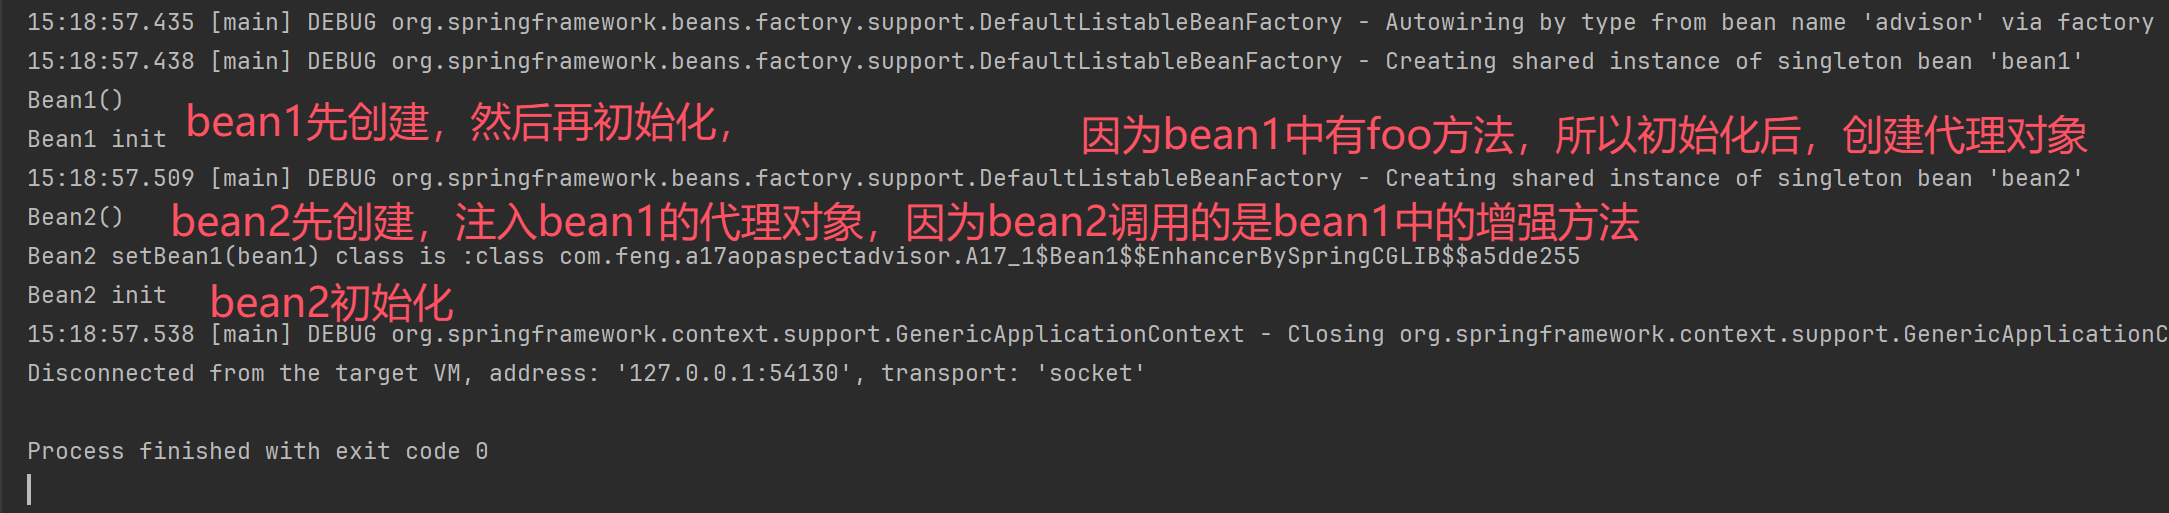
static class Bean1 {
    public void foo() {

    }
    public Bean1() {
        System.out.println("Bean1()");
    }
    @Autowired public void setBean2(Bean2 bean2) {
        System.out.println("Bean1 setBean2(bean2) class is: " + bean2.getClass());
    }
    @PostConstruct public void init() {
        System.out.println("Bean1 init()");
    }
}

static class Bean2 {
    public Bean2() {
        System.out.println("Bean2()");
    }
    @Autowired public void setBean1(Bean1 bean1) {
        System.out.println("Bean2 setBean1(bean1) class is: " + bean1.getClass());
    }
    @PostConstruct public void init() {
        System.out.println("Bean2 init()");
    }
}
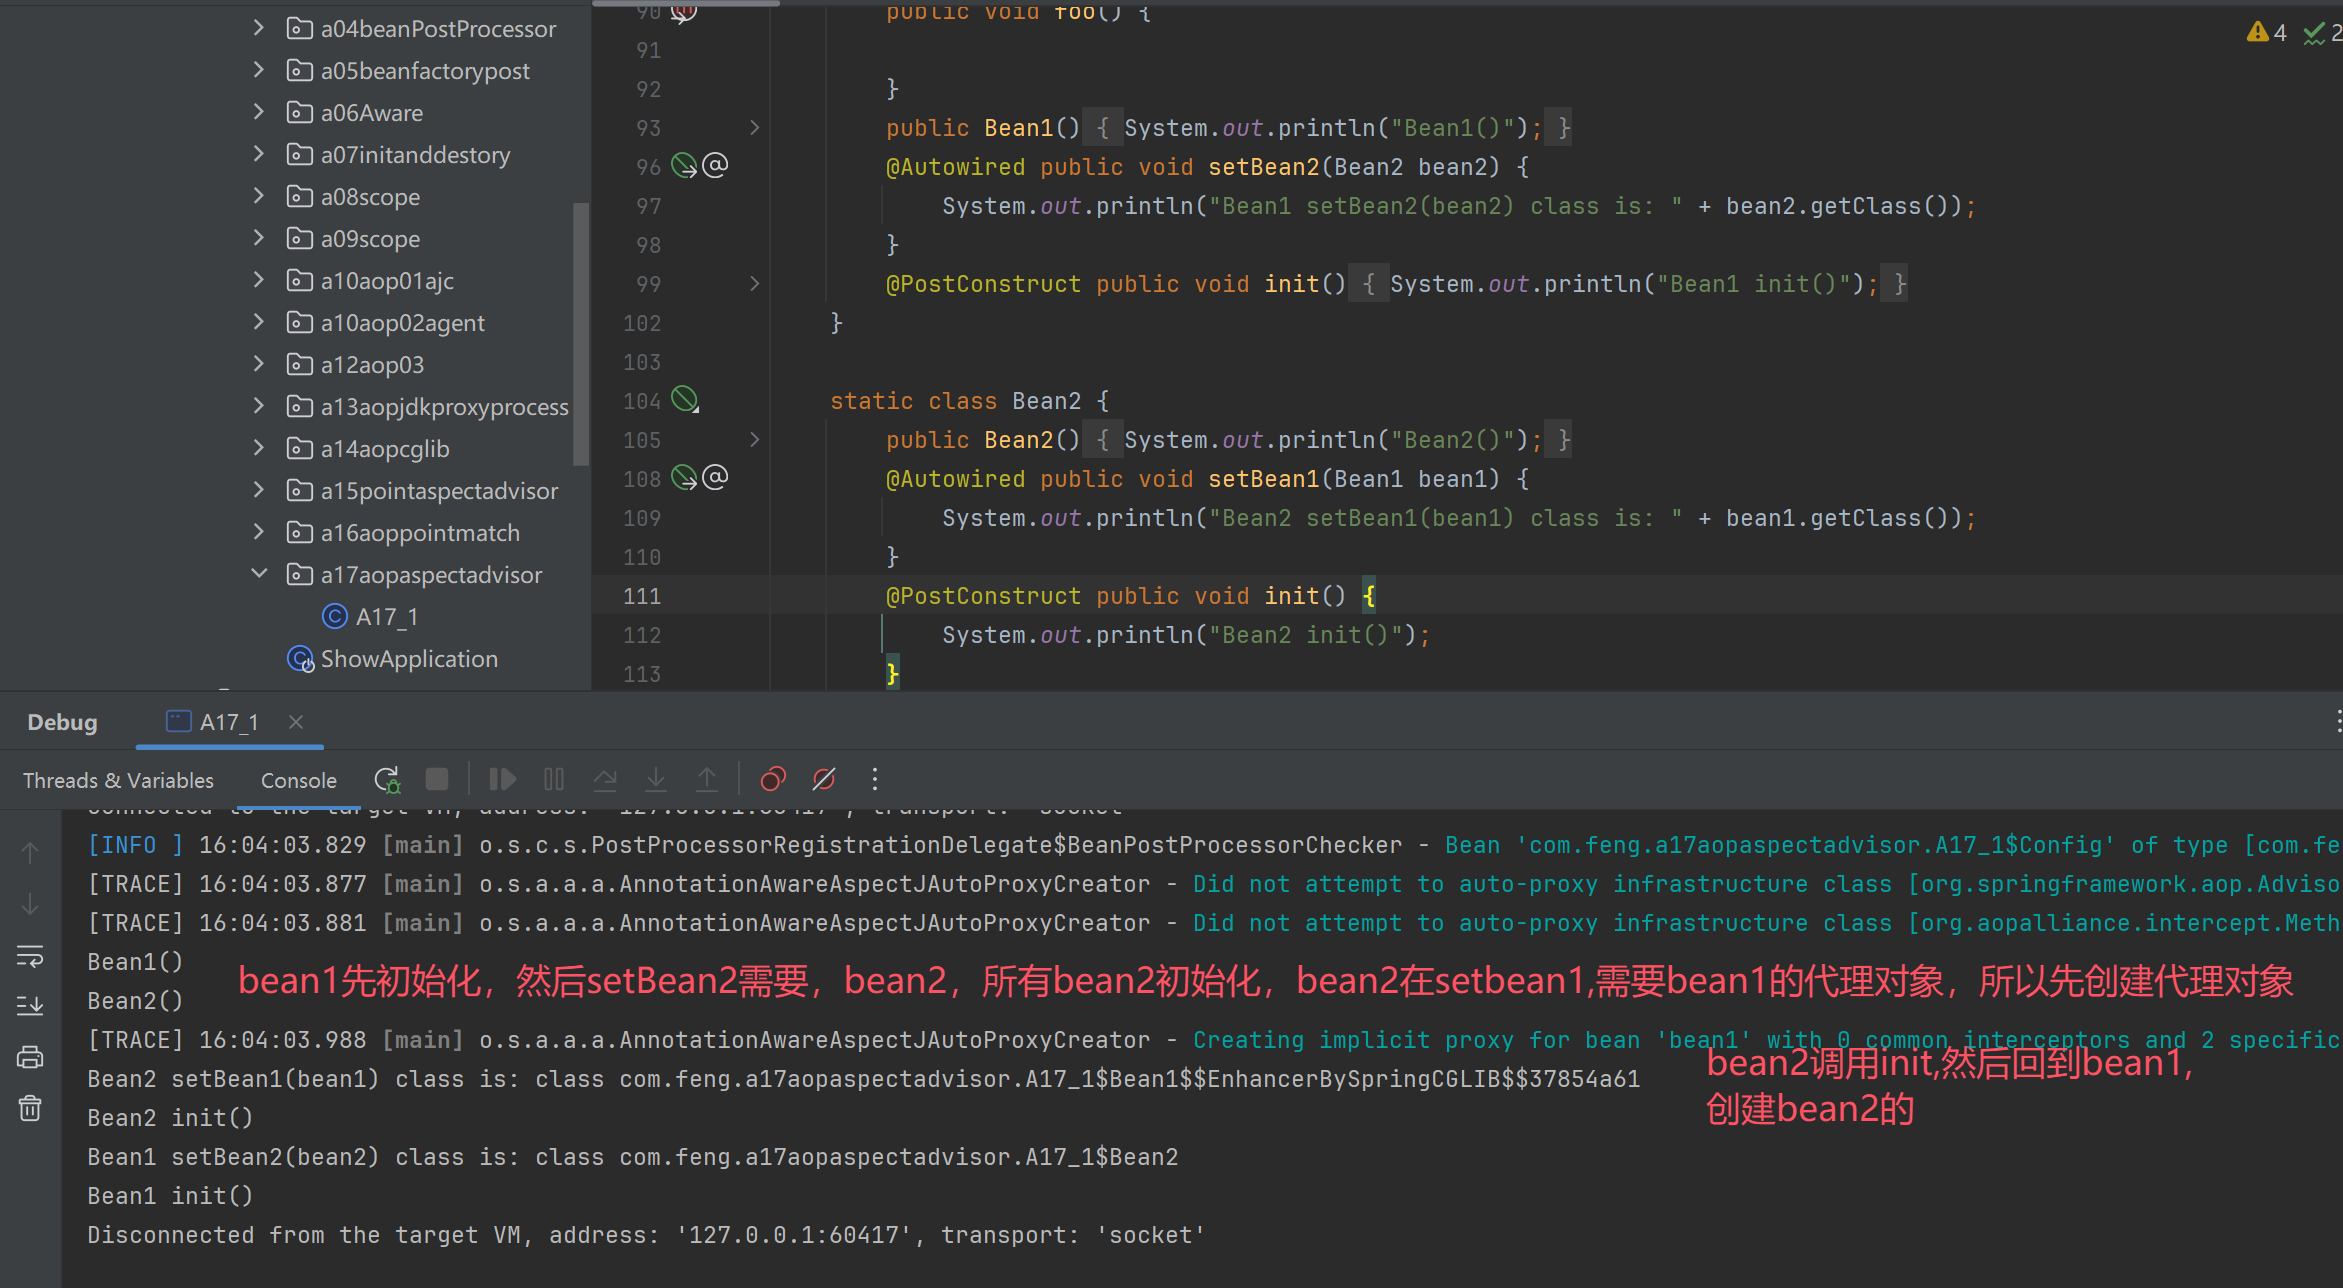
创建bean2的代理对象,然后bean1初始化
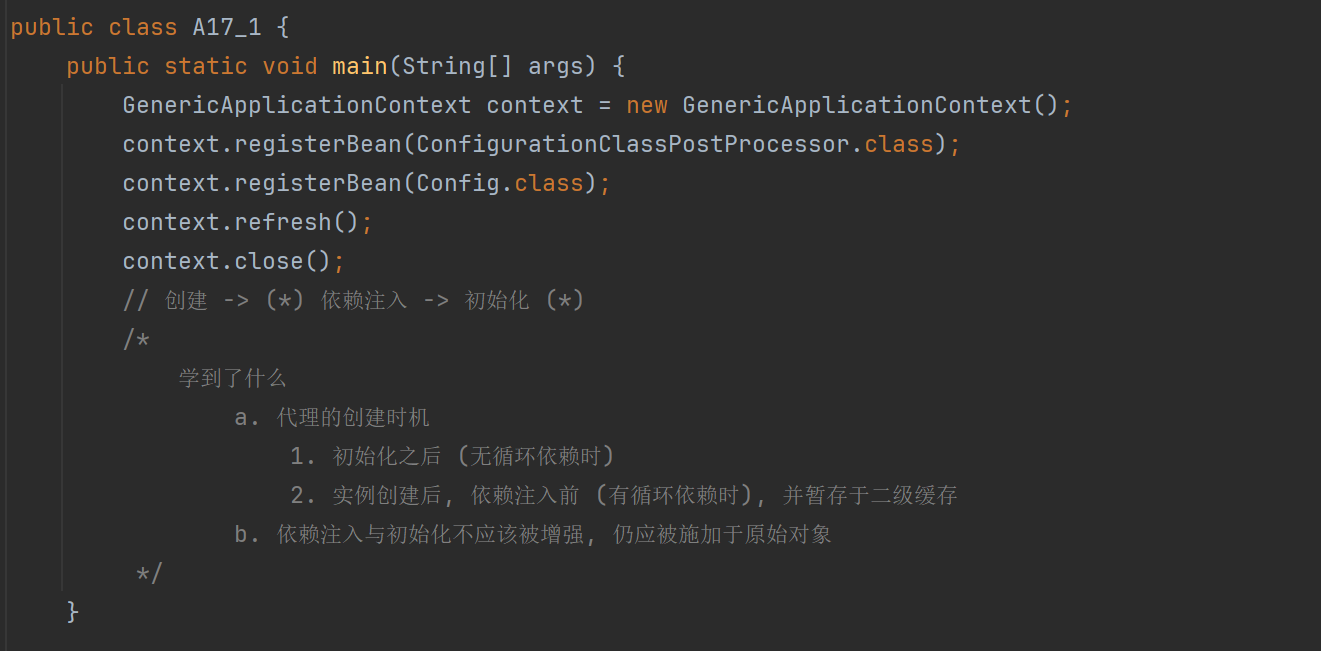
收获💡
- 代理的创建时机
- 初始化之后 (无循环依赖时)
- 实例创建后, 依赖注入前 (有循环依赖时), 并暂存于二级缓存
- 依赖注入与初始化不应该被增强, 仍应被施加于原始对象
演示3 - @Before 对应的低级通知
public class A17_2 {
    static class Aspect{
        @Before("execution(* foo())")
        public void before1(){
            System.out.println("before1");
        }

        @Before("execution(* foo())")
        public void before2(){
            System.out.println("before2");
        }

        public void after(){
            System.out.println("after");
        }

        public void afterReturning(){
            System.out.println("afterReturning");
        }

        public void afterThrowing(){
            System.out.println("afterThrowing");
        }

        public Object around(ProceedingJoinPoint pjp){
            return null;
        }
    }

    static class Target{
        public void foo(){
            System.out.println("foo");
        }
    }

    public static void main(String[] args) {
        //由工厂拿到切面对象
        AspectInstanceFactory factory = new SingletonAspectInstanceFactory(new Aspect());
        //高级切面转成低级切面类
        List<Advisor> list = new ArrayList<>();
        for (Method method : Aspect.class.getDeclaredMethods()) {
            if (method.isAnnotationPresent(Before.class)){
                //解析切点
                //得到切点表达式
                String expression = method.getAnnotation(Before.class).value();
                //创建切点对象
                AspectJExpressionPointcut pointcut = new AspectJExpressionPointcut();
                pointcut.setExpression(expression);
                //通知类
                AspectJMethodBeforeAdvice advice = new AspectJMethodBeforeAdvice(method, pointcut, factory);
                //切面
                Advisor advisor = new DefaultPointcutAdvisor(pointcut, advice);
                list.add(advisor);
            }
        }

        for (Advisor advisor : list) {
            System.out.println(advisor);
        }
    }

    /**
     * 1. @Before 前置通知会被转换为原始的 AspectJMethodBeforeAdvice 形式, 该对象包含了如下信息
     *    1. 通知代码从哪儿来
     *    2. 切点是什么(这里为啥要切点, 后面解释)
     *    3. 通知对象如何创建, 本例共用同一个 Aspect 对象
     * 2. 类似的还有
     *    1. AspectJAroundAdvice (环绕通知)
     *    2. AspectJAfterReturningAdvice
     *    3. AspectJAfterThrowingAdvice (环绕通知)
     *    4. AspectJAfterAdvice (环绕通知)
     */
}

收获💡
- @Before 前置通知会被转换为原始的 AspectJMethodBeforeAdvice 形式, 该对象包含了如下信息
- 通知代码从哪儿来
- 切点是什么(这里为啥要切点, 后面解释)
- 通知对象如何创建, 本例共用同一个 Aspect 对象
- 类似的还有
- AspectJAroundAdvice (环绕通知)
- AspectJAfterReturningAdvice
- AspectJAfterThrowingAdvice (环绕通知)
- AspectJAfterAdvice (环绕通知)
2.10 静态通知调用
代理对象调用流程如下(以 JDK 动态代理实现为例)
- 从 ProxyFactory 获得 Target 和环绕通知链,根据他俩创建 MethodInvocation,简称 mi
- 首次执行 mi.proceed() 发现有下一个环绕通知,调用它的 invoke(mi)
- 进入环绕通知1,执行前增强,再次调用 mi.proceed() 发现有下一个环绕通知,调用它的 invoke(mi)
- 进入环绕通知2,执行前增强,调用 mi.proceed() 发现没有环绕通知,调用 mi.invokeJoinPoint() 执行目标方法
- 目标方法执行结束,将结果返回给环绕通知2,执行环绕通知2 的后增强
- 环绕通知2继续将结果返回给环绕通知1,执行环绕通知1 的后增强
- 环绕通知1返回最终的结果
图中不同颜色对应一次环绕通知或目标的调用起始至终结
演示1 - 通知调用过程
代码参考
public class A18 {
    static class Aspect{
        @Before("execution(* foo())")
        public void before1(){
            System.out.println("before1");
        }

        @Before("execution(* foo())")
        public void before2(){
            System.out.println("before2");
        }

        public void after(){
            System.out.println("after");
        }

        @AfterReturning("execution(* foo())")
        public void afterReturning(){
            System.out.println("afterReturning");
        }

        @AfterThrowing("execution(* foo())")
        public void afterThrowing(){
            System.out.println("afterThrowing");
        }

        @Around("execution(* foo())")
        public Object around(ProceedingJoinPoint pjp){
            return null;
        }
    }

    static class Target{
        public void foo(){
            System.out.println("foo");
        }
    }

    public static void main(String[] args) throws NoSuchMethodException {
        //由工厂拿到切面对象
        AspectInstanceFactory factory = new SingletonAspectInstanceFactory(new Aspect());
        // 1.高级切面转成低级切面类
        List<Advisor> list = new ArrayList<>();
        for (Method method : Aspect.class.getDeclaredMethods()) {
            if (method.isAnnotationPresent(Before.class)){
                //解析切点
                //得到切点表达式
                String expression = method.getAnnotation(Before.class).value();
                //创建切点对象
                AspectJExpressionPointcut pointcut = new AspectJExpressionPointcut();
                pointcut.setExpression(expression);
                //通知类
                AspectJMethodBeforeAdvice advice = new AspectJMethodBeforeAdvice(method, pointcut, factory);
                //切面
                Advisor advisor = new DefaultPointcutAdvisor(pointcut, advice);
                list.add(advisor);
            }else if (method.isAnnotationPresent(AfterReturning.class)){
                String expression = method.getAnnotation(AfterReturning.class).value();
                AspectJExpressionPointcut pointcut = new AspectJExpressionPointcut();
                pointcut.setExpression(expression);
                AspectJAfterReturningAdvice advice = new AspectJAfterReturningAdvice(method, pointcut, factory);
                Advisor advisor = new DefaultPointcutAdvisor(pointcut, advice);
                list.add(advisor);
            } else if (method.isAnnotationPresent(Around.class)) {
                String expression = method.getAnnotation(Around.class).value();
                AspectJExpressionPointcut pointcut = new AspectJExpressionPointcut();
                pointcut.setExpression(expression);
                AspectJAroundAdvice advice = new AspectJAroundAdvice(method, pointcut, factory);
                Advisor advisor = new DefaultPointcutAdvisor(pointcut, advice);
                list.add(advisor);
            }
        }

        for (Advisor advisor : list) {
            System.out.println(advisor);
        }


        //2.通知统一转换为环绕通知 MethodInterceptor
        ProxyFactory proxyFactory = new ProxyFactory();
        proxyFactory.setTarget(new Target());
        proxyFactory.addAdvisors(list);

        System.out.println("<<<<<<<<<<<<<<<<<<<<<<");
        List<Object> methodInterceptorList = proxyFactory.getInterceptorsAndDynamicInterceptionAdvice(Target.class.getMethod("foo"), Target.class);
        for (Object methodInterceptor : methodInterceptorList) {
            System.out.println(methodInterceptor);
        }

    }
}
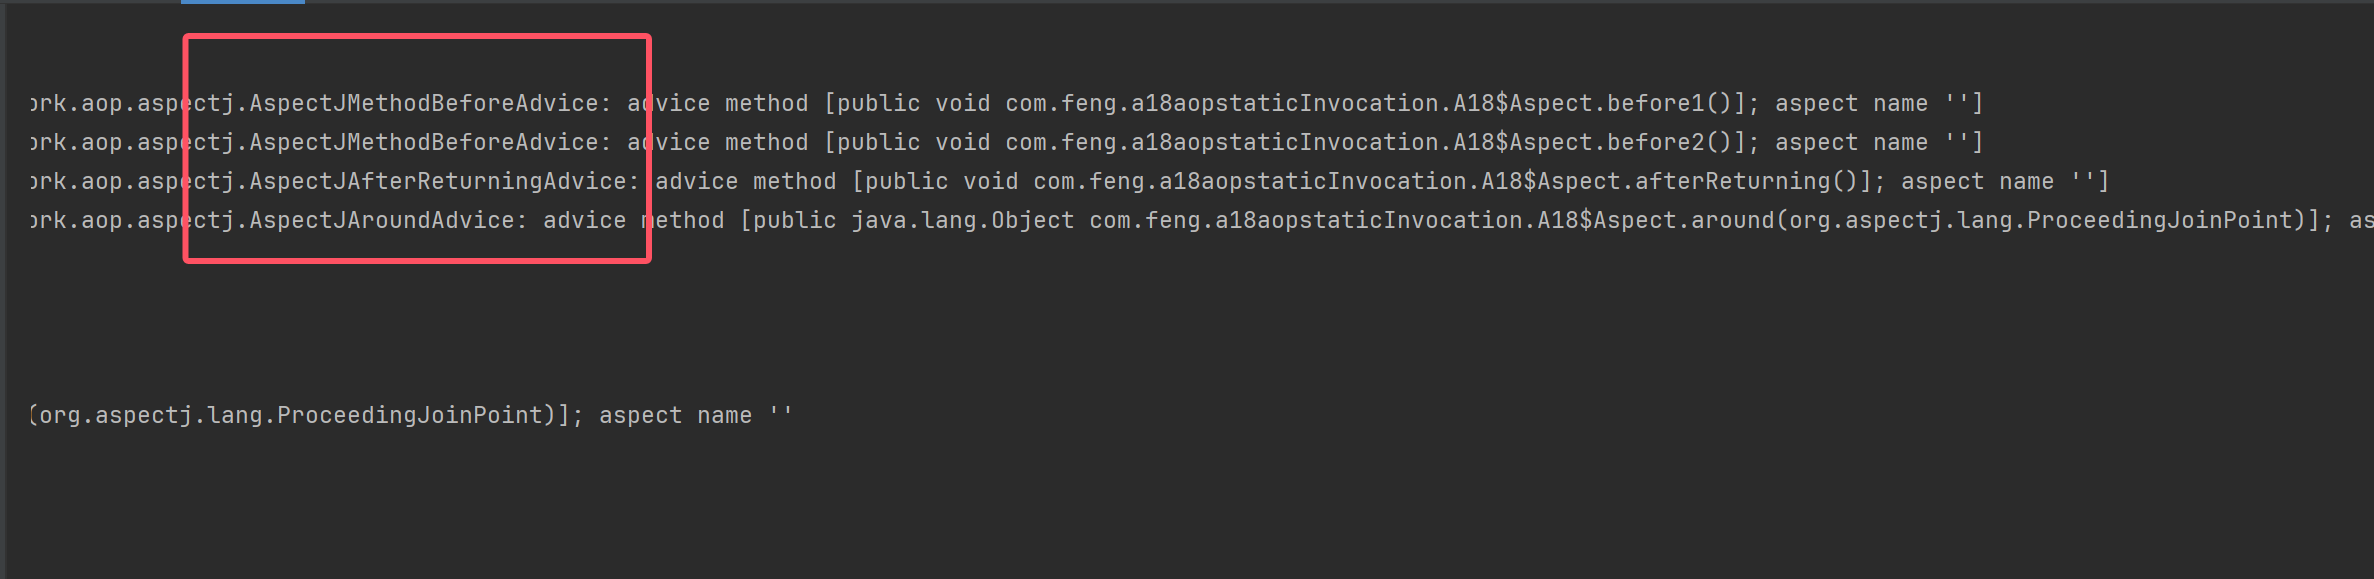
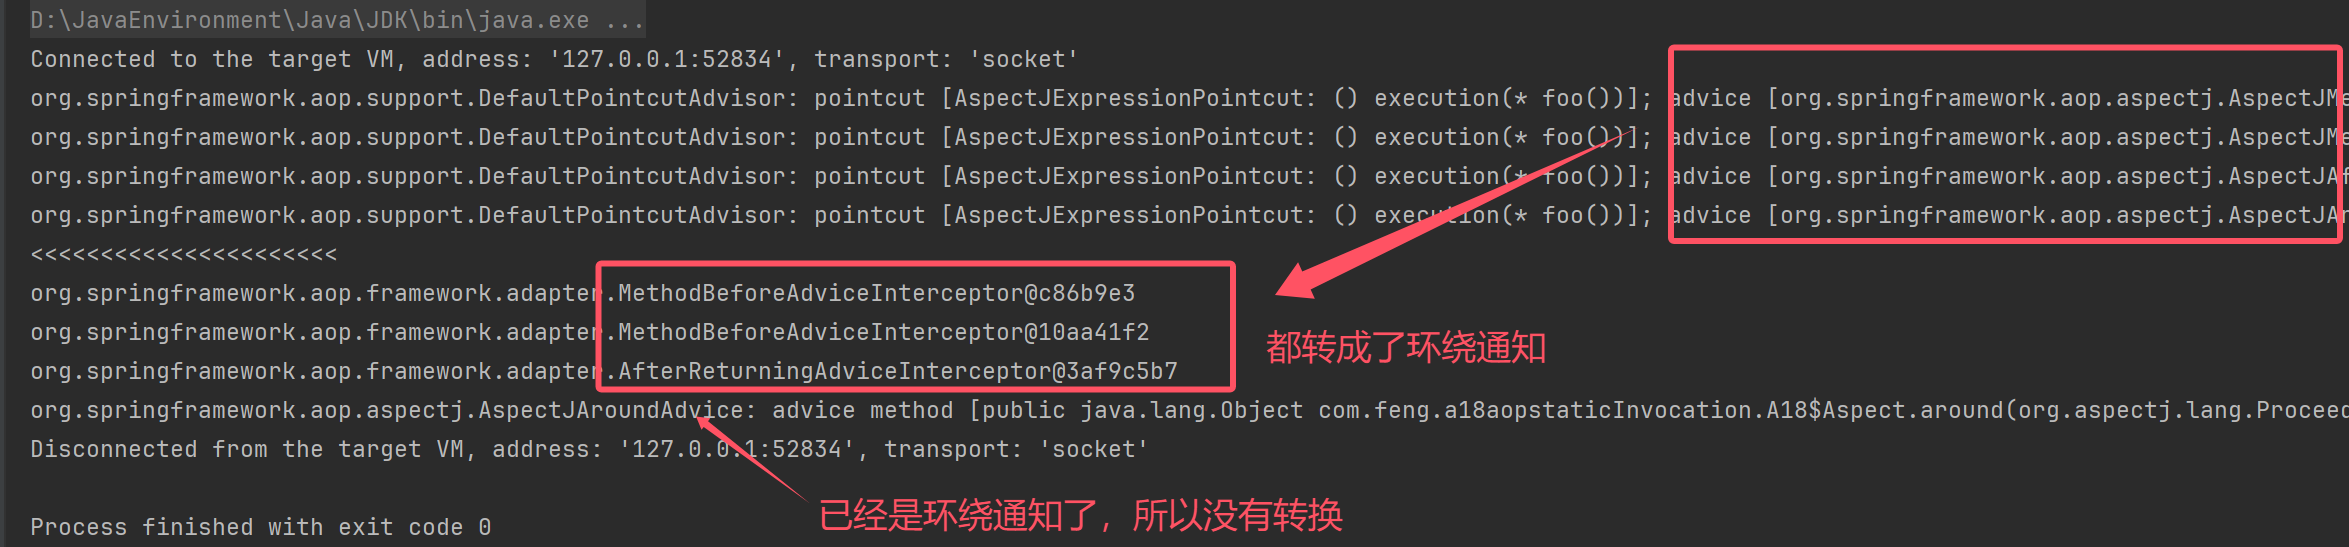
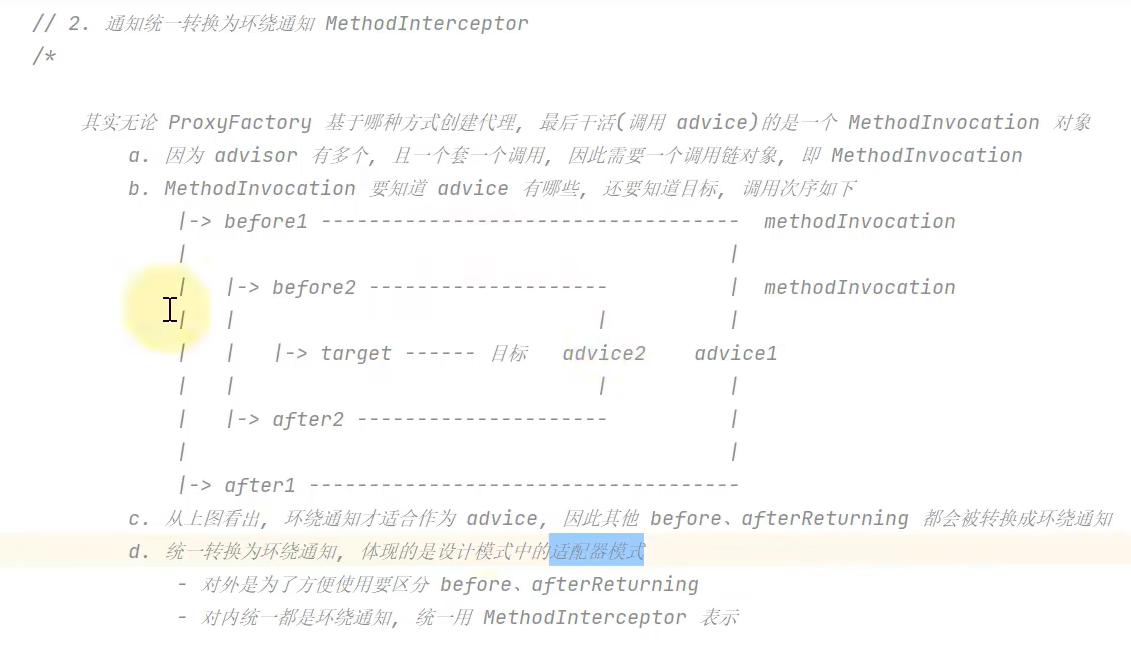
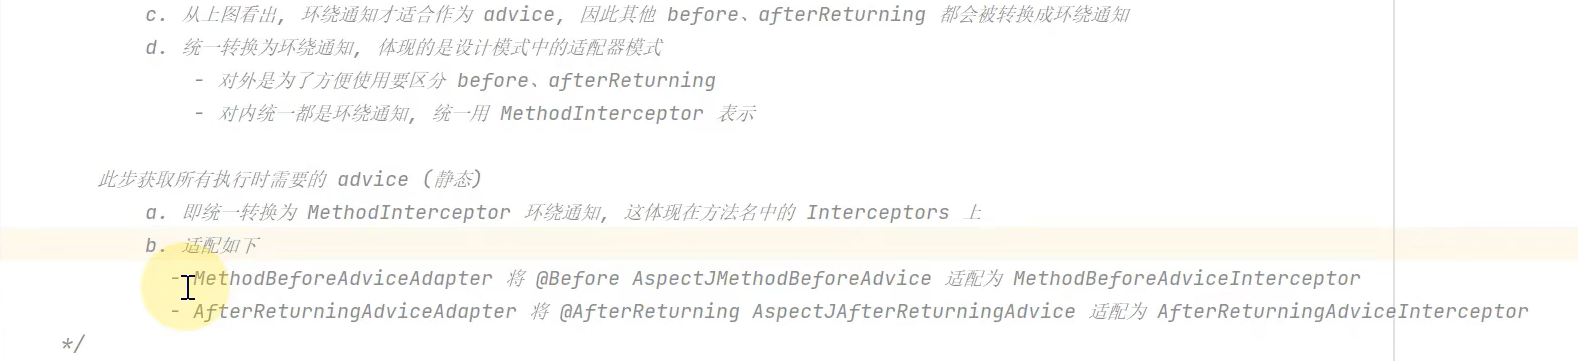
收获💡
代理方法执行时会做如下工作
- 通过 proxyFactory 的 getInterceptorsAndDynamicInterceptionAdvice() 将其他通知统一转换为 MethodInterceptor 环绕通知
- MethodBeforeAdviceAdapter 将 @Before AspectJMethodBeforeAdvice 适配为 MethodBeforeAdviceInterceptor
- AfterReturningAdviceAdapter 将 @AfterReturning AspectJAfterReturningAdvice 适配为 AfterReturningAdviceInterceptor
- 这体现的是适配器设计模式
- 所谓静态通知,体现在上面方法的 Interceptors 部分,这些通知调用时无需再次检查切点,直接调用即可
- 结合目标与环绕通知链,创建 MethodInvocation 对象,通过它完成整个调用
演示2 - 模拟 MethodInvocation
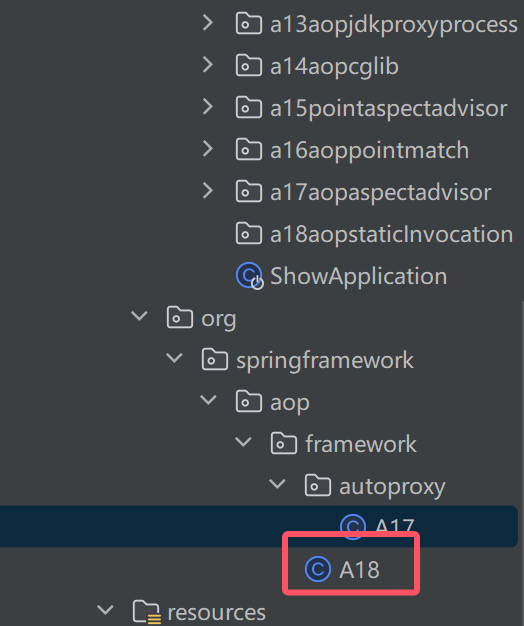
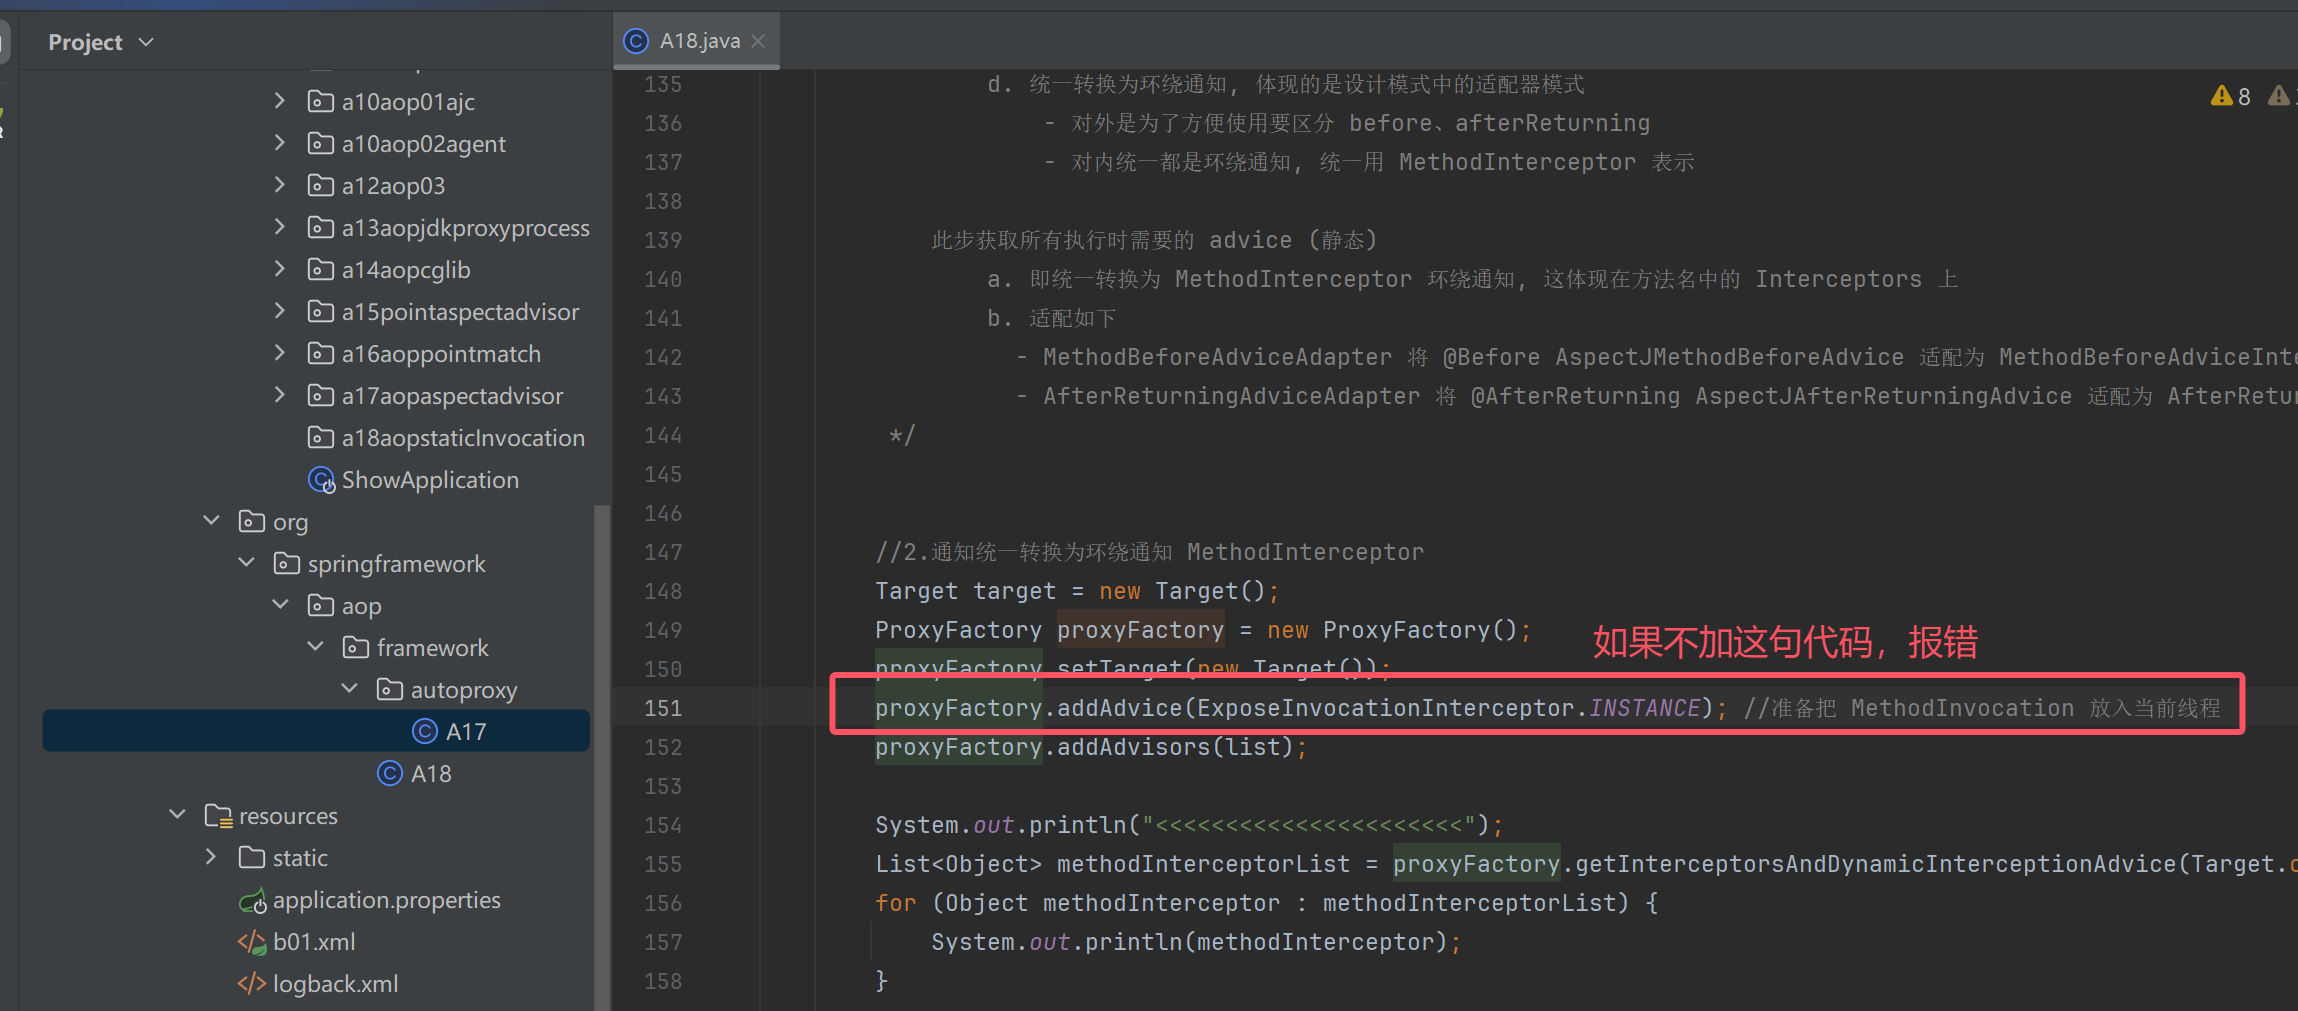
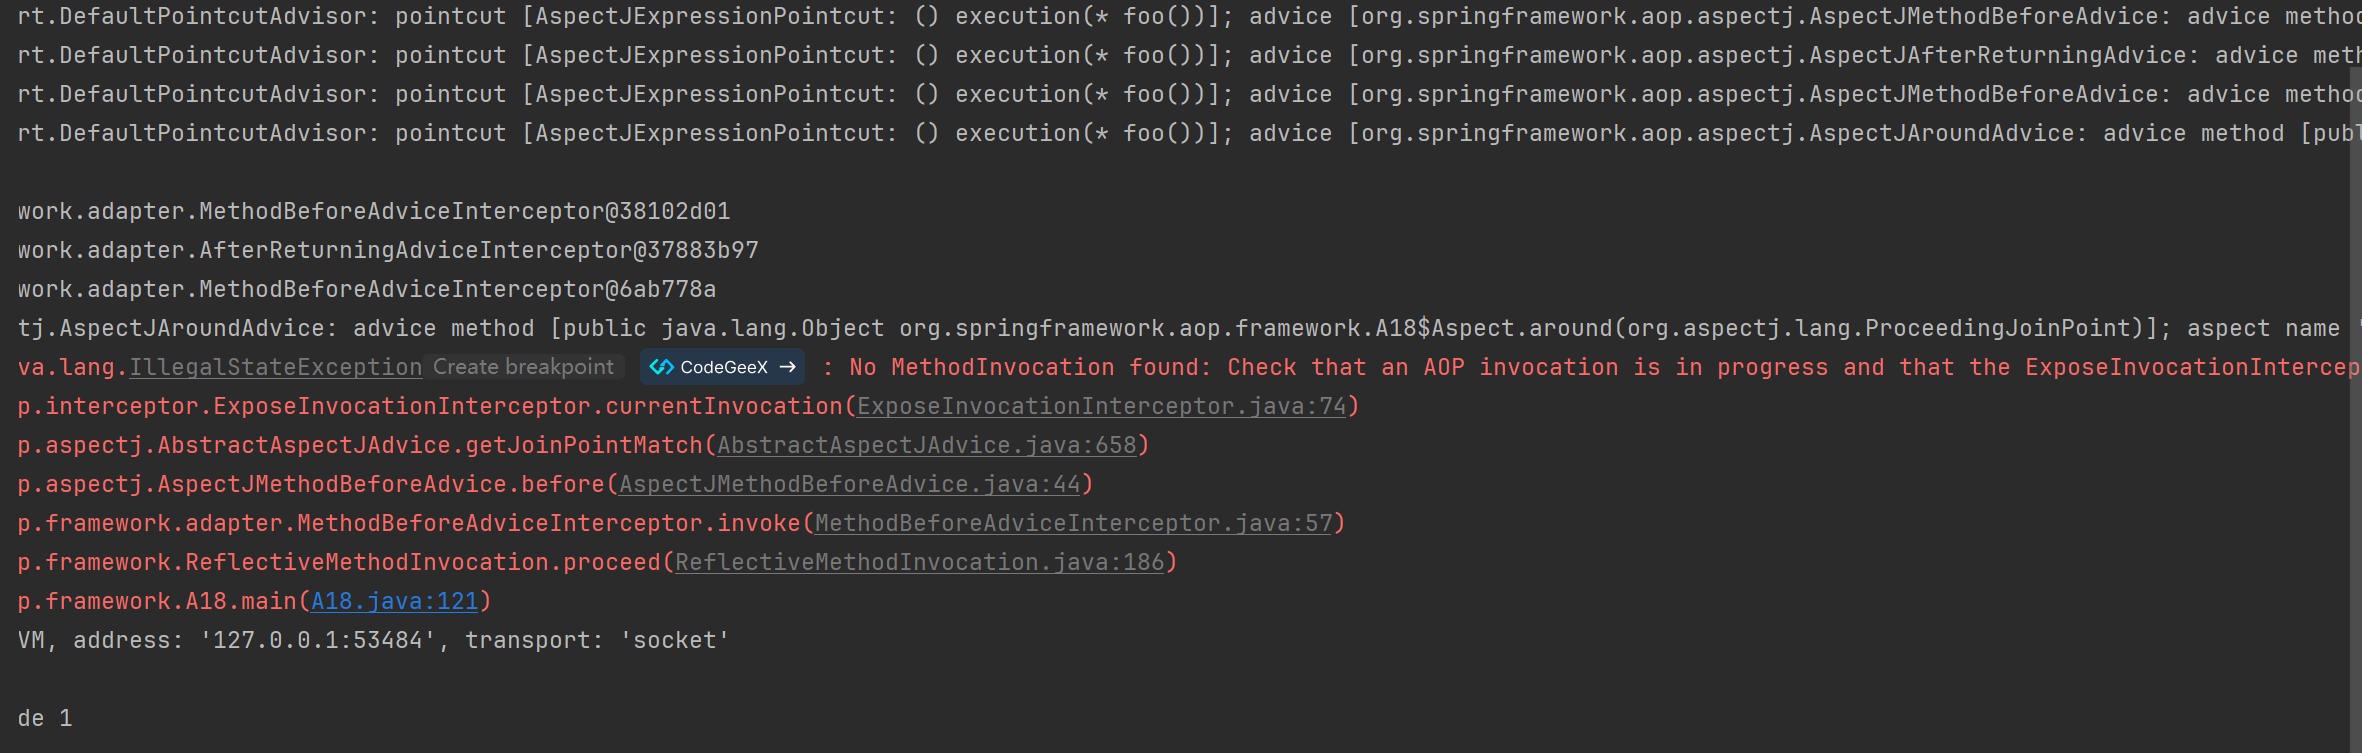
public class A18 {
    static class Aspect{
        @Before("execution(* foo())")
        public void before1(){
            System.out.println("before1");
        }

        @Before("execution(* foo())")
        public void before2(){
            System.out.println("before2");
        }

        public void after(){
            System.out.println("after");
        }

        @AfterReturning("execution(* foo())")
        public void afterReturning(){
            System.out.println("afterReturning");
        }

        @AfterThrowing("execution(* foo())")
        public void afterThrowing(){
            System.out.println("afterThrowing");
        }

        @Around("execution(* foo())")
        public Object around(ProceedingJoinPoint pjp) throws Throwable {
            try {
                System.out.println("around...before");
                return pjp.proceed();
            } finally {
                System.out.println("around...after");
            }
        }
    }

    static class Target{
        public void foo(){
            System.out.println("foo");
        }
    }

    public static void main(String[] args) throws Throwable {
        //由工厂拿到切面对象
        AspectInstanceFactory factory = new SingletonAspectInstanceFactory(new Aspect());
        // 1.高级切面转成低级切面类
        List<Advisor> list = new ArrayList<>();
        for (Method method : Aspect.class.getDeclaredMethods()) {
            if (method.isAnnotationPresent(Before.class)){
                //解析切点
                //得到切点表达式
                String expression = method.getAnnotation(Before.class).value();
                //创建切点对象
                AspectJExpressionPointcut pointcut = new AspectJExpressionPointcut();
                pointcut.setExpression(expression);
                //通知类
                AspectJMethodBeforeAdvice advice = new AspectJMethodBeforeAdvice(method, pointcut, factory);
                //切面
                Advisor advisor = new DefaultPointcutAdvisor(pointcut, advice);
                list.add(advisor);
            }else if (method.isAnnotationPresent(AfterReturning.class)){
                String expression = method.getAnnotation(AfterReturning.class).value();
                AspectJExpressionPointcut pointcut = new AspectJExpressionPointcut();
                pointcut.setExpression(expression);
                AspectJAfterReturningAdvice advice = new AspectJAfterReturningAdvice(method, pointcut, factory);
                Advisor advisor = new DefaultPointcutAdvisor(pointcut, advice);
                list.add(advisor);
            } else if (method.isAnnotationPresent(Around.class)) {
                String expression = method.getAnnotation(Around.class).value();
                AspectJExpressionPointcut pointcut = new AspectJExpressionPointcut();
                pointcut.setExpression(expression);
                AspectJAroundAdvice advice = new AspectJAroundAdvice(method, pointcut, factory);
                Advisor advisor = new DefaultPointcutAdvisor(pointcut, advice);
                list.add(advisor);
            }
        }

        for (Advisor advisor : list) {
            System.out.println(advisor);
        }

        /*
            @Before 前置通知会被转换为下面原始的 AspectJMethodBeforeAdvice 形式, 该对象包含了如下信息
                a. 通知代码从哪儿来
                b. 切点是什么
                c. 通知对象如何创建, 本例共用同一个 Aspect 对象
            类似的通知还有
                1. AspectJAroundAdvice (环绕通知)
                2. AspectJAfterReturningAdvice
                3. AspectJAfterThrowingAdvice (环绕通知)
                4. AspectJAfterAdvice (环绕通知)
         */

        // 2. 通知统一转换为环绕通知 MethodInterceptor
        /*

            其实无论 ProxyFactory 基于哪种方式创建代理, 最后干活(调用 advice)的是一个 MethodInvocation 对象
                a. 因为 advisor 有多个, 且一个套一个调用, 因此需要一个调用链对象, 即 MethodInvocation
                b. MethodInvocation 要知道 advice 有哪些, 还要知道目标, 调用次序如下

                将 MethodInvocation 放入当前线程
                    |-> before1 ----------------------------------- 从当前线程获取 MethodInvocation
                    |                                             |
                    |   |-> before2 --------------------          | 从当前线程获取 MethodInvocation
                    |   |                              |          |
                    |   |   |-> target ------ 目标   advice2    advice1
                    |   |                              |          |
                    |   |-> after2 ---------------------          |
                    |                                             |
                    |-> after1 ------------------------------------
                c. 从上图看出, 环绕通知才适合作为 advice, 因此其他 before、afterReturning 都会被转换成环绕通知
                d. 统一转换为环绕通知, 体现的是设计模式中的适配器模式
                    - 对外是为了方便使用要区分 before、afterReturning
                    - 对内统一都是环绕通知, 统一用 MethodInterceptor 表示

            此步获取所有执行时需要的 advice (静态)
                a. 即统一转换为 MethodInterceptor 环绕通知, 这体现在方法名中的 Interceptors 上
                b. 适配如下
                  - MethodBeforeAdviceAdapter 将 @Before AspectJMethodBeforeAdvice 适配为 MethodBeforeAdviceInterceptor
                  - AfterReturningAdviceAdapter 将 @AfterReturning AspectJAfterReturningAdvice 适配为 AfterReturningAdviceInterceptor
         */


        //2.通知统一转换为环绕通知 MethodInterceptor
        Target target = new Target();
        ProxyFactory proxyFactory = new ProxyFactory();
        proxyFactory.setTarget(new Target());
        proxyFactory.addAdvice(ExposeInvocationInterceptor.INSTANCE); //准备把 MethodInvocation 放入当前线程,以便给其他的通知用
        proxyFactory.addAdvisors(list);

        System.out.println("<<<<<<<<<<<<<<<<<<<<<<");
        List<Object> methodInterceptorList = proxyFactory.getInterceptorsAndDynamicInterceptionAdvice(Target.class.getMethod("foo"), Target.class);
        for (Object methodInterceptor : methodInterceptorList) {
            System.out.println(methodInterceptor);
        }

        System.out.println("<<<<<<<<<<<<<<<<<<<<<<");
        //3. 创建并执行调用链 (环绕通知s + 目标)
        MethodInvocation methodInvocation = new ReflectiveMethodInvocation(
                null,target, Target.class.getMethod("foo"), new Object[0],Target.class,methodInterceptorList);

        methodInvocation.proceed();

        /*
            学到了什么
                a. 无参数绑定的通知如何被调用
                b. MethodInvocation 编程技巧: 拦截器、过滤器等等实现都与此类似
                c. 适配器模式在 Spring 中的体现
         */
    }
}

模拟实现调用链--责任链模式
public class A18_1 {
    static class Target{
        public void foo(){
            System.out.println("Target.foo()");
        }
    }

    static class Advice1 implements MethodInterceptor {
        @Override
        public Object invoke(MethodInvocation invocation) throws Throwable {
            System.out.println("Advice1.before()");
            Object result = invocation.proceed(); //调用下一个通知或者目标
            System.out.println("Advice1.after()");
            return result;
        }
    }

    static class Advice2 implements MethodInterceptor {
        @Override
        public Object invoke(MethodInvocation invocation) throws Throwable {
            System.out.println("Advice2.before()");
            Object result = invocation.proceed(); //调用下一个通知或者目标
            System.out.println("Advice2.after()");
            return result;
        }
    }

    static class MyInvocation implements MethodInvocation {

        private Object target; // 假如1次
        private Method method;
        private Object[] args;
        List<MethodInterceptor> methodInterceptorList; //假如2次
        private int count = 1; //调用次数

        public MyInvocation(Object target, Method method, Object[] args, List<MethodInterceptor> methodInterceptorList) {
            this.target = target;
            this.method = method;
            this.args = args;
            this.methodInterceptorList = methodInterceptorList;
        }

        @Override
        public Method getMethod() {
            return method;
        }

        @Override
        public Object[] getArguments() {
            return args;
        }

        @Override
        public Object proceed() throws Throwable { //调用每一个环绕通知,调用目标
            if (count > methodInterceptorList.size()) {
                //调用目标, 返回并结束递归
                return method.invoke(target, args);
            }
            //逐一调用通知, count + 1  使用count++ 后++
            MethodInterceptor methodInterceptor = methodInterceptorList.get(count++ - 1);
            return methodInterceptor.invoke(this);
        }

        @Override
        public Object getThis() {
            return target;
        }

        @Override
        public AccessibleObject getStaticPart() {
            return method;
        }
    }

    public static void main(String[] args) throws Throwable {
        Target target = new Target();
        Advice1 advice1 = new Advice1();
        Advice2 advice2 = new Advice2();
        List<MethodInterceptor> methodInterceptorList = List.of(advice1, advice2);
        MyInvocation myInvocation = new MyInvocation(target, Target.class.getMethod("foo"), new Object[0], methodInterceptorList);
        myInvocation.proceed();
    }
}
使用了递归的方式
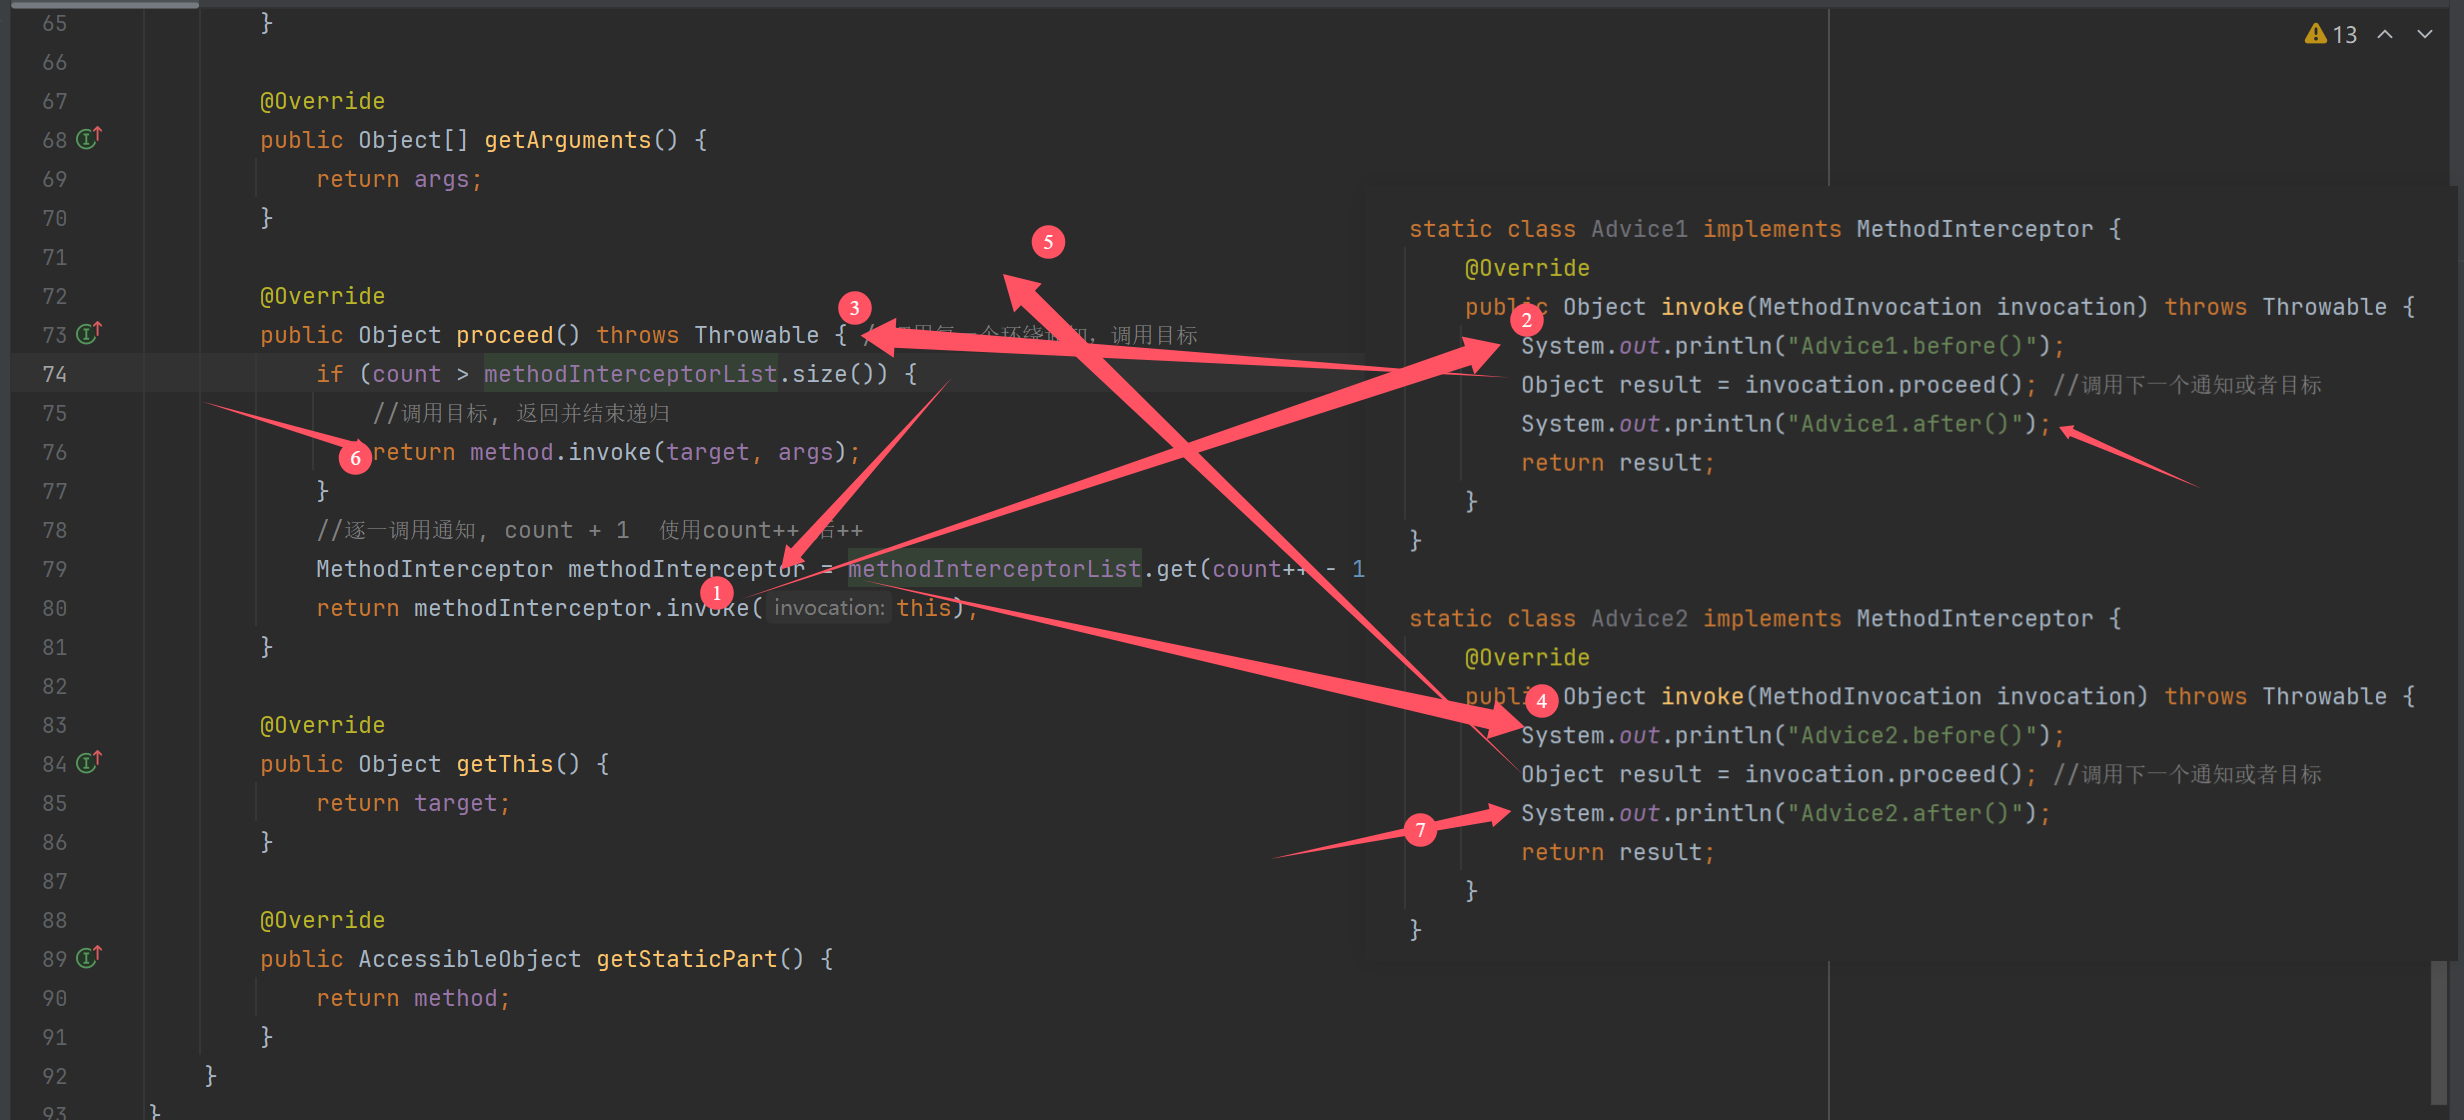
运行结果
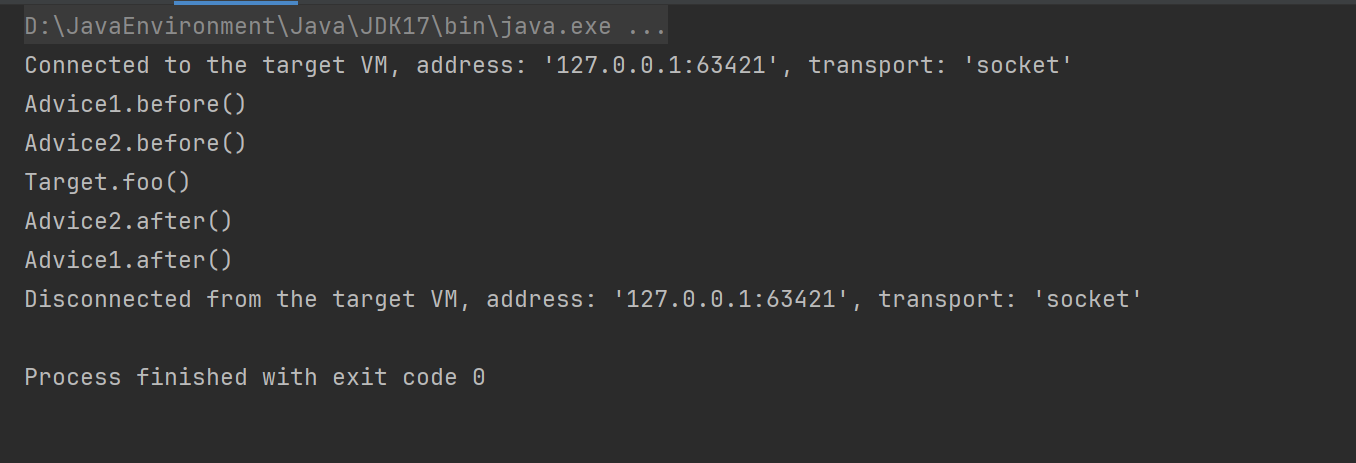
收获💡
- proceed() 方法调用链中下一个环绕通知
- 每个环绕通知内部继续调用 proceed()
- 调用到没有更多通知了, 就调用目标方法
MethodInvocation 的编程技巧在实现拦截器、过滤器时能用上
2.11 动态通知调用
演示 - 带参数绑定的通知方法调用
public class A19 {

    @Aspect
    static class MyAspect {
        @Before("execution(* foo(..))") // 静态通知调用,不带参数绑定,执行时不需要切点
        public void before1() {
            System.out.println("before1");
        }

        /**
         * args(x) 先根据名字在before2中找到x(第 0个参数) 的类型,然后在实际对象Target中找到实际目标方法foo方法携带的x参数,然后 传递到before2中
         * @param x
         */
        @Before("execution(* foo(..)) && args(x)") // 动态通知调用,需要参数绑定,执行时还需要切点对象
        public void before2(int x) {
            System.out.printf("before2(%d)%n", x);
        }
    }

    static class Target {
        public void foo(int x) {
            System.out.printf("target foo(%d)%n", x);
        }
    }

    @Configuration
    static class MyConfig {
        /**
         *  作用:
         *  1.把高级切面转换成低级advisor切面
         *  2.创建代理对象
         * @return
         */
        @Bean
        AnnotationAwareAspectJAutoProxyCreator proxyCreator() {
            return new AnnotationAwareAspectJAutoProxyCreator();
        }

        @Bean
        public MyAspect myAspect() {
            return new MyAspect();
        }
    }

    public static void main(String[] args) throws Throwable {
        GenericApplicationContext context = new GenericApplicationContext();
        context.registerBean(ConfigurationClassPostProcessor.class);//解析@bean注解
        context.registerBean(MyConfig.class);
        context.refresh();

        AnnotationAwareAspectJAutoProxyCreator creator = context.getBean(AnnotationAwareAspectJAutoProxyCreator.class);
        List<Advisor> list = creator.findEligibleAdvisors(Target.class, "target");

        Target target = new Target();
        ProxyFactory factory = new ProxyFactory();
        factory.setTarget(target);
        factory.addAdvisors(list);
        Object proxy = factory.getProxy(); // 获取代理

        List<Object> interceptorList = factory.getInterceptorsAndDynamicInterceptionAdvice(Target.class.getMethod("foo", int.class), Target.class);
        for (Object o : interceptorList) {
            showDetail(o);
        }

        System.out.println(">>>>>>>>>>>>>>>>>>>>>>>>>>");
        ReflectiveMethodInvocation invocation = new ReflectiveMethodInvocation(
                proxy, target, Target.class.getMethod("foo", int.class), new Object[]{100}, Target.class, interceptorList
        ) {}; // {}:代表创建的子类,子类可以调用受保护protected的方法
        /**
         * 具体来说,ReflectiveMethodInvocation invocation = new ReflectiveMethodInvocation(...) {}; 中的 {} 表示你正在创建一个匿名子类,继承 ReflectiveMethodInvocation,并为其实例化。这个匿名子类没有名字,也没有新的方法或字段,除非你在 {} 内部添加它们。
         *
         * 作用:
         * 创建子类:通过 {},你实际上是创建了 ReflectiveMethodInvocation 的一个匿名子类。
         * 灵活性:你可以在 {} 内部重写父类的方法,或者增加新的属性和方法,来为特定实例提供不同的行为。
         * 避免显式子类定义:使用匿名类可以在需要继承一个类但不想为其显式定义子类的情况下,进行快速的实现。
         * 具体例子:
         * 如果在 {} 内没有任何方法或属性声明,实际上这只是一个普通的匿名子类,行为和直接使用 ReflectiveMethodInvocation 类几乎一致。例如:
         * ReflectiveMethodInvocation invocation = new ReflectiveMethodInvocation(
         *     proxy, target, Target.class.getMethod("foo", int.class), new Object[]{100}, Target.class, interceptorList
         * ) {};
         * 这里 {} 内部没有任何代码,你只是创建了一个 ReflectiveMethodInvocation 的匿名子类实例。如果你需要重写某些方法,可以像这样:
         * ReflectiveMethodInvocation invocation = new ReflectiveMethodInvocation(
         *     proxy, target, Target.class.getMethod("foo", int.class), new Object[]{100}, Target.class, interceptorList
         * ) {
         *     @Override
         *     public Object proceed() throws Throwable {
         *         // 自定义处理逻辑
         *         System.out.println("调用前");
         *         Object result = super.proceed();
         *         System.out.println("调用后");
         *         return result;
         *     }
         * };在这个示例中,proceed() 方法被重写以添加自定义的行为。
         */
        invocation.proceed();

        /*
            学到了什么
                a. 有参数绑定的通知调用时还需要切点,对参数进行匹配及绑定
                b. 复杂程度高, 性能比无参数绑定的通知调用低
         */
    }

    public static void showDetail(Object o) {
        try {
            Class<?> clazz = Class.forName("org.springframework.aop.framework.InterceptorAndDynamicMethodMatcher");
            if (clazz.isInstance(o)) {
                Field methodMatcher = clazz.getDeclaredField("methodMatcher");
                methodMatcher.setAccessible(true);
                Field methodInterceptor = clazz.getDeclaredField("interceptor");
                methodInterceptor.setAccessible(true);
                System.out.println("环绕通知和切点:" + o);
                System.out.println("\t切点为:" + methodMatcher.get(o));
                System.out.println("\t通知为:" + methodInterceptor.get(o));
            } else {
                System.out.println("普通环绕通知:" + o);
            }
        } catch (Exception e) {
            e.printStackTrace();
        }
    }
}

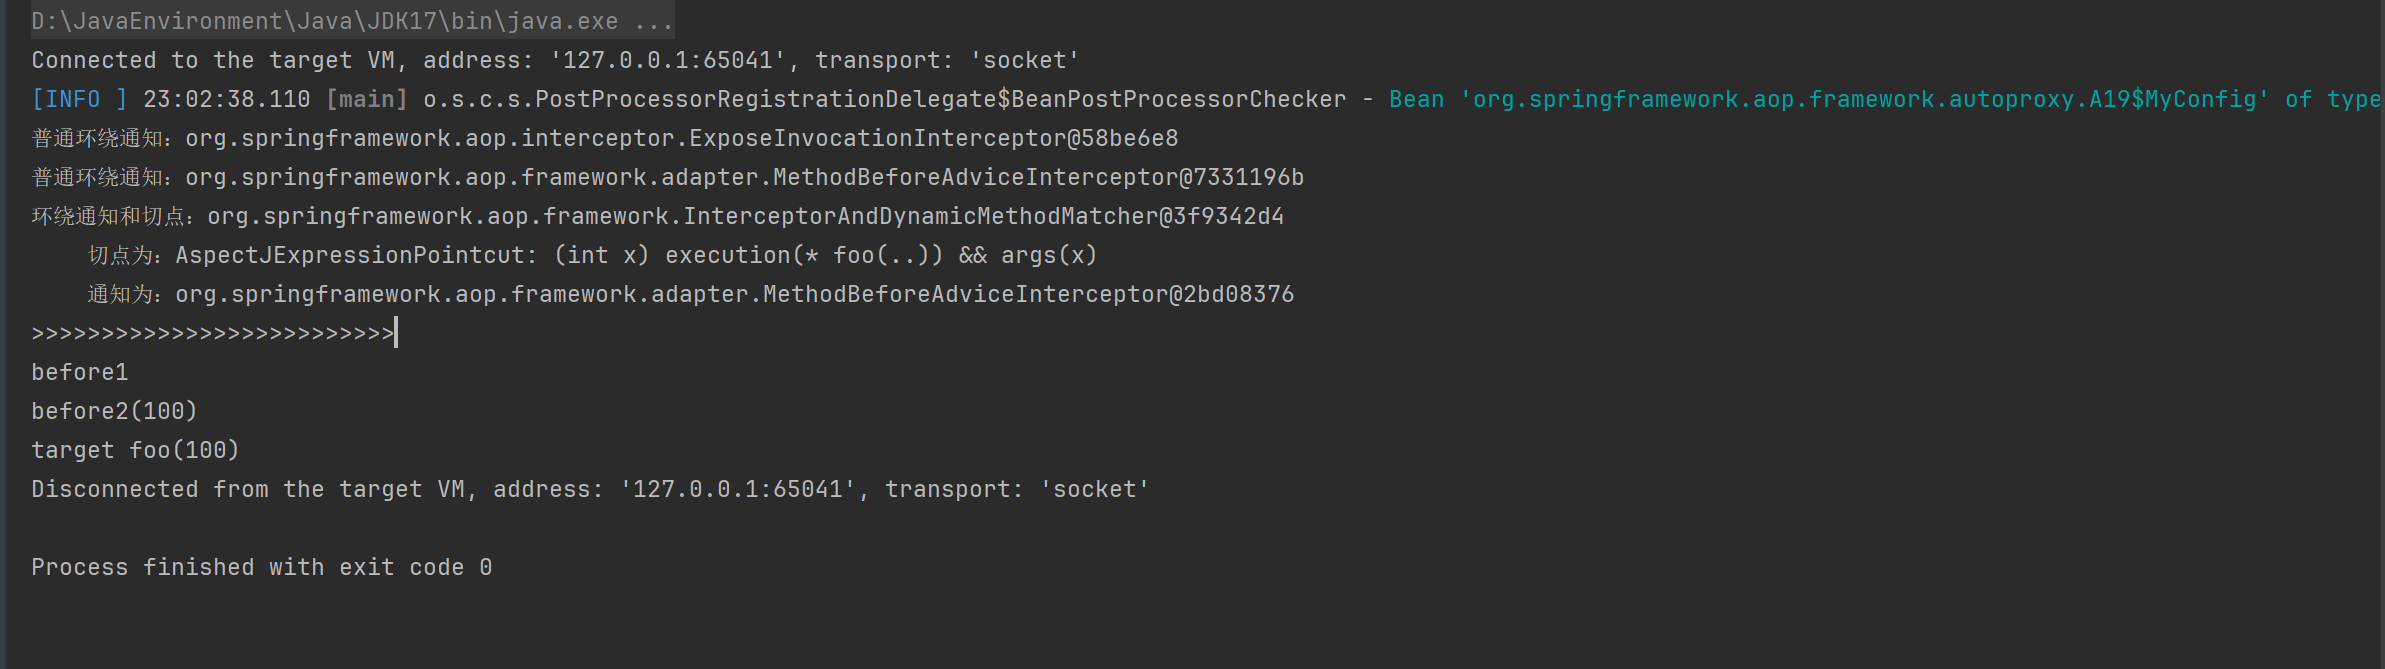
收获💡
- 通过 proxyFactory 的 getInterceptorsAndDynamicInterceptionAdvice() 将其他通知统一转换为 MethodInterceptor 环绕通知
- 所谓动态通知,体现在上面方法的 DynamicInterceptionAdvice 部分,这些通知调用时因为要为通知方法绑定参数,还需再次利用切点表达式
- 动态通知调用复杂程度高,性能较低